Stitch this Cute Baby Cardigan
Ready to dive into the wonderful world of crochet? There’s nothing quite as rewarding as fashioning something beautiful with your own hands. If you’re a beginner looking for a delightful project, you’ve come to the right place! Let’s embark on a journey to make this adorable crochet baby cardigan, perfect for gifting or dressing up your little one. Don’t worry if you’re new to this – we’ll guide you every step of the way with easy-to-follow instructions and plenty of encouragement. Get ready to experience the joy of hook and yarn!
Gather Your Supplies
Before we begin, let’s assemble everything you’ll need for this charming project. Having your materials ready will ensure a smooth and enjoyable making process. Here’s what you will need:
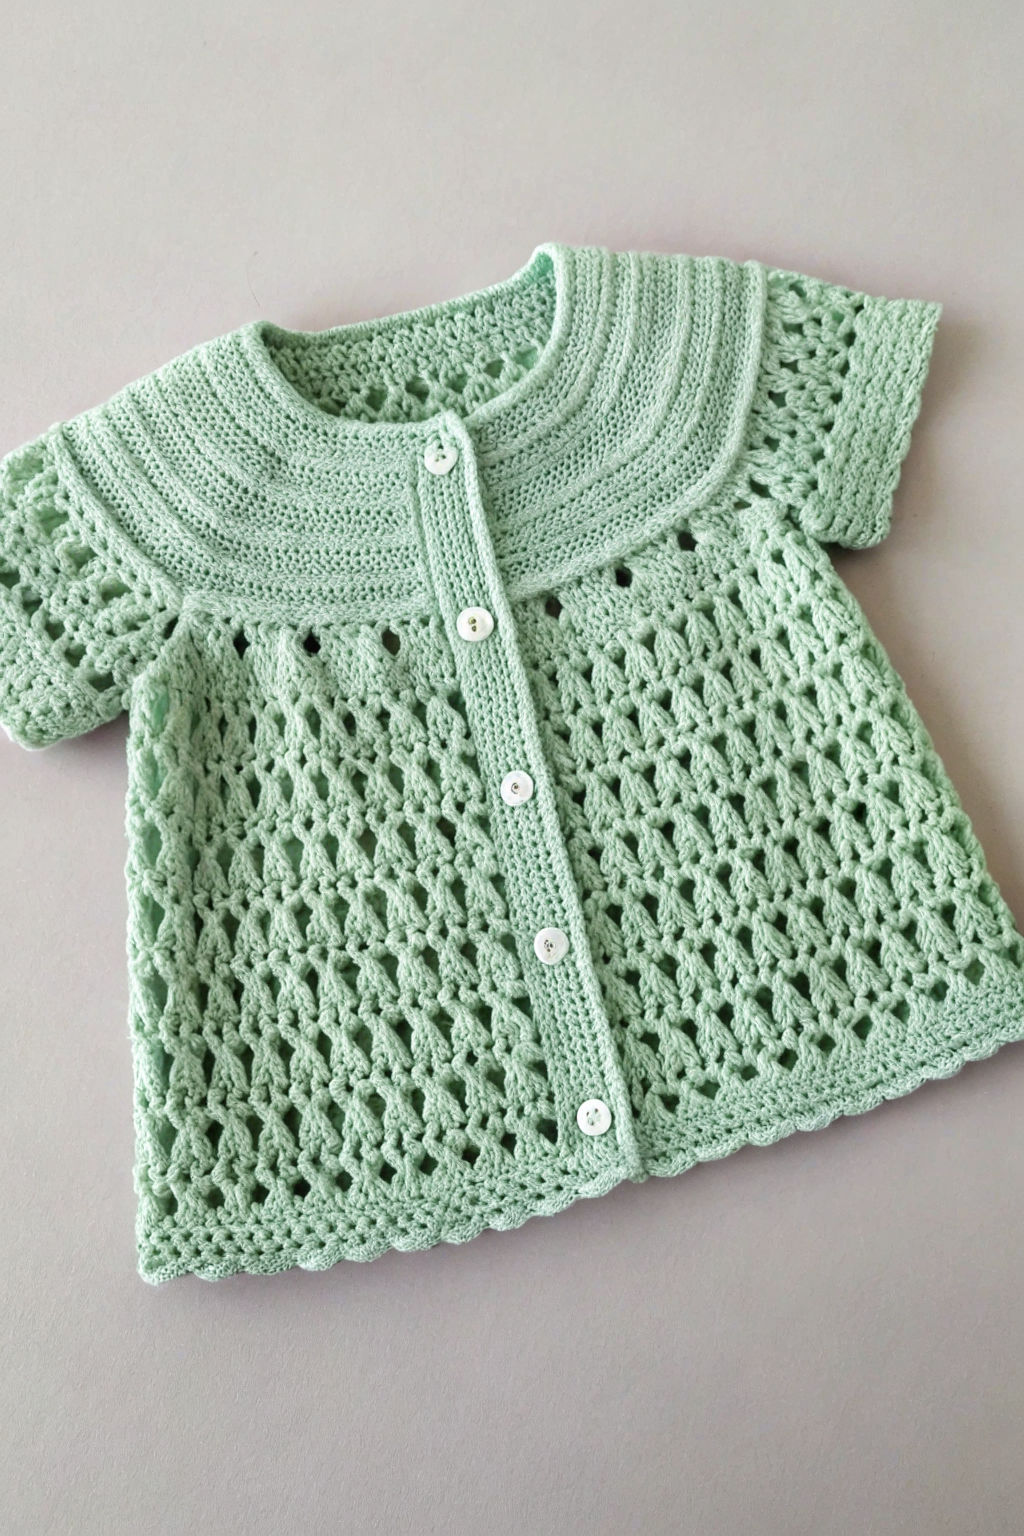
- Yarn 🧶: Approximately 300 yards of DK weight cotton or cotton blend yarn in a soft color like mint green, similar to the cardigan in the image. Cotton is a great choice for baby clothes because it’s soft and breathable.
- Crochet Hook 🪡: Size 4.0 mm (G/6) crochet hook. This is a good general size for DK weight yarn, but always check your yarn label for recommendations.
- Buttons 🪡: Five small white buttons, about 1/2 inch in diameter.
- Yarn Needle 🪡: For weaving in ends and sewing on buttons.
- Scissors ✂️: To trim your yarn.
Basic Crochet Stitches You’ll Need
This cardigan uses a few fundamental crochet stitches that are easy to learn. Let’s quickly go over them:
- Chain (ch): The foundation of most crochet projects. You form a chain by slipping the yarn over the hook and pulling it through the loop on your hook.
- Slip Stitch (sl st): A very simple stitch used to join rounds or move yarn across a row without adding height. Insert hook into stitch, yarn over, and pull through both loops on hook.
- Single Crochet (sc): A short, dense stitch. Insert hook into stitch, yarn over, pull up a loop (two loops on hook), yarn over, and pull through both loops.
- Double Crochet (dc): A taller stitch than single crochet, producing a more open fabric. Yarn over, insert hook into stitch, yarn over, pull up a loop (three loops on hook), yarn over, pull through two loops (two loops on hook), yarn over, and pull through remaining two loops.
- Front Post Double Crochet (fpdc): Adds texture, often used in ribbing. Yarn over, insert hook from front to back to front around the post of the double crochet stitch in the row below, yarn over, pull up a loop, yarn over, pull through two loops, yarn over, and pull through remaining two loops.
- Back Post Double Crochet (bpdc): Also used for ribbing and texture. Yarn over, insert hook from back to front to back around the post of the double crochet stitch in the row below, yarn over, pull up a loop, yarn over, pull through two loops, yarn over, and pull through remaining two loops.
Don’t worry if these descriptions seem a bit much right now. As we go through the steps, you’ll see how each stitch is fashioned. There are also tons of helpful video tutorials online if you’re a visual learner!
Let’s Get Crocheting: Step-by-Step Tutorial
We’ll build this cardigan from the top down, starting with the yoke. Refer to the image to see the overall shape and details as we progress.
Round 1: Starting the Yoke
Begin by making a chain of approximately 70 chains. This will form the neckline. Join with a slip stitch to the first chain to assemble a ring, being careful not to twist the chain. This is your starting round.
Round 2: Yoke Shaping – Double Crochet Round
Chain 3 (counts as your first double crochet), and then work double crochet into each chain around. Join with a slip stitch to the top of the beginning chain-3. You should have approximately 70 double crochet stitches. This round provides a solid base for the yoke.
Round 3: Increasing for the Yoke
This round begins the shaping of the yoke. Chain 3 (counts as first dc). Now, we’ll develop increases to widen the yoke. The increases are placed strategically to shape the cardigan. Work 2 dc in the next stitch, 1 dc in the next stitch, repeat from * to * around. Join with a slip stitch to the top of the beginning chain-3. You’ll notice the fabric starting to gently ruffle slightly – this is intentional and part of the yoke shaping. Refer to the image to see how the yoke gently flares out.
Rounds 4-10: Continuing Yoke Increases and Pattern
Continue working in double crochet rounds, increasing in each round to further shape the yoke. A simple way to increase evenly is to increase approximately every 7-8 stitches. You can do this by working two double crochet stitches in the same stitch at regular intervals around the round. In these rounds, we are also starting to incorporate the openwork pattern in sections.
Patterned Yoke Section (Rounds 4-10): In these rounds, we will work sections of solid double crochet and sections of the openwork mesh pattern. Observe in the image that the top part of the yoke near the neck and the lower part of the yoke are solid, while the middle section is more open.
- Round 4: Chain 3 (counts as first dc), work dc in each stitch for approximately the first quarter of the round (this will be the front panel). Then, work the mesh pattern for the next half of the round (the shoulder and back panel). The mesh pattern is: chain 2, skip the next stitch, double crochet in the next stitch, repeat from * to *. Finish the last quarter of the round with double crochet in each stitch (the other front panel). Join with sl st.
- Round 5-10: Continue in double crochet for the solid sections and maintain the chain 2, skip 1, dc mesh pattern in the mesh sections. In each round, you can slightly adjust the placement of the solid and mesh sections to match the yoke shape in the image. You’ll be gradually increasing the size of the yoke and establishing the openwork design.
Tip: Don’t be afraid to count your stitches and adjust the number of increases in each round to ensure the yoke lays flat and grows evenly. If it starts to cup too much, you might need to add more increases. If it’s too wavy, you may have increased too much.
Round 11: Separating for Sleeves and Body
Now, we will divide the yoke into the body and sleeves. This is a crucial step in constructing the cardigan shape.
- Work in double crochet across the first section (front panel).
- To form the first armhole, skip stitches for the sleeve. Estimate the number of stitches needed for the sleeve opening by trying it on a baby garment or roughly dividing the yoke stitches by three and subtracting a few for the front panels. Let’s say you skip approximately 15-20 stitches. Chain the same number of stitches you skipped (15-20 ch) to bridge the armhole gap.
- Continue in the mesh pattern across the back panel until you reach the second armhole position.
- Skip the same number of stitches for the second sleeve (15-20 stitches), and chain the same number (15-20 ch).
- Work double crochet across the remaining section (second front panel). Join with a slip stitch.
You’ve now separated the body from the sleeve openings!
Rounds 12-25: Working the Body
Now we’ll focus on fashioning the body of the cardigan using the mesh pattern.
- Round 12: Chain 3 (counts as first dc), work dc in each stitch across the front panel to the chain space of the armhole. Then, work the mesh pattern (chain 2, skip 1, dc) across the chain stitches of the armhole and across the back panel and the chain stitches of the second armhole and the second front panel. Join with a slip stitch.
- Rounds 13-25: Continue working in the mesh pattern in rounds. Chain 2, skip 1, dc around. Join with a slip stitch at the end of each round. Repeat these rounds until the body of the cardigan reaches your desired length. Refer to the image to see the length of the cardigan.
Tip: To ensure the mesh pattern aligns nicely, always start each round’s pattern by chaining 2 and skipping the stitch right at the beginning of the round (after the chain 3).
Sleeves
Let’s make the sleeves. We’ll work in rounds around the armhole openings.
- Round 1: Join yarn at the armhole opening. Chain 1, work single crochet evenly around the armhole opening edge. Join with a slip stitch.
- Rounds 2-5: Work single crochet in each stitch around for a few rounds to form a small sleeve cuff. You can adjust the number of rounds to your preference. Fasten off and weave in ends. Repeat for the second sleeve. Observe in the image that the sleeves are short and have a simple single crochet edge.
Collar
Now for the charming collar! We’ll craft a ribbed collar using front post and back post double crochet.
- Round 1: Join yarn at the neckline. Chain 2 (does not count as a stitch), work single crochet evenly around the entire neckline edge. Join with a slip stitch. This round provides a foundation for the ribbed collar.
- Round 2: Chain 2 (counts as first fpdc). Work fpdc around the next stitch, bpdc around the next stitch, repeat from * to * around. Join with a slip stitch to the top of the beginning chain-2.
- Rounds 3-6: Repeat Round 2, working fpdc around each fpdc from the previous round and bpdc around each bpdc from the previous round. This will form the ribbed texture of the collar. You can adjust the number of rounds to get the desired collar width seen in the image. Fasten off and weave in ends.
Button Bands and Buttonholes
We need to assemble button bands on the front edges to finish the cardigan and add buttonholes on one side.
- Button Band (Right Front – Buttonhole side): Join yarn at the bottom right front edge. Chain 1, work single crochet evenly up the right front edge to the collar. Work approximately 2-3 rows of single crochet to develop a neat button band. In the second or third row, produce buttonholes evenly spaced. To fashion a buttonhole, chain 2, skip 2 stitches, and continue single crochet. Repeat for the desired number of buttonholes (approximately 5, as seen in the image).
- Button Band (Left Front): Join yarn at the bottom left front edge. Chain 1, work single crochet evenly up the left front edge to the collar. Work the same number of rows of single crochet as the right button band, but without buttonholes.
Finishing Touches
- Bottom Edge: You can add a simple single crochet border around the bottom edge of the cardigan for a clean finish.
- Weave in all loose ends using your yarn needle to ensure a neat and professional look.
- Sew on the buttons opposite the buttonholes, aligning them carefully.
Congratulations! You’ve just made a beautiful crochet baby cardigan!
Tips for Success
- Tension is Key: Try to maintain even tension throughout your work for a consistent fabric.
- Count Stitches: Especially in the yoke rounds, counting stitches will help ensure even shaping.
- Refer to the Image: Keep the image handy as you work to guide you on the design details.
- Take Breaks: Crochet is enjoyable, but take breaks to avoid hand fatigue, especially when you’re just starting out.
- Don’t Be Afraid to Undo: If you make a mistake, don’t hesitate to undo a few stitches or even a row. Everyone makes mistakes, and it’s part of the learning process!
Share Your Handmade Joy!
We hope you enjoyed making this sweet baby cardigan. There’s something truly special about giving a handmade gift or dressing your little one in something you fashioned with love. We would absolutely love to see your finished cardigans!