Make Your Own Sweet Amigurumi Chick Plushie!
Hello fellow crafters! Are you ready to fashion the most adorable little friend? Today, we’re diving into the wonderful world of amigurumi to build a charming chick plushie that will melt your heart. If you’re new to crochet or knitting, don’t worry! This step-by-step guide is designed just for you. We’ll walk through each part slowly, and before you know it, you’ll have assembled your very own fluffy chick. Get ready to grab your yarn and hook, and let’s get started on this fun project!
Materials You’ll Need to Fashion Your Chick 🐥
Before we begin, let’s gather all the supplies you’ll need to make your amigurumi chick. Here’s a handy list:
- Yellow yarn 🧶 (Worsted weight)
- Orange yarn 🧶 (Worsted weight)
- Pink yarn 🧶 (Small amount for cheeks)
- Black yarn or safety eyes 👀 (6mm or similar size)
- Crochet hook 🪡 (Size 3.5mm or 4mm, or size to match your yarn)
- Stuffing material (fiberfill)
- Yarn needle
- Scissors ✂️
- Stitch marker (optional, but helpful)
Let’s Talk Stitches and Abbreviations
To construct this chick, we’ll be using basic crochet stitches. Here are a few abbreviations you’ll see in the instructions, explained in simple terms:
- MR: Magic Ring – This is how we start working in the round, creating a closed circle without a hole in the center.
- sc: Single Crochet – Insert hook, yarn over, pull through loop, yarn over, pull through both loops on hook.
- inc: Increase – Work two single crochet stitches in the same stitch. This makes your circle bigger.
- dec: Decrease – We’ll use the invisible decrease method: Insert hook in front loop only of the first stitch, insert hook in front loop only of the next stitch, yarn over, pull through both loops on hook, yarn over, pull through both loops on hook. This makes your circle smaller.
- sl st: Slip Stitch – Insert hook, yarn over, pull through loop and through the loop on your hook. Used to join rounds or finish off.
- **( )N:* Repeat instructions in parentheses N times. For example, (sc, inc)*6 means repeat “single crochet, increase” six times.
- BLO: Back Loops Only – Crochet only in the back loop of the stitch, leaving the front loop unworked.
Don’t worry if these terms seem new! We’ll go through them step-by-step as we make the chick.
Step-by-Step Guide to Making Your Amigurumi Chick
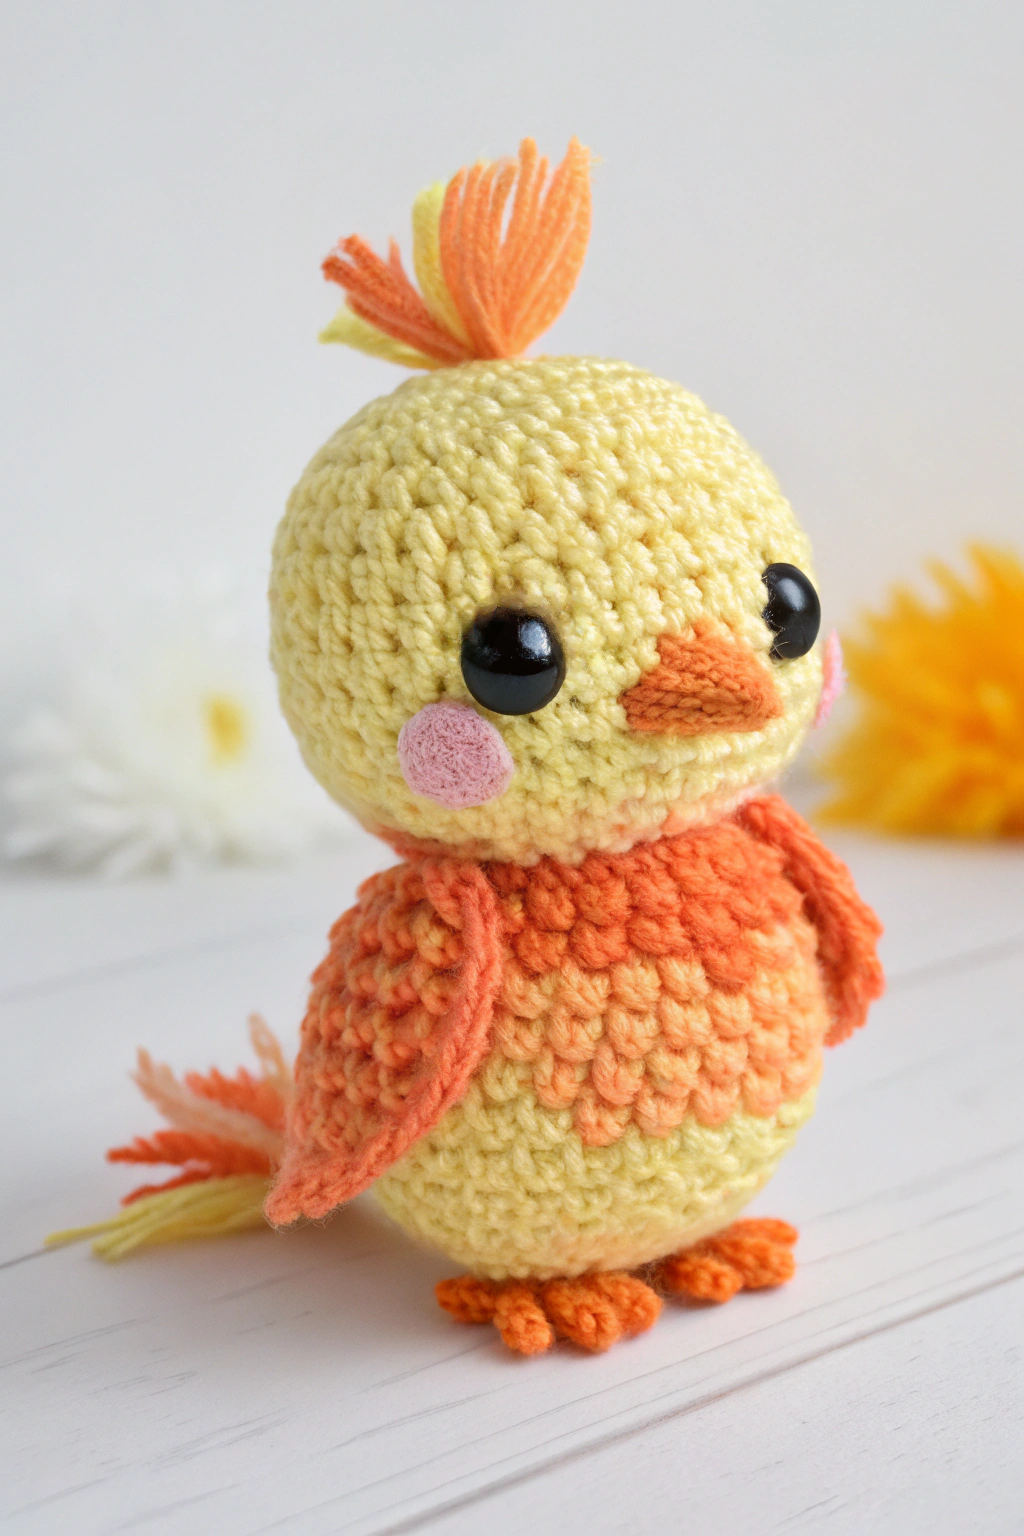
Now for the fun part! Let’s start developing our adorable chick piece by piece. Refer to the image to see how each part comes together.
Forming the Head (Yellow Yarn)
We’ll begin by fashioning the head of our chick using yellow yarn.
Round 1: MR, 6 sc in MR (6 stitches) Round 2: inc in each st around (12 stitches) Round 3: (sc, inc)*6 (18 stitches) Round 4: (2 sc, inc)*6 (24 stitches) Round 5: (3 sc, inc)*6 (30 stitches) Round 6: (4 sc, inc)*6 (36 stitches) Round 7-12: sc in each st around (36 stitches for 6 rounds) – This means you’ll work single crochet in every stitch for 6 rounds. You can see in the image that the chick’s head is nicely rounded.
At this point, if you are using safety eyes, now is a good time to attach them! Refer to the image – the eyes are positioned on the front of the head, a few rounds below the top. Space them a few stitches apart. If you prefer to embroider the eyes, you can do that later with black yarn.
Round 13: (4 sc, dec)*6 (30 stitches) Round 14: (3 sc, dec)*6 (24 stitches) Round 15: (2 sc, dec)*6 (18 stitches) Round 16: (sc, dec)*6 (12 stitches)
Stuff the head firmly with fiberfill. Make sure it’s nicely shaped and plump, like in the image!
Round 17: dec*6 (6 stitches) Fasten off: Cut the yarn, leaving a long tail. Use your yarn needle to thread the tail through the front loops of the last 6 stitches. Pull tight to close the opening and secure. Weave in the end to hide it inside the head.
Making the Body (Yellow and Orange Yarn)
Now, let’s construct the body. We’ll start with yellow and transition to orange to give it that lovely gradient effect seen in the image.
Round 1: MR, 6 sc in MR (6 stitches) with yellow yarn Round 2: inc in each st around (12 stitches) Round 3: (sc, inc)*6 (18 stitches) Round 4: (2 sc, inc)*6 (24 stitches) Round 5: (3 sc, inc)*6 (30 stitches) Round 6: (4 sc, inc)*6 (36 stitches) Round 7-10: sc in each st around (36 stitches for 4 rounds) – Continue with yellow yarn. Observe in the image how the top part of the body is yellow. Round 11: Change to orange yarn. sc in each st around (36 stitches) – To change colors, finish the last stitch in yellow, drop the yellow yarn, pick up the orange yarn, and pull it through to complete the stitch. Round 12-16: sc in each st around (36 stitches for 5 rounds) – Continue with orange yarn. You can see in the image the body is mainly orange towards the bottom.
Start stuffing the body firmly as you continue decreasing.
Round 17: (4 sc, dec)*6 (30 stitches) Round 18: (3 sc, dec)*6 (24 stitches) Round 19: (2 sc, dec)*6 (18 stitches) Round 20: (sc, dec)6 (12 stitches) Round 21: dec6 (6 stitches) Fasten off: Cut the yarn, leaving a long tail. Use your yarn needle to thread the tail through the front loops of the last 6 stitches. Pull tight to close the opening and secure. Weave in the end.
Crafting the Beak (Orange Yarn)
The beak is a small, cute detail! We’ll fashion a simple triangular beak.
Round 1: MR, 4 sc in MR (4 stitches) Round 2: inc, 3 sc (5 stitches) Round 3: inc, 4 sc (6 stitches) Round 4: inc, 5 sc (7 stitches) Round 5: inc, 6 sc (8 stitches) Fasten off: Leave a long tail for sewing. Slightly flatten the beak into a triangle shape.
Making the Cheeks (Pink Yarn – Make 2)
These sweet pink cheeks will add a touch of cuteness! We’ll produce two small circles.
Round 1: MR, 6 sc in MR (6 stitches) Round 2: inc in each st around (12 stitches) Fasten off: Leave a long tail for sewing.
Assembling the Crest (Orange and Yellow Yarn)
The crest on top of the head gives our chick personality! We’ll assemble this using strands of yarn.
- Cut several strands of orange yarn and yellow yarn, about 4-5 inches long each.
- Take a few strands of orange and yellow together, fold them in half.
- Using your crochet hook, insert it into the top center of the chick’s head.
- Hook the folded loop of yarn strands and pull it through a bit.
- Thread the loose ends of the yarn strands through the loop and pull tight to secure. This is like making a fringe.
- Repeat this process, adding more strands of orange and yellow yarn to form a fluffy crest. Refer to the image to see how the crest is arranged.
- Trim the ends of the crest to shape it as desired, similar to the image.
Fashioning the Wings (Orange Yarn – Make 2)
Let’s make the wings for our chick to flutter!
Round 1: MR, 6 sc in MR (6 stitches) Round 2: inc in each st around (12 stitches) Round 3: (sc, inc)*6 (18 stitches) Round 4: (2 sc, inc)*6 (24 stitches) Round 5-6: sc in each st around (24 stitches for 2 rounds) Fasten off: Leave a long tail for sewing. Flatten the wings slightly into a semi-circle shape.
Constructing the Feet (Orange Yarn – Make 2)
These little feet will help our chick stand! We’ll build simple feet.
Round 1: MR, 6 sc in MR (6 stitches) Round 2: (sc, inc)*3 (9 stitches) Round 3: sc in each st around (9 stitches) Fasten off: Leave a long tail for sewing. Slightly flatten the feet.
Making the Tail (Orange and Yellow Yarn)
Similar to the crest, we’ll produce the tail using strands of yarn.
- Cut several strands of orange and yellow yarn, about 3-4 inches long each.
- Follow the same method as for the crest to attach the yarn strands to the back of the chick’s body to form a tail. Refer to the image for the tail placement and style.
- Trim the ends of the tail to shape it, mirroring the crest’s style.
Final Assembly – Your Chick is Almost Here!
Now, the most rewarding part – putting it all together!
- Attach the Head to the Body: Position the head on top of the body. Using the long tail of the head, sew it securely to the body, going around and joining the two pieces firmly.
- Attach the Beak: Sew the beak to the center front of the chick’s face, just below the eyes. Observe in the image the position of the beak.
- Attach the Cheeks: Sew the pink cheeks to either side of the beak, under the eyes. You can see in the image the placement of the cheeks.
- Attach the Wings: Sew the wings to the sides of the body, about halfway down. Refer to the image for wing placement.
- Attach the Feet: Sew the feet to the bottom front of the body, so the chick can stand. Look at the image to see how the feet are positioned.
Congratulations! You have just fashioned your very own adorable amigurumi chick!
Tips for Beginner Crafters 🌟
- Stitch Tension: Try to keep your stitches consistent and not too loose or too tight. This will make your amigurumi look neat and even.
- Stitch Markers: If you’re losing track of rounds, use a stitch marker at the beginning of each round.
- Stuffing: Stuff firmly to give your chick a good shape, but not so tightly that the stitches are stretched.
- Yarn Choice: Worsted weight yarn is a good starting point for amigurumi. You can experiment with different yarn colors and textures in the future!
- Practice Makes Perfect: Don’t be discouraged if your first attempt isn’t perfect. Keep practicing, and each one you make will be even better!
Share Your Handmade Chick! 📸
We hope you had a wonderful time crafting this charming amigurumi chick! Remember, the joy is in the process of making something special with your own hands. We’d absolutely love to see your finished chicks! Share photos of your handmade chick projects and inspire other beginner crafters. Happy crafting!