Crochet Your Own Fashion Handbag
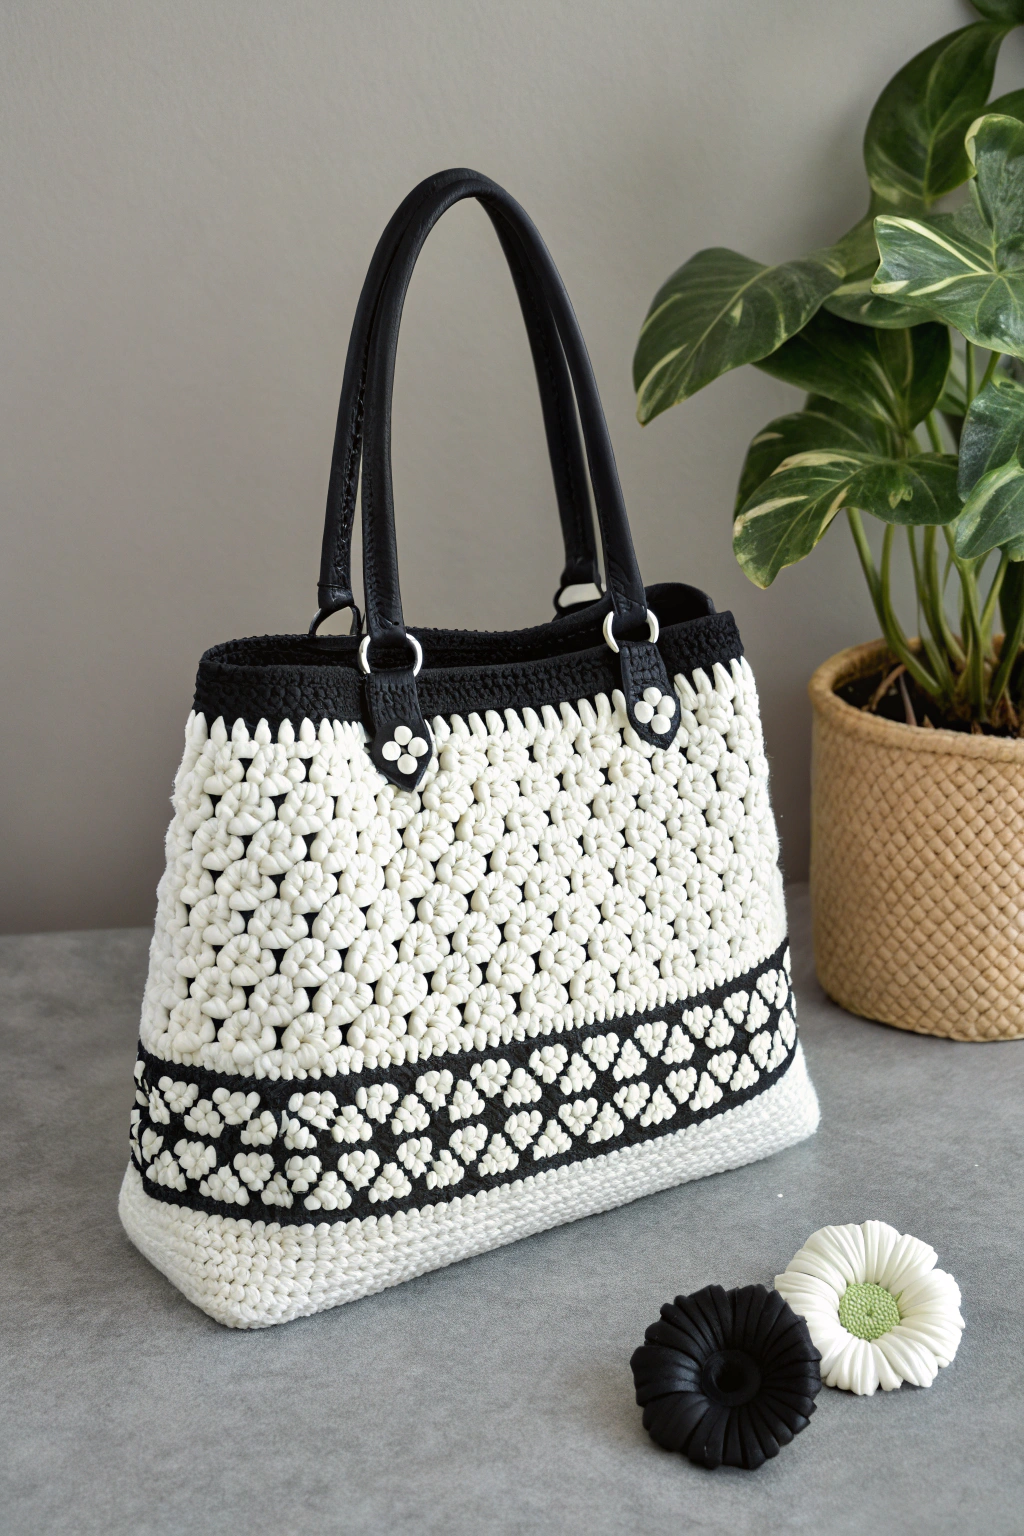
Are you ready to embark on a fun and rewarding journey of making your very own stylish handbag? In this guide, we’ll walk you through the steps to fashion a beautiful crocheted handbag, just like the one you see in the image. Don’t worry if you’re completely new to crochet – we’ll take it slow and explain everything in a way that’s super easy to grasp. Get ready to transform yarn into a gorgeous accessory that you can proudly carry and say, “I made this!”
Gather Your Supplies
Before we dive into the wonderful world of crochet, let’s gather all the materials you’ll need to build this stunning handbag. Having everything ready beforehand will make your crafting experience smooth and enjoyable.
- 🧶 Yarn: You’ll need two colors of yarn for this project. In the image, we see a lovely combination of white and black yarn. A medium-weight cotton or cotton blend yarn would work wonderfully as it provides structure and durability for a handbag. About 300-400 yards of white and 150-200 yards of black should be sufficient, but it’s always good to have a little extra.
- 🪡 Crochet Hook: The size of your crochet hook will depend on your yarn weight and desired fabric density. A size H-8 (5mm) crochet hook is a good starting point for medium-weight yarn. Check your yarn label for recommended hook sizes as well.
- ✂️ Scissors: A sharp pair of scissors is essential for snipping yarn ends neatly.
- 📍 Stitch Markers: These little helpers are invaluable for keeping track of your rounds or stitch counts, especially for beginners. A few stitch markers will be very useful.
- Tapestry Needle: Also known as a yarn needle, this is a large-eyed, blunt needle used for weaving in yarn ends to give your finished handbag a clean and professional look.
- 👜 Handbag Handles: To complete your handbag, you’ll need handles! The handbag in the image features black leather handles. You can find similar handles at craft stores or online. Look for handles that come with rings or attachments for easy fastening to your crocheted bag.
- Optional: Fabric for lining: If you wish to add a lining to your handbag for extra structure and to keep small items from slipping through the crochet stitches, you’ll need fabric and basic sewing supplies (needle, thread, sewing machine or hand-sewing needle). This is optional but adds a professional touch.
Getting Started: Understanding Basic Crochet
If you’re completely new to crochet, don’t worry! Think of crochet as using a hook to pull loops of yarn through other loops, forming fabric. It’s like building with yarn! For this handbag, we’ll be using a few fundamental crochet stitches. Let’s break them down in simple terms:
The Slip Knot
Every crochet project begins with a slip knot. Imagine making a loop with your yarn, like you’re starting to tie a knot, but don’t tighten it fully. Then, use your crochet hook to pull a loop of yarn through that initial loop. That’s your slip knot on your hook – the very first stitch! It’s the foundation you’ll build upon.
Chain Stitch (ch)
The chain stitch is the most basic stitch in crochet and often forms the starting chain for many projects. To form a chain stitch, hold your hook with the slip knot, then wrap the yarn around your hook (this is called “yarn over”), and pull the yarn through the loop on your hook. That’s one chain stitch! Repeat this to make a chain of any length. Think of chain stitches as the foundation row or round you build upon, like the first row of bricks in a wall.
Single Crochet (sc)
Single crochet is a short, dense stitch. To make a single crochet, insert your hook into the stitch of the previous row or round, yarn over, pull up a loop (you’ll have two loops on your hook), yarn over again, and pull through both loops on your hook. This is a single crochet stitch. It creates a close-knit fabric and is perfect for areas where you want a solid, less holey texture.
Double Crochet (dc)
Double crochet is a taller stitch than single crochet, resulting in a more open fabric. To form a double crochet, yarn over, insert your hook into the stitch, yarn over again, pull up a loop (you’ll now have three loops on your hook). Yarn over again, pull through the first two loops on your hook (two loops remain). Yarn over one last time, and pull through the remaining two loops. That’s a double crochet! It’s taller and creates a fabric with more drape compared to single crochet.
Slip Stitch (sl st)
A slip stitch is a very short stitch, often used to join rounds or move yarn without adding height. To make a slip stitch, insert your hook into the stitch, yarn over, and pull the yarn directly through both the loop on your hook and the stitch you just inserted into. It’s a simple stitch that lies very flat.
Crafting Your Crocheted Handbag: Step-by-Step
Now, let’s get to the exciting part – actually making our handbag! Refer to the image to see how the different parts come together. We’ll construct the bag from the bottom up, adding details as we go.
Step 1: Constructing the Base
- Start with the base in white yarn. To begin, we’ll fashion the rectangular base of the handbag. As you can see in the image, the base is rectangular. We’ll start by making a chain that will form the length of the base. Let’s begin with a chain of 25 chain stitches using your white yarn. This is just a starting point, you can adjust this chain length to make your base wider or narrower as you wish.
- Round 1: Now, we’ll work in rows to build the rectangular base. Single crochet in the second chain from your hook and in each chain across to the end. You will have 24 single crochet stitches. Chain 1 and turn your work. The “chain 1 and turn” at the end of each row is important to prepare for the next row and keep your work facing the right way.
- Rounds 2-15 (or desired base depth): Continue to single crochet in each stitch across in each row. Chain 1 and turn at the end of each row. Repeat this process until your base is the desired depth. Aim for approximately 15 rows to achieve a similar base depth to the bag in the image, but feel free to make it deeper or shallower to your liking. You’re essentially building a flat rectangle of single crochet.
- Fasten off white yarn: Once your base rectangle is the size you want, cut the white yarn, leaving a tail of about 6 inches. Pull the tail through the last loop on your hook and tighten to secure. Weave in this yarn end later using your tapestry needle.
Step 2: Building the Body of the Handbag in White
- Join white yarn for the body. Now we’ll start working on the main body of the handbag, still using white yarn. Join your white yarn to any corner of your crocheted base rectangle by making a slip knot on your hook and pulling it through a stitch at the corner.
- Round 1: We’ll now work in rounds around the rectangle to build up the sides. Chain 1. Single crochet evenly around the entire rectangle base. When you reach the corners, place 2 single crochet stitches into each corner stitch to help the corners turn nicely and prevent them from becoming too tight. Join with a slip stitch to the first single crochet of the round.
- Round 2 and onwards (Main Body Stitch Pattern): This is where we introduce the textured stitch that makes the handbag body so unique! Look closely at the image. It appears to be a type of puff stitch or bobble stitch worked in a pattern. Let’s try a simplified version that captures the look. For this round, we’ll be working what we’ll call a “Daisy Puff Stitch“.
- Daisy Puff Stitch (Simplified): *Yarn over, insert hook into stitch, yarn over, pull up a loop (repeat this two more times – you’ll have 7 loops on your hook). Yarn over and pull through all 7 loops. Chain 1 to close the puff stitch.* This sequence forms one “Daisy Puff Stitch”.
- Pattern for Round 2 onwards: Chain 1. *Daisy Puff Stitch in the next stitch, skip the next stitch.* Repeat from * to * all the way around. Join with a slip stitch to the first chain 1 of the round.
- Continue Rounds: Repeat Round 2 (Daisy Puff Stitch round) until your handbag body reaches the desired height, stopping before the black stripe section. In the image, the white body section is quite tall. Continue for approximately 25-30 rounds or until it’s about 2/3 of the total bag height, before you start the black stripe section. You can adjust the height as you prefer.
Step 3: Adding the Black Stripe Detail
- Change to black yarn. Now, we’ll introduce the black yarn to form the decorative stripes seen in the image. Fasten off your white yarn as before. Join black yarn at any point in your current round.
- Round 1 (Black Stripe): Chain 1 with black yarn. Single crochet in each stitch around. Join with a slip stitch to the first single crochet.
- Round 2 (Black Stripe Pattern): Chain 1. *Single crochet in the next stitch, chain 1, skip the next stitch.* Repeat from * to * all the way around. Join with a slip stitch to the first single crochet. This creates the open, decorative stripe.
- Round 3 (Black Stripe): Chain 1. Single crochet in each stitch and chain-1 space around. Join with a slip stitch to the first single crochet.
- Repeat Black Stripe Section: Repeat Rounds 1-3 of the black stripe section one more time to form the second black stripe, as seen in the image. After completing the second set of Rounds 1-3 in black, fasten off black yarn.
Step 4: Completing the Top White Section
- Rejoin white yarn. Rejoin your white yarn where you left off with the black stripes.
- Continue Daisy Puff Stitch Rounds: Continue working the Daisy Puff Stitch pattern rounds (same as in Step 2, Round 2 onwards) in white yarn. Work approximately 5-7 rounds of the Daisy Puff Stitch in white, to create a white section above the black stripes, similar to the image.
- Fasten off white yarn. Fasten off white yarn after completing the white section above the black stripes.
Step 5: Crafting the Black Top Border
- Join black yarn for the top border. Join black yarn to begin working the top border.
- Round 1 (Top Border): Chain 1 with black yarn. Single crochet in each stitch around the top edge of the bag. Join with a slip stitch to the first single crochet.
- Round 2 (Top Border): Chain 1. Single crochet in each stitch around. Join with a slip stitch to the first single crochet.
- Round 3 (Optional Scalloped Edge): For a slightly decorative top edge, you can add a simple scalloped border. Chain 1. *Skip the next stitch, 5 double crochet in the next stitch, skip the next stitch, slip stitch in the next stitch.* Repeat from * to * around. Fasten off black yarn. If you prefer a simpler edge, just repeat Round 2 for another round or two of single crochet.
Step 6: Attaching the Handles
- Position the handles. Decide where you want to attach your handbag handles. The handles in the image are attached towards the top edge of the bag, evenly spaced.
- Attach with rings and crochet. If your handles come with rings, position the rings at the desired points on the top border of your handbag. Using black yarn and your crochet hook, work single crochet stitches around the ring and through the top border stitches of your bag to securely attach the handles. You can work several rounds of single crochet to make the attachment points sturdy and decorative, as seen in the image with the small flower-like embellishments around the handle attachments.
Step 7: Making and Attaching the Flowers (Optional)
To add an extra touch of charm, you can fashion small crocheted flowers to embellish your handbag. As clearly seen in the image, white flower accents are attached at each point where the handles connect to the bag. These flowers add a lovely detail and polish to the overall look. You can easily make these simple five-petal flowers to replicate this design element.
Small Flower Pattern (using white yarn):
- Make a magic ring (or chain 4 and join with a slip stitch to form a ring).
- Round 1: Chain 1, then work 10 single crochet stitches into the ring. Join with a slip stitch to the first single crochet. Fasten off the white yarn, leaving a yarn tail of about 6 inches for sewing.
Petals (using black yarn or white yarn):
- Join your black yarn (or white yarn if you prefer all-white flowers) to any single crochet stitch from Round 1 of the flower base.
- *Chain 3, then make a slip stitch in the next single crochet stitch of the flower base.* Repeat this sequence from * to * a total of five times to form five petals. Fasten off the black (or white) yarn, leaving a yarn tail for sewing.
Attaching the Flowers:
- Position the flowers: Refer to the image again. You can clearly see one white flower is sewn at each of the four handle attachment points.
- Sew them on: Use the yarn tails from your fashioned flowers and your tapestry needle to sew the flowers securely onto the handbag. Attach them directly at each point where the handbag handles are connected to the crocheted bag. This will mimic the design you see in the image and add a delightful finishing touch.
Finishing Touches
- Weave in all yarn ends. Use your tapestry needle to carefully weave in all loose yarn ends on the inside of your handbag. This will make your handbag look neat and prevent ends from unraveling.
- Optional Lining: If you chose to add a lining, now is the time to sew it in. Measure your handbag and cut fabric pieces to fit the inside. Sew the lining pieces together to form a bag shape, and then hand-sew or machine-sew the lining into the inside of your crocheted handbag.
- Shape and admire! Give your handbag a gentle shaping by hand. Step back and admire your beautiful, handmade crocheted handbag! You’ve successfully fashioned a stylish and unique accessory.
The Joy of Handmade
Congratulations on making your very own crocheted handbag! Isn’t it satisfying to know you fashioned something beautiful and functional with your own hands? This project is a wonderful example of how yarn and a simple hook can be transformed into something truly special. Every stitch you made adds a touch of your personality and care into this piece. Enjoy carrying your handmade handbag and the compliments that are sure to come your way!