Crochet Your Dream Backpack: A Beginner-Friendly Guide
Hello fellow crafters! Are you ready to embark on a fun and rewarding journey of making your very own stylish and practical backpack? Get ready to pick up your hook and yarn, because in this blog post, we’re going to walk you through each step to fashion this beautiful crocheted backpack you see in the image. Don’t worry if you’re brand new to crochet – we’ll take it slow and explain everything as we go. Imagine the satisfaction of carrying around a backpack you constructed with your own two hands! Let’s dive in and develop this amazing piece together!
Materials You’ll Need
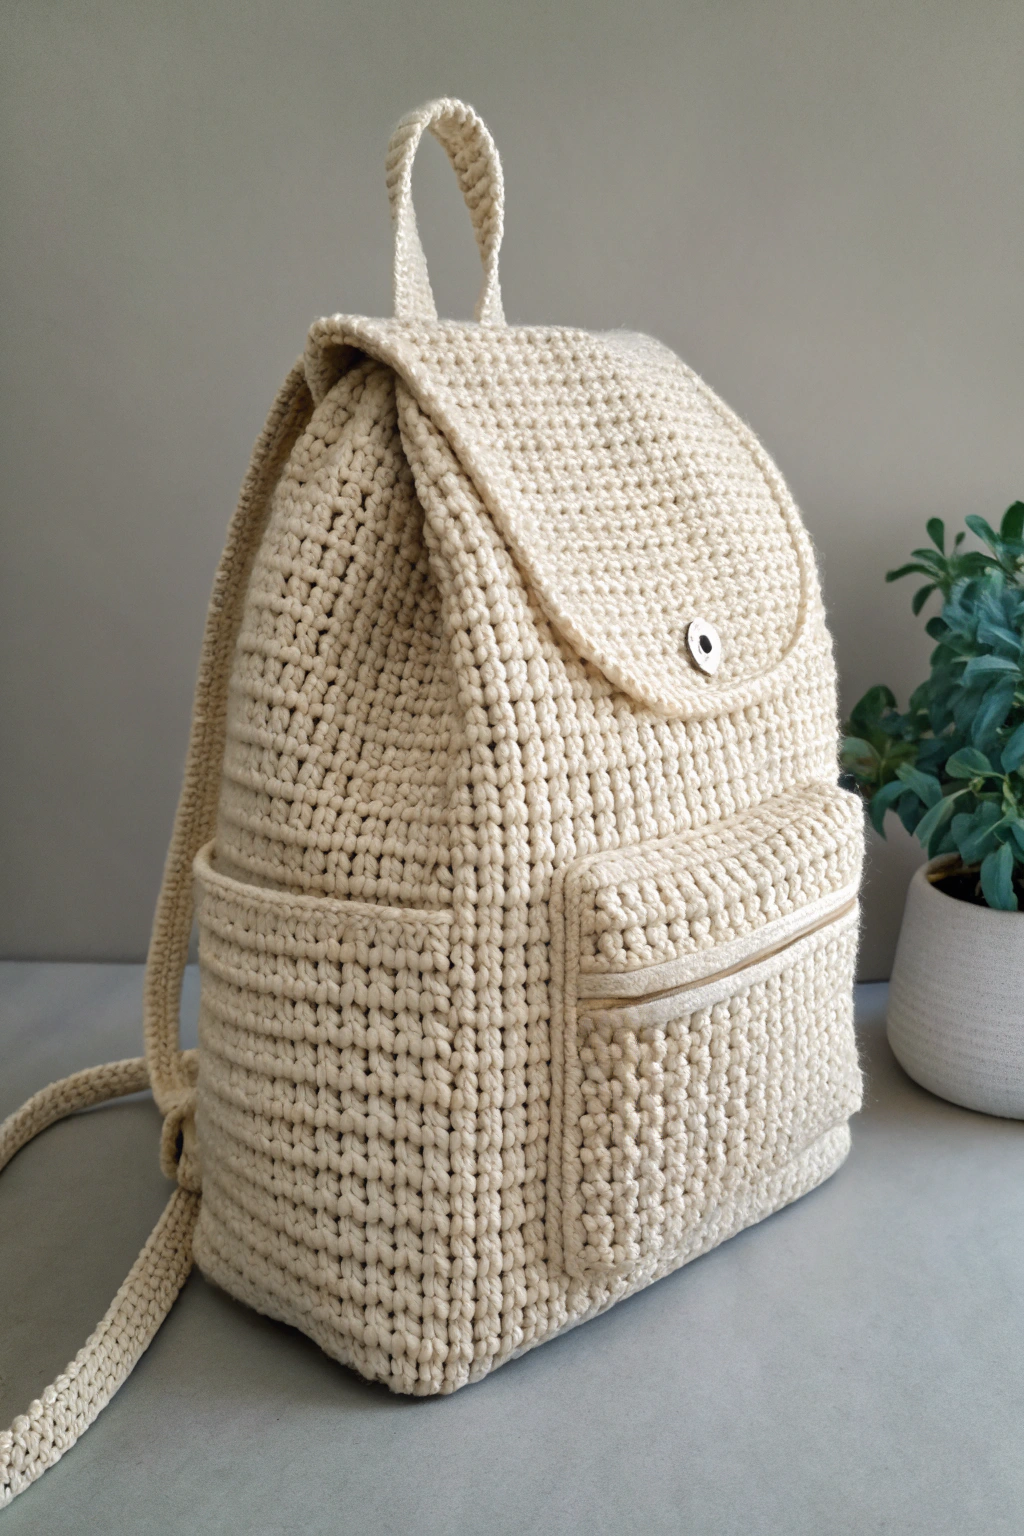
Before we get started, let’s gather all the materials you’ll need to make your crochet backpack. This list is based on the backpack you see in the image, so you can achieve a very similar look!
- 🧶 Chunky Yarn (like cotton or acrylic): Choose a soft, sturdy yarn in your favorite color! For a backpack like the one in the image, a natural cream or beige color works beautifully. You’ll need approximately 500-600 grams, but it’s always good to have a little extra.
- 🪡 Crochet Hook: An 8mm crochet hook is a good starting point for chunky yarn. Check the yarn label for their recommended hook size and adjust if needed to get a nice, dense fabric similar to the backpack in the image.
- ✂️ Scissors: For snipping your yarn.
- 📍 Stitch Markers: These little helpers will mark important places in your work, especially for beginners.
- 📏 Measuring Tape: To ensure your backpack is the size you want.
- 🔘 Button or Magnetic Snap: For closing the flap of your backpack.
- 🧵 Sewing Needle and Thread: To attach the button or magnetic snap.
- Zipper (Optional): If you want to add a zipper to the front pocket like the one in the image, get a zipper that is slightly shorter than the width of the pocket opening.
Getting Started: The Base
Let’s begin by forming the base of our backpack. This is the bottom part that will give your backpack structure. We’re going to make a rectangle for the base.
Round 1: Chain and Single Crochet Foundation
First, we’ll fashion a chain. To start, make a slip knot on your hook. If you’re unsure how to do this, imagine making a loop with your yarn and pulling the yarn tail through the loop to tighten it on your hook. Now, chain 20. A chain is the basic foundation of crochet – you produce it by pulling the yarn through the loop on your hook repeatedly. Think of it like building the first row of bricks in a wall.
Next, we’ll work single crochet stitches into this chain. Single crochet is a short, dense stitch that’s perfect for sturdy items like backpacks. It’s like building a solid, compact layer. In the second chain from your hook (count two chains back from the hook), insert your hook. Yarn over (wrap the yarn around your hook from back to front) and pull up a loop (you’ll have two loops on your hook). Yarn over again and pull through both loops on your hook. That’s one single crochet! Repeat single crochet in each chain across. You should have 19 single crochet stitches.
Round 2 and onwards: Building the Rectangular Base
Now we’ll continue constructing in rounds to make our rectangle bigger. Chain 1 (this chain does not count as a stitch, it’s just to bring your yarn up to the right height for the next row – think of it as a small step up to the next level of bricks), and turn your work. Turning means flipping your crochet piece over so you can work back in the other direction.
Single crochet in each stitch across. When you reach the last stitch, make 3 single crochet stitches in that last stitch. This corner increase is what helps us fashion the rectangle shape. We are essentially adding extra stitches at the corner to allow the work to turn smoothly. Now, continue single crocheting down the other side of the foundation chain (the unworked loops on the other side of your initial chain). Make 3 single crochet stitches in the last stitch (which is also the first stitch of the round). Join with a slip stitch to the first single crochet of the round. A slip stitch is a very simple stitch used to join rounds or seams – insert your hook into the stitch, yarn over, and pull through both loops on your hook. You’ve completed Round 2!
Repeat Round 2 until your base is the desired size. For a backpack similar to the one in the image, aim for a base that is approximately 10 inches wide and 4 inches deep. Refer to the image to see the proportions of the base in relation to the rest of the backpack. You can measure as you go to ensure it’s the right size. Each round will increase the size of your rectangle. Remember to always make 3 single crochet stitches in each corner stitch to maintain the rectangular shape.
Building the Body
Now that we have the base, let’s start building the main body of the backpack! We’ll be working in continuous rounds, meaning we won’t join at the end of each round – we’ll just keep crocheting in a spiral. This method helps to produce a seamless, cylindrical shape.
Round 1 (Body): Starting the Walls
Chain 1 (again, this is just a turning chain and doesn’t count as a stitch). Now, single crochet in each stitch around, but this time, work in the back loop only (BLO) of each stitch. Look closely at the top of your crochet stitches – you’ll see a ‘V’ shape. The back loop is the loop furthest away from you. Working in the back loop only develops a nice textured ridge where the base meets the body, as you can observe in the image. This creates a neat, defined edge.
Rounds 2 onwards (Body): Growing the Backpack
Continue single crocheting in each stitch around in continuous rounds (both loops this time, unless instructed otherwise), without joining. Just keep spiraling upwards. Use a stitch marker at the beginning of each round to help you keep track of your rounds if needed. Craft round after round, watching your backpack body grow taller.
Keep making rounds until your backpack body reaches your desired height. For a backpack similar to the one in the image, aim for a height of about 12-14 inches, but you can adjust this to your preference. Periodically check the image to see how the height of the body relates to the overall backpack.
Fashioning the Flap
The flap is the top part of the backpack that folds over to close it. Let’s fashion this next!
Row 1 (Flap): Starting the Flap Shape
To start the flap, we need to decide where the back of your backpack will be. Position your backpack body so that the back is facing you. Count approximately one-third of the way around from one side of the back. Join your yarn here with a slip stitch.
Chain 1, and single crochet across the top edge for about two-thirds of the backpack opening width. Refer to the image – the flap should cover the top opening nicely, but not be too wide. Turn your work.
Rows 2 onwards (Flap): Shaping and Lengthening
Chain 1, single crochet across. Turn. Repeat this row, decreasing by one stitch at the beginning and end of every other row to fashion the tapered shape of the flap seen in the image. To decrease, work two single crochet stitches together: insert your hook into the first stitch, yarn over, pull up a loop, insert your hook into the next stitch, yarn over, pull up a loop (you’ll have three loops on your hook), yarn over, pull through all three loops. That’s one decrease!
Continue making rows, decreasing every other row, until your flap is the desired length and tapered shape. The flap in the image is rounded at the bottom. To achieve a similar rounded shape, you can decrease more rapidly in the last few rows, or simply round off the corners by working fewer stitches in those rows. Experiment and see what looks best to you!
Crafting the Pockets
Now let’s craft those handy front pockets! The backpack in the image has two pockets. We’ll make them separately and then attach them to the backpack body.
Making the Pocket Panels
For each pocket, chain 15 (or adjust for your desired pocket width). Single crochet in the second chain from the hook and across. You’ll have 14 single crochet stitches. Chain 1, turn, and single crochet in each stitch across. Repeat this until your pocket panel is square or rectangular, depending on your preference and what looks good proportionally on your backpack. Look at the image to judge the pocket size and shape. Make two identical pocket panels.
Attaching the Pockets and Optional Zipper
Position the pocket panels on the front of your backpack body, evenly spaced and at the height you prefer. Pin them in place to hold them while you attach them.
Using your crochet hook and yarn, single crochet around three sides of each pocket panel, attaching it to the backpack body as you go. Leave the top edge of the pocket open. This is like assembling the pocket onto the backpack.
If you want to add a zipper to the top of the lower pocket, now is the time. Carefully sew the zipper along the top edge of the lower pocket opening using your sewing needle and thread.
Assembling the Straps and Handle
Let’s assemble the straps and handle so you can actually wear your backpack!
Making the Straps
For each strap, chain 6. Single crochet in the second chain from the hook and across. You’ll have 5 single crochet stitches. Chain 1, turn, and single crochet in each stitch across. Repeat this to produce long straps. The straps in the image are quite long, so make them approximately 24-30 inches long, or adjust to comfortably fit over your shoulders. Make two straps.
Making the Handle
For the handle, follow the same method as the straps, but make it shorter, about 6-8 inches long.
Attaching Straps and Handle
Position the straps on the back of the backpack. One strap should attach on each side of the base at the bottom, and then attach to the upper back of the backpack. Refer to the image to see the strap placement. Pin them in place and then sew them securely to the backpack using your sewing needle and thread or by slip stitching them on with your crochet hook and yarn for a crocheted look.
Attach the handle to the top center back of the backpack, between the strap attachments. Sew it securely in place.
Finishing Touches and Your Handmade Backpack
We’re almost done! Now for the final touches.
Attaching the Button/Magnetic Snap
Sew the button or magnetic snap to the center front of the backpack body, where the flap will close. Then, sew the corresponding part of the button or magnetic snap to the underside of the flap, ensuring it lines up correctly for closure.
Weaving in Ends
Use your crochet hook to weave in all loose yarn ends on the inside of your backpack. This makes your crafted backpack look neat and prevents ends from unraveling.
Congratulations! You have now produced your very own crocheted backpack! Isn’t it amazing what you can make with just yarn and a hook? Take a step back and admire your handmade creation. You developed this from scratch! Feel proud of yourself – you did it!
Now, fill your backpack with your essentials and show off your amazing handmade bag! We would absolutely love to see your versions! Please share photos of your crafts– we can’t wait to see the unique backpacks you fashion! Happy crocheting!