Easy & Delicious Cake Pops
Get ready to bake the most delightful treats – homemade Cake Pops! These adorable and tasty spheres on sticks are perfect for any occasion, and this guide will show beginner bakers how to make them easily at home with halal ingredients. Cake pops are fun to assemble and decorate, and they’re a wonderful way to bring joy to your family and friends. Let’s get started on this exciting baking adventure!
Halal Ingredients You’ll Need
Before starting, gather all the necessary ingredients. It’s always helpful to have everything measured and ready to go. This recipe uses simple, everyday ingredients that are easily accessible and halal.
- 🍰 Cake Mix: 1 box (about 15-18 ounces) of your favorite halal-certified cake mix (vanilla, chocolate, or any flavor you prefer).
- 🥚 Eggs: As called for on your cake mix box.
- 🥛 Oil: As called for on your cake mix box.
- 💧 Water or Milk: As called for on your cake mix box (ensure milk is halal if using).
- 🍦 Frosting: 1 container (about 12-16 ounces) of halal-certified frosting (vanilla or chocolate works well).
- 🍫 Candy Melts or Chocolate: About 1-2 bags (12 ounces each) of halal-certified candy melts or chocolate chips (white, milk, or dark).
- 🌈 Sprinkles or Decorations: Halal-certified sprinkles, edible glitter, chopped nuts, or other decorations of your choice.
- 🍭 Lollipop Sticks: About 20-30 lollipop sticks, usually 4-6 inches long.
Kitchen Equipment
Having the right tools makes baking easier and more enjoyable. Here is a list of essential kitchen equipment you will need to make these cake pops.
- 🥣 Mixing Bowls: You’ll need at least two bowls – one large for mixing the cake batter and another smaller one for melting chocolate.
- 🥄 Measuring Cups and Spoons: For accurately measuring ingredients.
- 🥣 Electric Mixer or Whisk: An electric mixer is helpful but a whisk works just fine too!
- 🥄 Spatula: For scraping bowls and folding ingredients.
- 🍽️ Baking Pan: A 9×13 inch baking pan is a good size for this recipe.
- 🔥 Oven: For baking the cake.
- 🔥 Microwave-Safe Bowl or Double Boiler: For melting candy melts or chocolate.
- 🍽️ Baking Sheet: For placing finished cake pops to set.
- 📃 Parchment Paper or Wax Paper: To line the baking sheet and prevent sticking.
Let’s Learn Basic Kitchen Techniques
For beginner bakers, it’s helpful to understand a few basic techniques we’ll be using in this recipe. Don’t worry, they are all very simple!
Mixing Cake Batter
Mixing cake batter is about combining all the ingredients until they are just blended together. “Blending” means to mix until everything is smoothly incorporated. Be careful not to overmix the batter once the flour is added, as this can make the cake tough. Just mix until you no longer see streaks of flour.
Baking a Cake
Baking a cake involves heating the cake batter in the oven until it is cooked through. “Cooked through” means that the cake is no longer wet or gooey in the center. You can test if a cake is cooked through by gently inserting a toothpick into the center. If the toothpick comes out clean, the cake is done. Ovens use heat to transform the liquid batter into a solid, fluffy cake.
Melting Chocolate or Candy Melts
Melting chocolate or candy melts makes them smooth and liquid, perfect for dipping cake pops. This can be done in the microwave or using a double boiler. A “double boiler” is a method of gently heating something by placing a bowl over a pot of simmering water. The steam from the simmering water heats the bowl above it. When melting in the microwave, it’s important to do it in short intervals and stir frequently to prevent burning. “Burning” happens when chocolate gets too hot and becomes scorched and unusable.
Rolling Cake Balls
Rolling cake balls is simply shaping the crumbled cake into small, round balls. This is done by hand. The key is to make them uniform in size so they bake evenly and look consistent. “Uniform” means all the same or very similar.
Step-by-Step Instructions: Making Cake Pops
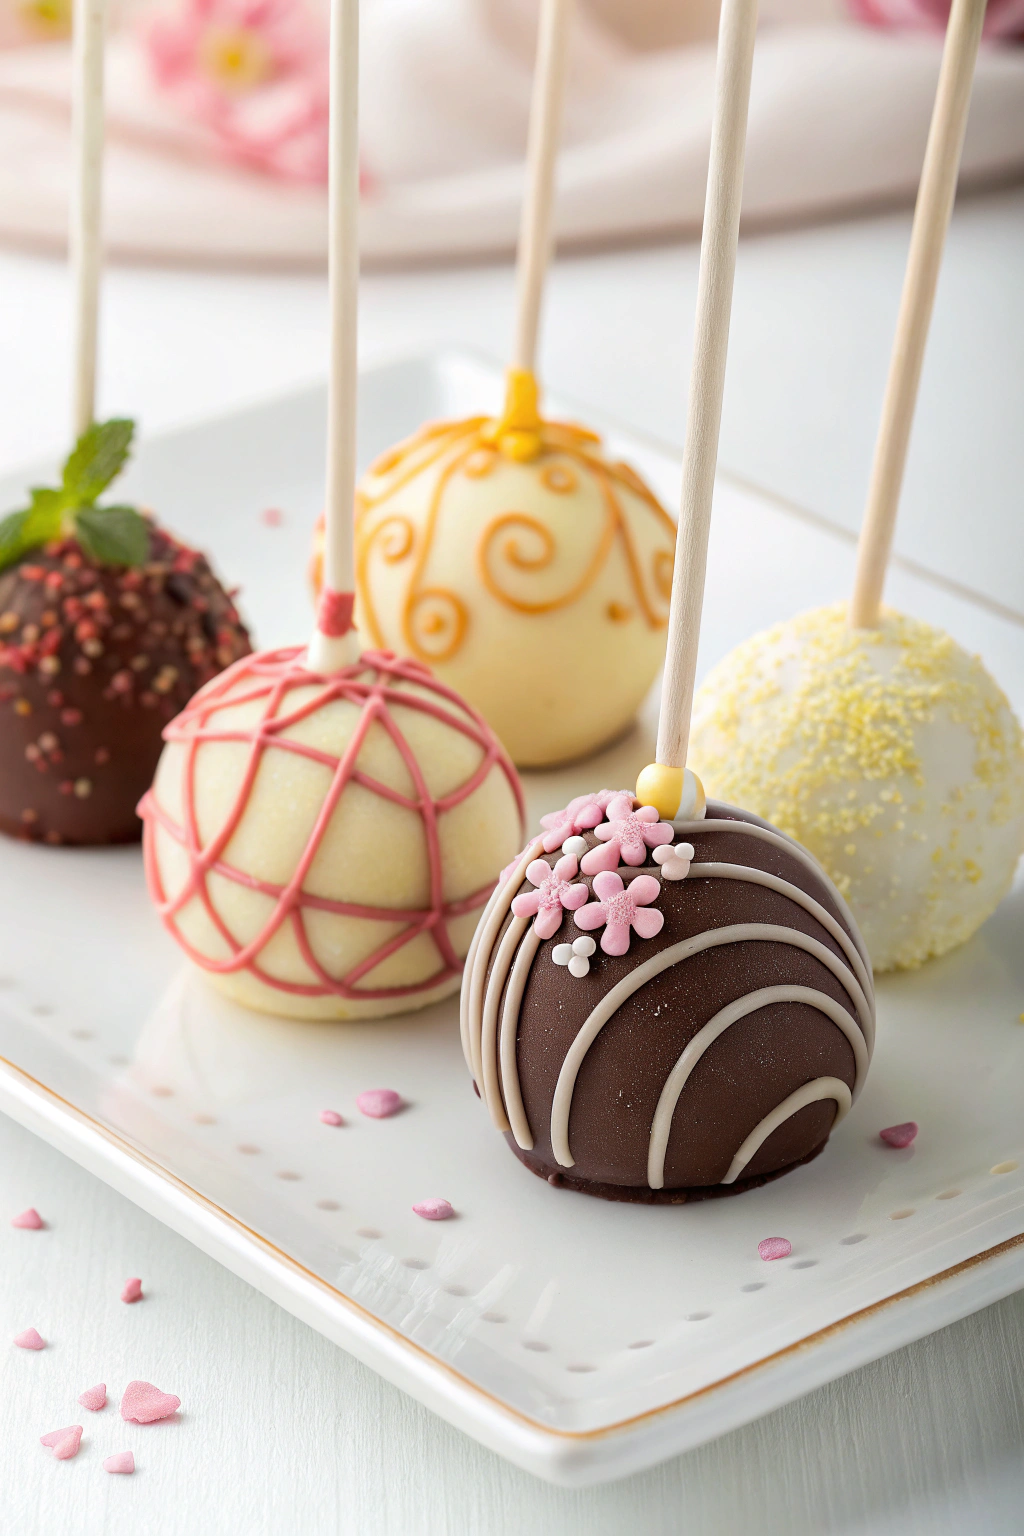
Now, let’s put everything together and make some delicious cake pops! Follow these steps carefully, and remember, baking is a fun learning process. Refer to the image to see examples of decorated cake pops.
Step 1: Baking the Cake
- Step 1.1: Preheat the oven to 350°F (175°C). “Preheating” the oven means turning it on to the correct temperature and letting it heat up before you put the cake in. This ensures the cake bakes evenly from the start.
- Step 1.2: Prepare the cake batter according to the instructions on your cake mix box, using halal ingredients for eggs, oil, and water or milk.
- Step 1.3: Pour the batter into a greased and floured 9×13 inch baking pan. “Greasing and flouring” the pan prevents the cake from sticking. You can grease it with halal butter or cooking spray, then lightly dust it with flour.
- Step 1.4: Bake for the time indicated on the cake mix box, or until a toothpick inserted into the center comes out clean. This usually takes about 25-35 minutes, but oven times can vary.
- Step 1.5: Once baked, let the cake cool completely in the pan. “Cool completely” means allowing the cake to reach room temperature. This is important because warm cake is harder to crumble and work with.
Step 2: Crumbling the Cake and Making Cake Balls
- Step 2.1: Once the cake is completely cool, crumble it into a large mixing bowl. Use your hands or a fork to break the cake into small, even crumbs. Remove any hard or crusty edges if you prefer.
- Step 2.2: Add the frosting to the cake crumbs. Start with about ¾ of the container and mix it in with your hands or a spatula. The frosting acts like a “glue” to hold the cake crumbs together.
- Step 2.3: Continue adding frosting, a little at a time, until the mixture is moist enough to hold its shape when squeezed, but not too sticky. You want to be able to roll it into balls.
- Step 2.4: Using your hands or a spoon, roll the cake mixture into 1-1.5 inch balls. Place the rolled cake balls on a baking sheet lined with parchment paper or wax paper. Refer to the image; the cake pops are round spheres.
- Step 2.5: Place the baking sheet with the cake balls in the refrigerator for about 30 minutes to an hour to firm up. “Firm up” means to become slightly harder and less soft. This makes them easier to dip in the melted candy melts or chocolate.
Step 3: Dipping and Decorating Cake Pops
- Step 3.1: While the cake balls are chilling, prepare the candy melts or chocolate for dipping. Melt them according to the package instructions. If using a microwave, melt in 30-second intervals, stirring after each interval, until smooth. If using a double boiler, melt over simmering water, stirring constantly until smooth. Ensure the melted candy or chocolate is smooth and liquid for easy dipping.
- Step 3.2: Remove the cake balls from the refrigerator. Take one cake ball at a time and dip the tip of a lollipop stick into the melted candy melts or chocolate. This helps the stick adhere to the cake pop.
- Step 3.3: Insert the dipped stick about halfway into the cake ball. Gently but firmly push it in so it’s secure.
- Step 3.4: Dip the entire cake ball into the melted candy melts or chocolate, coating it completely. Refer to the image; the cake pops are fully coated. Let any excess drip off by gently tapping the stick against the side of the bowl.
- Step 3.5: Immediately decorate the cake pop with sprinkles, edible glitter, chopped nuts, or other decorations before the coating sets. The image shows various decorations like sprinkles and drizzles.
- Step 3.6: Place the decorated cake pop stick-up on a baking sheet lined with parchment paper or wax paper, or in a cake pop stand if you have one.
- Step 3.7: Repeat steps 3.2-3.6 for all remaining cake balls.
- Step 3.8: Allow the cake pops to set completely at room temperature or in the refrigerator for about 30 minutes, until the coating is firm. “Set completely” means the coating is hard and no longer sticky or wet.
Helpful Tips for Perfect Cake Pops
- Cake Consistency: If your cake ball mixture is too dry, add a little more frosting, one tablespoon at a time, until it reaches the right consistency. If it’s too wet, add a bit more crumbled cake.
- Melting Chocolate: Be careful not to overheat the candy melts or chocolate, as it can become thick and seize. If it becomes too thick, you can add a tiny bit of vegetable oil or shortening to thin it out, but do this sparingly.
- Dipping Technique: Dip quickly and smoothly to get an even coating. If the coating is too thick, gently thin it with a bit of vegetable oil or shortening.
- Decorating Timing: Decorate the cake pops immediately after dipping because the candy melts or chocolate sets quickly. If it sets before you decorate, the sprinkles or decorations won’t stick.
- Stick Security: Dipping the stick in melted coating before inserting it into the cake ball helps to secure it and prevents the cake pop from falling off.
- Storage: Store finished cake pops in an airtight container at room temperature for a few days or in the refrigerator for up to a week.
Share Your Cake Pops!
Congratulations, you’ve just made delicious homemade cake pops! These delightful treats are perfect for parties, celebrations, or simply enjoying a sweet moment at home. Baking is a wonderful way to express your creativity and share joy with others through food.
We encourage you to try this recipe and make your own unique cake pop creations. Feel free to experiment with different cake flavors, frosting types, and decorations to personalize them. Don’t hesitate to share pictures of your beautiful cake pops with friends and family – and inspire others to embark on their own baking adventures! Enjoy the process and the delicious results!