Fashion a Chic Crocheted Clutch Bag
Hello fellow crafters! Are you ready to embark on a fun and rewarding journey of making your very own stylish accessory? In this guide, we’ll walk you through the steps to fashion a beautiful crocheted clutch bag, just like the elegant one you see pictured. Don’t worry if you’re completely new to crochet – we’ll take it nice and slow, explaining everything as we go. Get ready to experience the joy of making something gorgeous with your own hands!
Materials You’ll Need
Before we get started, let’s gather all the supplies we’ll need to build this stunning clutch. Having everything ready will make the whole making process smooth and enjoyable!
- 🧶 Yarn: Medium-weight black yarn. Something like worsted weight acrylic or cotton will work great for beginners. You won’t need a whole lot, maybe one skein or less, but it’s always good to have a little extra.
- 🪡 Crochet Hook: Size H-8 (5mm) crochet hook. This is a good size hook for working with medium-weight yarn and is easy for beginners to handle.
- ✂️ Scissors: For snipping yarn ends. Any sharp scissors will do!
- 🧵 Yarn Needle: Also called a tapestry needle or darning needle. This is a large, blunt needle with a big eye to thread yarn through, used for weaving in loose ends and attaching embellishments.
- ✨ Beads or Pearls: Small silver or pearl beads for embellishing your clutch, just like in the picture. You can find these at any craft store. About 50-70 should be plenty, depending on how densely you want to place them.
- 🔒 Clasp or Button: A magnetic snap, button, or any closure you prefer to keep your clutch closed. A simple sew-on magnetic snap works wonderfully for this project.
Getting Started: Crochet Basics for Beginners
If you’ve never held a crochet hook before, that’s absolutely okay! Crocheting is a wonderful craft that’s easier to learn than you might think. Think of it like using a hook to pull loops of yarn through other loops, forming fabric. Let’s cover a few very basic steps that will be the foundation of our clutch bag.
Making a Slip Knot
First, we need to form a slip knot to get started. Imagine you are making a loop with your yarn. Hold the end of the yarn and fashion a loop, crossing the yarn over itself to make a ‘p’ shape. Then, reach through the loop with your hook, catch the yarn that’s coming from the skein (the ball of yarn), and pull it through the loop. Pull gently on both ends of the yarn to tighten the knot on your hook. That’s your slip knot – the very first step in almost every crochet project!
Chain Stitch (ch)
The chain stitch is the most basic crochet stitch, and it’s like the foundation row for many projects. To produce a chain stitch, hold your hook with the slip knot on it. Yarn over (yo), which means to wrap the yarn around your hook from back to front. Then, pull the hook with the yarn through the loop on your hook. That’s one chain stitch! Repeat this process – yarn over, pull through – to fashion a chain of any length. Each time you pull through, you’re making another link in your chain. Think of it like building a chain link by link.
Single Crochet (sc)
Single crochet is another fundamental stitch, and it constructs a tighter, denser fabric than some other stitches. For single crochet, first, you’ll need a chain. Let’s say you have a chain. Now, insert your hook into the second chain from the hook (skip the chain closest to the hook). Yarn over, and pull the yarn back through the chain loop. You’ll now have two loops on your hook. Yarn over again, and pull the yarn through both loops on your hook. That’s one single crochet stitch! You’ve just made a solid little stitch, perfect for our clutch. For the next single crochet, insert your hook into the next chain stitch in your foundation chain and repeat the steps.
Double Crochet (dc)
Double crochet is a taller stitch than single crochet. It forms a fabric with a bit more height and drape. It’s like building a slightly taller brick compared to the single crochet brick. To develop a double crochet, yarn over before you insert your hook into the stitch (again, skip the first chain from the hook if starting from a chain). Insert your hook into the stitch. Yarn over again, and pull the yarn back through the stitch. You’ll have three loops on your hook now. Yarn over again, pull through the first two loops on your hook. Now you have two loops left. Yarn over one last time, and pull through the remaining two loops. That’s a double crochet! It’s a bit taller and more open than a single crochet.
Step-by-Step Instructions to Make Your Clutch Bag
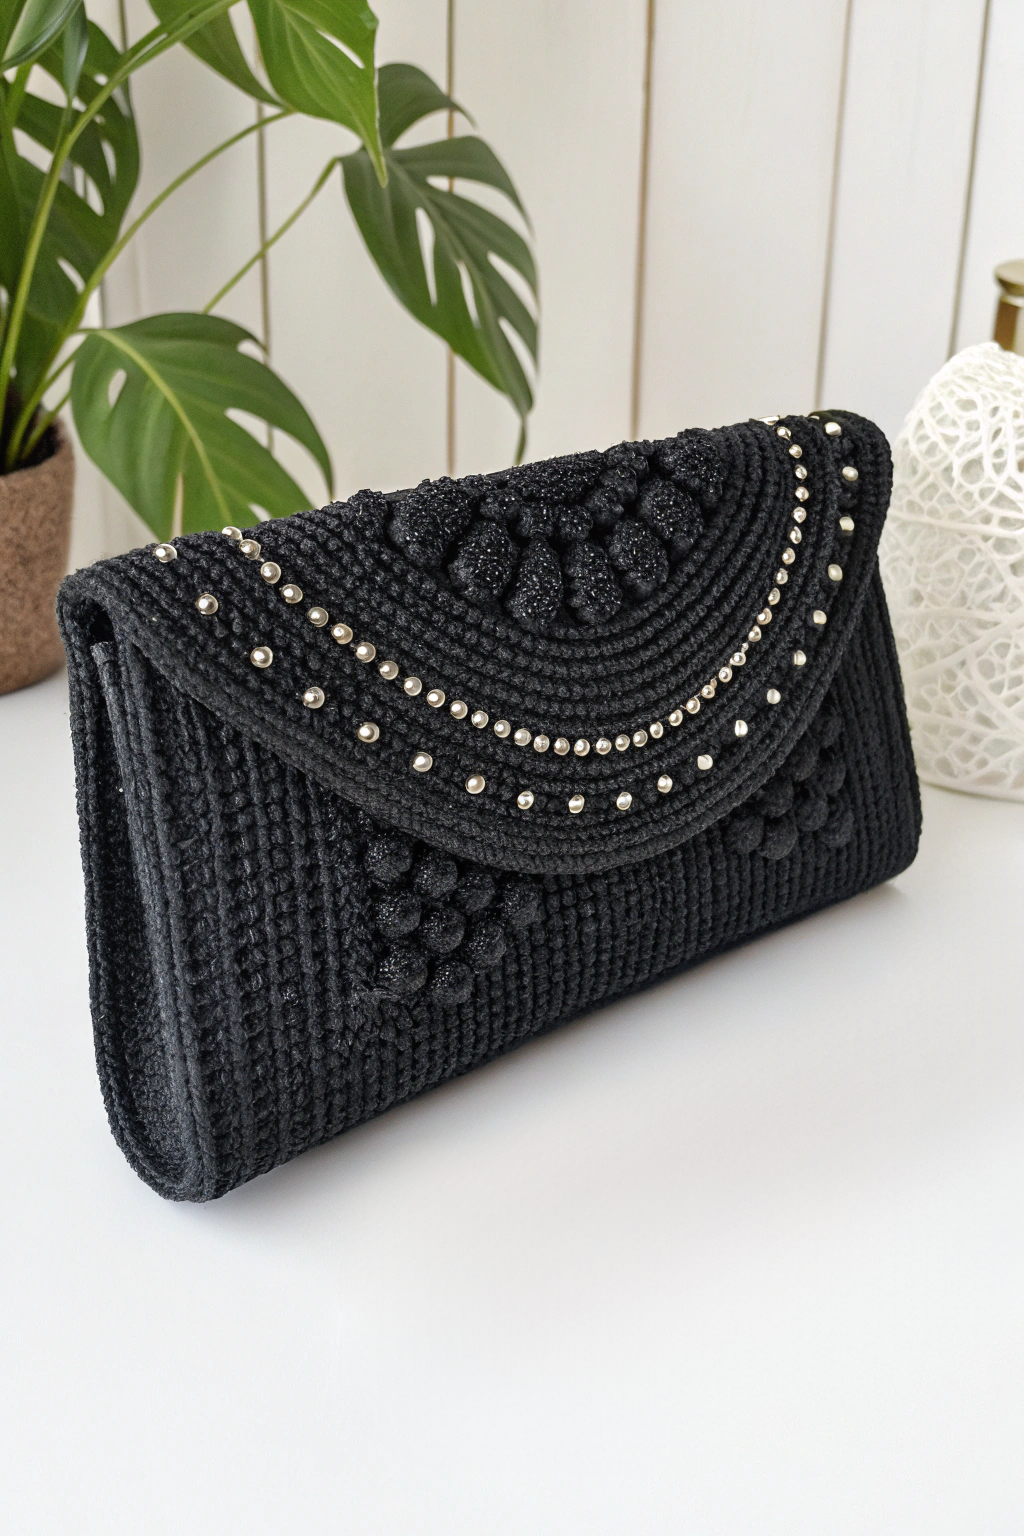
Now that we’ve covered the basics, let’s get to the exciting part – making our crocheted clutch bag! Refer to the image to see the shape and details as we go.
Step 1: Forming the Base of the Clutch
- Chain 30. Start by making a chain of 30 chain stitches. This chain will determine the width of your clutch bag. Remember to keep your chain stitches relatively even and not too tight.
- Row 1: Single Crochet across. In the second chain from your hook, fashion a single crochet stitch. Then, single crochet in each chain across to the end of the chain. You should have 29 single crochet stitches. At the end of the row, chain 1 (this is called a turning chain and doesn’t count as a stitch), and turn your work. Turning your work means you flip it over so you can start crocheting in the opposite direction.
- Rows 2- 40 (or desired length): Single Crochet in each stitch across. For the next rows, you will continue to single crochet in each stitch across the row. To do this, insert your hook into the first stitch of the row (the stitch right next to the turning chain), and single crochet. Continue single crocheting in each stitch across the row. At the end of each row, chain 1 and turn your work. Repeat this for approximately 40 rows, or until your rectangle is the size you want for the base and body of your clutch. Observe in the image how the main body of the clutch is a rectangle constructed from rows of crochet. You can adjust the number of rows to make your clutch taller or shorter.
Step 2: Crafting the Flap
Now we’ll start developing the flap of the clutch, which is the top part that folds over. Notice in the image how the flap is rounded and has decorative elements. We’ll fashion this shape and detail in the following steps.
- Row 41: Decrease row for flap shaping. To start shaping the flap, we’ll make decreases to create the rounded edge. Start the row with a chain 1 and turn. Single crochet in the first stitch. Then, for the decrease: single crochet two stitches together (sc2tog). To sc2tog, insert your hook into the next stitch, yarn over, pull through (2 loops on hook). Insert your hook into the next stitch, yarn over, pull through (3 loops on hook). Yarn over, pull through all three loops. You’ve just decreased! Continue single crocheting across the row until the last 3 stitches. Then, sc2tog over the next two stitches, and single crochet in the very last stitch. Chain 1 and turn.
- Rows 42-50 (approximately): Continue decreasing and shaping. Continue to fashion decrease rows to shape the flap. For these rows, you can decrease at the beginning and end of every other row instead of every row. For example, Row 42: chain 1, turn, single crochet across. Row 43: chain 1, turn, decrease at the beginning and end as in Row 41. Row 44: chain 1, turn, single crochet across. And so on. Refer to the image – you can see the flap gradually narrowing and rounding as it goes up. The exact number of rows and decreases will depend on how rounded you want your flap to be. Aim for a gently curved flap that’s visually similar to the one in the picture.
Step 3: Adding the Decorative Elements
This is where we assemble the beautiful textured details on the flap that you see in the image. These are made with bobble or popcorn stitches, which give a raised, textured effect.
- Row 51: Row of Double Crochet. Chain 2 (counts as first double crochet), turn. Double crochet in each stitch across the row. This row provides a base for our decorative elements. Chain 1, turn.
- Row 52: Bobble/Popcorn Stitch Row. This row will produce the raised floral-like shapes. We’ll use a simplified bobble stitch. Single crochet in the first stitch. In the next stitch, make a bobble stitch. To form a bobble stitch: Work 5 double crochet stitches into the same stitch, but stop before the last yarn over and pull through on each double crochet. You will have 6 loops on your hook. Yarn over and pull through all 6 loops. This constructs a bobble. Continue: Single crochet in the next stitch, bobble stitch in the next stitch. Repeat from * to * across the row. End with a single crochet in the last stitch. Chain 1, turn. Refer to the image – you can see these raised bobbles forming the decorative pattern.
- Row 53-54: Single Crochet Rows. For the next two rows, simply single crochet in each stitch across. These rows will make the bobbles stand out more. Chain 1 and turn at the end of each row.
- Repeat Decorative Rows (Optional): If you want more decorative rows below the first one, repeat Rows 51-54. As you can see in the image, this clutch features a single row of bobbles, but feel free to craft additional rows for a bolder textured design.
Step 4: Adding the Bead Embellishments
Now for the sparkly touch! We’ll assemble the beads to give our clutch that elegant finish, just like in the picture.
- Attaching Beads: Thread your yarn needle with a length of yarn. Bring the yarn to the front of your work where you want to attach a bead. Thread a bead onto your yarn needle. Bring the needle back down through the fabric right next to where it came up, securing the bead in place. Tie a knot on the back to secure the yarn. Snip the ends. You are essentially sewing the beads onto the surface of your crochet.
- Placement of Beads: Refer closely to the image. You can see that beads are placed along the rounded edge of the flap and also within the bobble stitch decorative elements. Strategically fashion beads along the curved edge of your flap, spacing them evenly. Then, add beads to the center of each bobble stitch flower to highlight them. Be creative and develop your own bead pattern if you wish, or follow the image closely for a similar look.
Step 5: Finishing and Closure
We’re almost there! Just a few more steps to complete our beautiful clutch.
- Edging (Optional): If you want a neater edge around the flap and opening of the clutch, you can make a round of slip stitches or single crochet stitches around the entire perimeter. This is optional but can give a polished look.
- Weaving in Ends: Use your yarn needle to weave in all loose yarn ends on the inside of your clutch. This is important to keep your work neat and prevent ends from unraveling. Thread the yarn end onto your needle, and weave it through several stitches on the back of your work, then snip off the excess yarn.
- Attaching Closure: Sew on your chosen clasp or button to the inside of the flap and the corresponding spot on the body of the clutch to construct a closure. A magnetic snap is easy to use and provides a clean finish.
Share Your Makes!
Congratulations! You have just fashioned a gorgeous crocheted clutch bag! Isn’t it satisfying to make something beautiful with your own hands? We hope you enjoyed this journey of crafting and learned some new crochet skills along the way.
Now it’s your turn to show off your amazing craft! We would absolutely love to see your finished clutch bags. Please share photos of your makes – it’s so inspiring to see everyone’s unique versions. Happy crocheting, and keep making beautiful things!