Knit Your Own Cozy Pom Pom Beanie!
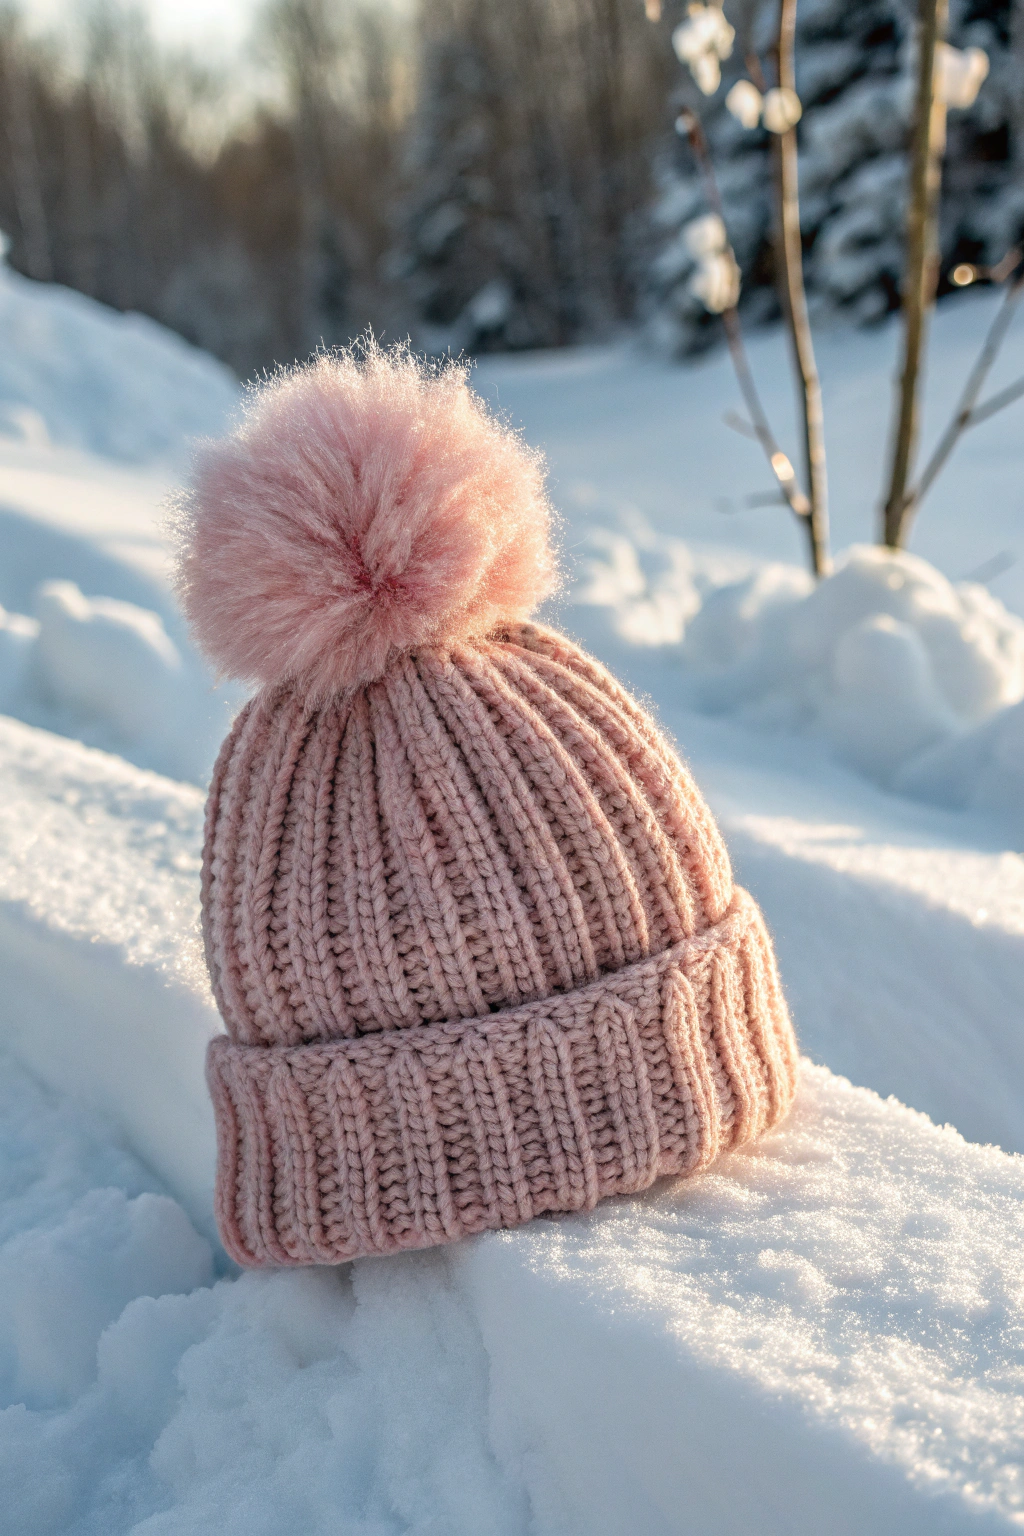
Hey there, crafty friends! Ever dreamed of making your very own super snuggly beanie, perfect for chilly days? Well, grab your needles and some yarn because today we’re going to fashion a beautiful, textured pom pom beanie just like the one you see in the picture! Don’t worry if you’re brand new to knitting – we’ll go through every step together in a way that’s easy and fun to understand. Get ready to experience the amazing feeling of building something beautiful with your own two hands!
What You’ll Need to Get Started
Before we dive into the fun part, let’s gather all the supplies you’ll need to construct your beanie. Having everything ready will make the whole process smooth and enjoyable!
- 🧶 Yarn: You’ll need some lovely, soft worsted weight yarn. In the picture, the beanie is a gorgeous light pink, but you can choose any color you adore! About 200 yards should be plenty for a beanie. Worsted weight yarn is a medium thickness – imagine it as being somewhere between the thickness of kitchen twine and chunky blanket yarn.
- 🪡 Knitting Needles: You’ll need two types of knitting needles:
- Circular Knitting Needles: Size US 8 (5mm), 16-inch circular needles. Circular needles are two needle points connected by a flexible cable. The 16-inch length refers to the length of the cable and needle points combined. These are great for knitting in the round, which we’ll be doing for most of the beanie.
- Double Pointed Needles (DPNs): Size US 8 (5mm). You’ll need a set of 5 DPNs. These are needles that are pointed at both ends. We’ll use these later when the beanie gets smaller at the top.
- ✂️ Scissors: For snipping yarn ends.
- 🧵 Tapestry Needle (Yarn Needle): This is a large, blunt needle with a big eye, perfect for weaving in yarn ends and closing up the top of the beanie.
- Pom Pom Maker (or Cardboard): To make that fluffy pom pom on top! You can use a pom pom maker (available at craft stores) or fashion one from cardboard – we’ll talk about both options later.
Let’s Get Knitting!
Now for the exciting part – actually making our beanie! Remember, there’s no rush. Take your time, enjoy the process, and don’t be afraid to rewind and re-read if you need to. We’re in this together!
Step 1: Casting On
- First, we need to get the yarn onto our needles – this is called casting on. We’ll use a simple method called the long-tail cast on. Imagine you’re starting to build the first row of bricks in a wall.
- Hold one circular needle in your right hand. Make a slip knot – this is like the first knot you’d form when tying your shoelaces, but a bit looser. Place the slip knot onto your needle. This is your first stitch.
- Now for the long-tail part! Hold the yarn in your left hand. You’ll have two strands of yarn: the ‘tail’ (the shorter end) and the ‘working yarn’ (the yarn coming from the ball). Position your left thumb and index finger to hold the yarn.
- Bring the needle tip down and forward, scooping up the yarn from underneath your left thumb. Then, bring the needle tip back and down, scooping up the yarn from your left index finger. Pull the yarn through the loop on the needle to form a new stitch.
- Repeat this process until you have cast on 96 stitches onto your circular needle. Count them carefully! This number will give us the size and fit of the beanie you see in the picture. Think of each stitch as a tiny loop on your needle – you’re assembling a chain of these loops.
Step 2: Knitting the Ribbed Brim
- The bottom edge of the beanie in the image has a ribbed texture. This is called ribbing, and it makes the edge stretchy and snug. We’re going to craft a 2×2 rib, which means we’ll alternate knitting two stitches and purling two stitches.
- Joining in the Round: Make sure your stitches aren’t twisted on the circular needle. Bring the two needle tips together. Knit the first stitch on the left needle with the right needle. Now you’ve joined the round! You’re now knitting in a circle, like building a cylinder instead of a flat piece.
- Knit Stitch (k): To knit a stitch, hold the yarn in your right hand. Insert the right needle tip into the front of the first stitch on the left needle from left to right. Wrap the yarn around the right needle tip counter-clockwise. Pull the right needle tip back through the stitch, bringing the loop of yarn with it. Slide the old stitch off the left needle. You’ve just produced a knit stitch! Imagine you’re making a little knot with the yarn on the front of the fabric.
- Purl Stitch (p): To purl a stitch, bring the yarn to the front of your work (towards you). Insert the right needle tip into the front of the first stitch on the left needle from right to left. Wrap the yarn around the right needle tip counter-clockwise. Bring the right needle tip back through the stitch, pulling the loop of yarn through. Slide the old stitch off the left needle. A purl stitch is like a knit stitch but it forms a little bump on the front of the fabric.
- 2×2 Rib Pattern: Now we’ll fashion the ribbing. For each round, repeat the following: Knit 2 stitches (k2), then purl 2 stitches (p2). This means you knit two stitches, then purl the next two stitches, then knit the next two, and so on, all the way around the circle.
- Continue Ribbing: Repeat this 2×2 rib pattern for about 2 inches. Refer to the image – you can see the ribbed brim is about this height. This ribbed section is like the foundation of our beanie, giving it shape and structure.
Step 3: Knitting the Beanie Body (Stockinette Stitch)
- The main part of the beanie in the image is smooth and slightly textured. This is fashioned using stockinette stitch in the round. Stockinette stitch in the round is super simple – you just knit every stitch!
- Stockinette Stitch in the Round: For every round, simply knit every stitch (k). That’s it! No purling needed for this section. You are now constructing a smooth fabric.
- Continue Stockinette Stitch: Keep knitting in stockinette stitch (knit every round) until your beanie measures about 7 inches from the cast-on edge to your needle. Again, refer to the image to see the length of the beanie body. This section is like building the walls of our beanie, making it taller and taller.
Step 4: Shaping the Crown (Decreasing)
- Now we need to shape the top of the beanie so it curves inwards, just like in the picture. We do this by decreasing stitches, which means we’re developing a narrower circle of knitting.
- Decrease Round 1: Knit 2 stitches together (k2tog), knit 10 stitches (k10). Repeat from * to * all the way around the round. “Knit 2 stitches together” means you insert your needle into two stitches at once and knit them as if they were one stitch. This reduces the number of stitches on your needle. You’ve just fashioned your first decrease round!
- Decrease Round 2: Knit every stitch (k). No decreases in this round.
- Decrease Round 3: Knit 2 stitches together (k2tog), knit 9 stitches (k9). Repeat from * to * around.
- Decrease Round 4: Knit every stitch (k).
- Decrease Round 5: Knit 2 stitches together (k2tog), knit 8 stitches (k8). Repeat from * to * around.
- Continue Decreasing: Keep repeating these decrease rounds, each time decreasing one less stitch between the k2tog decreases. So, next it will be k2tog, k7, then k2tog, k6, and so on. Knit a plain knit round in between each decrease round.
- Switch to DPNs: As you decrease, the circle of stitches will get smaller and smaller, and it will become difficult to knit comfortably on circular needles. This is when we switch to double-pointed needles (DPNs). Divide your stitches evenly across 4 DPNs. Use the fifth DPN to knit. Imagine you are now assembling a smaller and smaller circle using these needles.
- Continue Decreasing on DPNs: Keep decreasing in the same pattern until you have only about 8-10 stitches left.
Step 5: Finishing and Making the Pom Pom
- Cut the Yarn: Cut the yarn, leaving a tail about 8 inches long.
- Draw Yarn Through Stitches: Thread the yarn tail onto your tapestry needle. Slip all the remaining stitches off the DPNs onto the tapestry needle. Pull the yarn tail snugly to close the top of the beanie. Imagine you’re drawing a drawstring tight to close a bag.
- Secure the Top: Weave the yarn tail through the stitches again in the opposite direction to make sure the top is securely closed. Then, weave the yarn tail down into the inside of the beanie and trim the excess yarn. This is like fastening the top of your beanie neatly.
- Make the Pom Pom: Now for the fun part – making the pom pom! You can use a pom pom maker according to the instructions that come with it. Or, if you’re using cardboard:
- Cut two cardboard circles. The larger the circle, the bigger the pom pom. For a beanie like the one in the picture, circles about 4-5 inches in diameter would work well.
- Cut a smaller circle out of the center of each cardboard circle to make donut shapes.
- Hold the two cardboard donuts together. Wrap yarn around and around the cardboard donuts, going through the center hole each time. Wrap and wrap until the cardboard is completely covered and the hole is nearly filled. The more yarn you wrap, the denser your pom pom will be.
- Carefully cut through all the loops of yarn around the outer edge of the cardboard donuts.
- Cut a separate piece of yarn and tie it tightly around the yarn bundle between the two cardboard donuts. Tie it very securely!
- Remove the cardboard donuts. Fluff and trim your pom pom to shape it into a nice round ball. You’ve just produced a fluffy pom pom!
- Attach the Pom Pom: Use the yarn tails from making the pom pom (or thread a new piece of yarn onto your tapestry needle) to securely attach the pom pom to the top center of the beanie. Sew it on firmly so it won’t come off. You’re now assembling the final touch to your beanie!
Tips for Beginner Knitters
- Count your stitches often! Especially when you’re just starting out, it’s easy to accidentally add or drop stitches. Counting regularly will help you catch mistakes early.
- Don’t be afraid to unravel (rip out) if you make a mistake. Everyone makes mistakes, especially when learning something new. If you notice a mistake, gently unravel back to where the mistake happened and fix it. It’s better to fix it early than to continue knitting with a mistake.
- Take breaks! Knitting can be tiring, especially for your hands and wrists. Take breaks to stretch and rest your hands.
- Practice makes perfect! The more you knit, the easier and more natural it will become. Don’t get discouraged if your first beanie isn’t perfect – just keep practicing, and you’ll be crafting beautiful things in no time!
Share Your Finished Beanie!
Congratulations! You’ve just fashioned your very own cozy pom pom beanie! Doesn’t it feel amazing to make something beautiful with your own hands? Wear your beanie with pride, or give it as a thoughtful handmade gift.
We would absolutely love to see your finished beanies! Share photos of your crafts on social media – we can’t wait to see your amazing work! Happy knitting!