Crochet a Cute Ladybug Friend Today!
Are you ready for a project that’s as adorable as it is fun to make? Get ready to pick up your crochet hook and yarn, because we’re going to fashion a charming little ladybug toy! This project is perfect for beginners eager to try amigurumi, and trust me, the result is absolutely worth every stitch. Imagine the joy of holding this handmade little bug in your hands, knowing you developed it yourself! Let’s get started on this delightful crafting journey!
Materials You’ll Need to Make Your Ladybug
Before we begin, let’s gather all the supplies you’ll need. Having everything ready will make the process smooth and enjoyable. Here’s what you’ll need to assemble your own little ladybug friend:
- Worsted weight yarn in red, black, and cream color – This is the standard yarn thickness, easy to work with and perfect for this project.
- Crochet hook size 3.5mm (E/4) – This hook size is generally recommended for worsted weight yarn, but check your yarn label for suggestions too.
- Safety eyes, 12mm – These are plastic eyes that securely attach to your toy, making it safe for all ages.
- Fiberfill stuffing – This fluffy material is used to give your ladybug its soft, huggable shape.
- Yarn needle – This is a large-eyed needle with a blunt tip, used for weaving in yarn ends and sewing pieces together.
- Scissors – For cutting yarn.
- Stitch markers (optional) – These little rings can help you keep track of your rounds, especially helpful when you’re just starting out!
Let’s Start Fashioning the Ladybug’s Head
We’ll begin by making the ladybug’s head, which is the cute, cream-colored part you see in the image. We’ll use a technique called “crocheting in the round” to form a sphere shape. If you’ve never crocheted before, don’t worry! It’s like building with yarn, one stitch at a time.
Round 1: Magic Ring and First Round of Stitches
Start by producing a magic ring. This is a way to begin crocheting in the round without leaving a hole in the center. To fashion a magic ring, wrap the yarn around your fingers to form a loop, then insert your hook into the loop, yarn over (that means wrap the yarn around your hook), and pull through to make a slip knot. Now you have a loop on your hook.
Next, we’ll craft the first round of stitches into this magic ring. We’re going to use single crochet stitches, which are the most basic crochet stitches. To single crochet, insert your hook into the magic ring, yarn over, pull the yarn through the loop (you’ll have two loops on your hook), yarn over again, and pull through both loops on your hook. That’s one single crochet! Make 6 single crochet stitches into the magic ring. After you’ve fashioned 6 stitches, gently pull the tail of your magic ring to close the center hole.
Round 2: Increasing Stitches
Now we’re going to develop the head’s shape by increasing the number of stitches in each round. This means we’ll be making two stitches in each stitch from the previous round. This is called “increasing”. In Round 2, make 2 single crochet stitches in each of the 6 stitches from Round 1. This will give you a total of 12 stitches. You can use a stitch marker to mark the beginning of each round if you find it helpful.
Rounds 3-8: Shaping the Head
For the next few rounds, we’ll continue to increase, but in a specific pattern to shape the head into a nice sphere.
- Round 3: *Single crochet in the next stitch, then increase in the next stitch.* Repeat from * to * around. This means you’ll alternate between making one single crochet and then two single crochet in the next stitch. You’ll repeat this pattern all the way around the round. You should have 18 stitches at the end of this round.
- Round 4: *Single crochet in the next 2 stitches, then increase in the next stitch.* Repeat from * to * around. Now you’re increasing every three stitches. You’ll have 24 stitches.
- Round 5: *Single crochet in the next 3 stitches, then increase in the next stitch.* Repeat from * to * around. Increasing every four stitches now. You’ll have 30 stitches.
- Round 6: *Single crochet in the next 4 stitches, then increase in the next stitch.* Repeat from * to * around. Increasing every five stitches. You’ll have 36 stitches.
- Round 7: *Single crochet in the next 5 stitches, then increase in the next stitch.* Repeat from * to * around. Increasing every six stitches. You’ll have 42 stitches.
- Round 8: Single crochet in each stitch around. This is a round with no increases, which will help to solidify the shape. You’ll still have 42 stitches.
Adding the Eyes
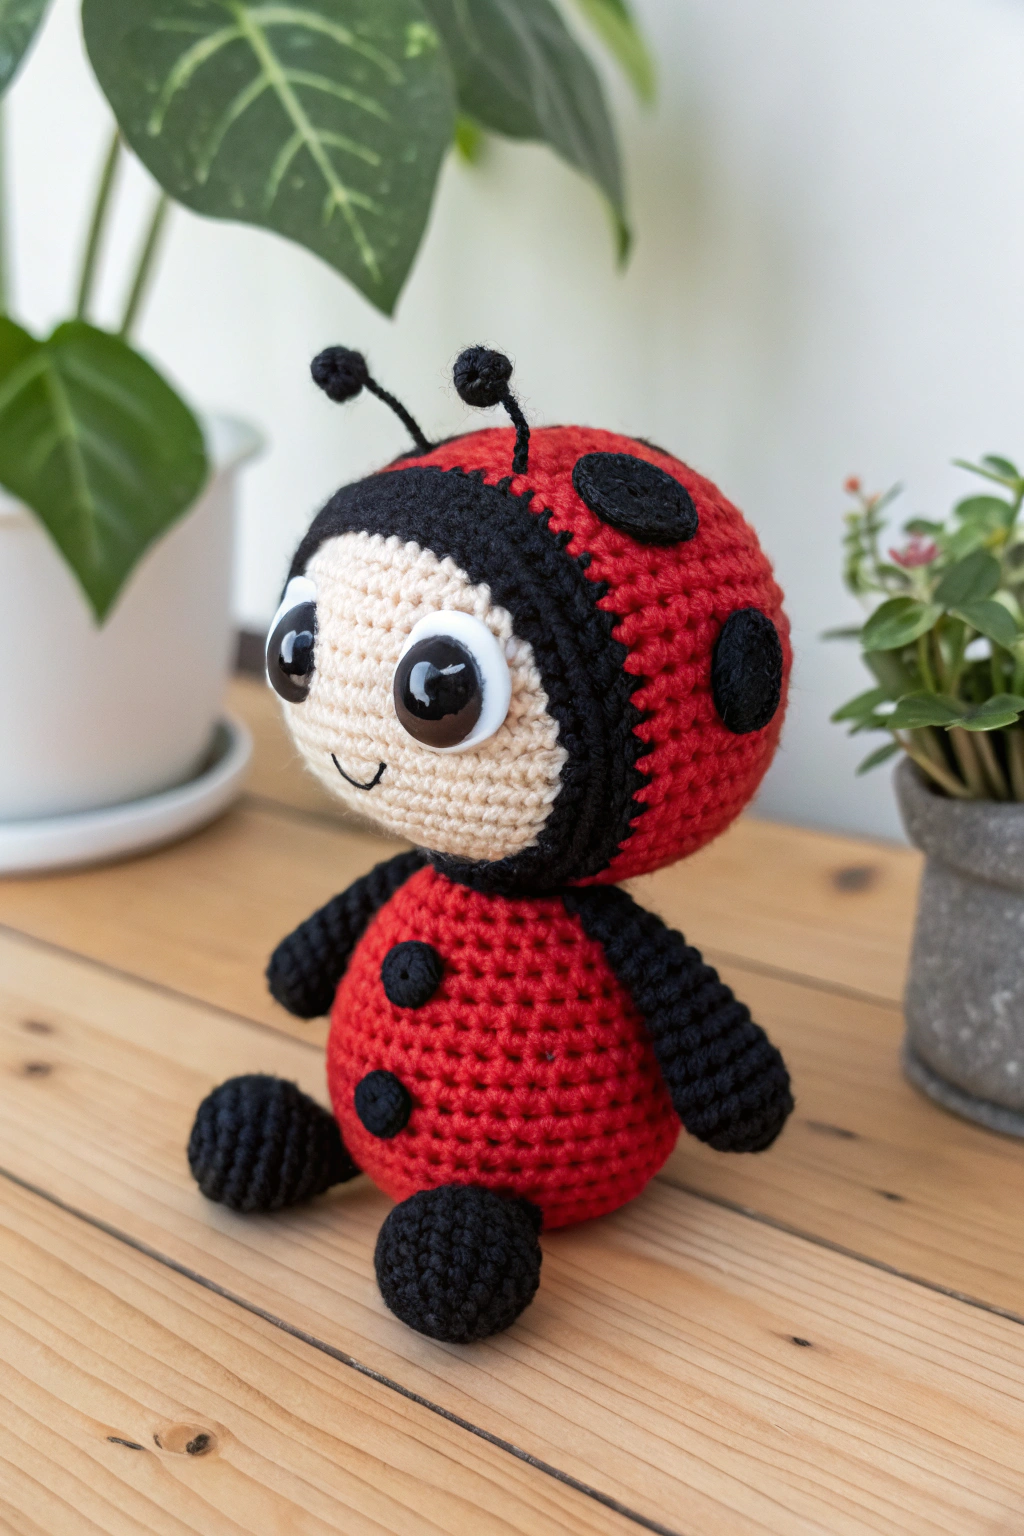
Now is the perfect time to attach the safety eyes. Look at the image to see where the eyes are placed on the ladybug’s head. They are positioned on the lower half of the cream-colored head. Count approximately 5 rounds down from the top of the head and space the eyes about 7 stitches apart. Push the posts of the safety eyes through the crochet fabric from the front to the back, and then secure them on the inside with the washers provided with the eyes. Make sure they are firmly attached.
Rounds 9-14: Completing the Head
We’re almost done with the head! Now we’ll fashion the back of the head and start closing it up.
- Rounds 9-13: Single crochet in each stitch around for 5 rounds. This continues to build the sphere shape. You’ll still have 42 stitches in each of these rounds.
- Round 14: *Single crochet in the next 5 stitches, then decrease over the next 2 stitches.* Repeat from * to * around. “Decreasing” means we’re reducing the number of stitches. To decrease, insert your hook into the next stitch, yarn over and pull through (two loops on hook), insert your hook into the next stitch, yarn over and pull through (three loops on hook), yarn over and pull through all three loops. That’s a decrease! You’ll have 36 stitches after this round.
Rounds 15-19: Decreasing and Stuffing
We’ll continue decreasing to close up the head and form its final shape.
- Round 15: *Single crochet in the next 4 stitches, then decrease over the next 2 stitches.* Repeat from * to * around. You’ll have 30 stitches.
- Round 16: *Single crochet in the next 3 stitches, then decrease over the next 2 stitches.* Repeat from * to * around. You’ll have 24 stitches.
- Round 17: *Single crochet in the next 2 stitches, then decrease over the next 2 stitches.* Repeat from * to * around. You’ll have 18 stitches.
- Round 18: *Single crochet in the next stitch, then decrease over the next 2 stitches.* Repeat from * to * around. You’ll have 12 stitches.
- Round 19: Decrease over every 2 stitches around. You’ll have 6 stitches left.
Now it’s time to stuff the head firmly with fiberfill. Make sure it’s nice and plump to give the ladybug a good shape.
Closing the Head
To close up the head completely, cut the yarn, leaving a tail for sewing. Thread the yarn tail onto your yarn needle. Weave the needle through the front loops only of the remaining 6 stitches, going all the way around. Then pull the yarn tail tight to close the hole completely. Secure the yarn tail by weaving it in and out of the stitches a few times, and then trim the excess yarn.
Crafting the Ladybug’s Body
Next, we’ll make the red body of the ladybug, which is shaped similarly to the head, but with different color and stitch counts.
Rounds 1-8: Starting and Shaping the Body
Just like the head, we’ll start with a magic ring and increase to shape the body. Use red yarn for the body.
- Round 1: Magic ring, 6 single crochet in the ring. (6 stitches)
- Round 2: Increase in each stitch around. (12 stitches)
- Round 3: *Single crochet in the next stitch, increase in the next stitch.* Repeat around. (18 stitches)
- Round 4: *Single crochet in the next 2 stitches, increase in the next stitch.* Repeat around. (24 stitches)
- Round 5: *Single crochet in the next 3 stitches, increase in the next stitch.* Repeat around. (30 stitches)
- Round 6: *Single crochet in the next 4 stitches, increase in the next stitch.* Repeat around. (36 stitches)
- Round 7: *Single crochet in the next 5 stitches, increase in the next stitch.* Repeat around. (42 stitches)
- Round 8: Single crochet in each stitch around. (42 stitches)
Rounds 9-16: Building the Body Length
Now we’ll build the length of the body by crocheting several rounds without increasing or decreasing.
- Rounds 9-16: Single crochet in each stitch around for 8 rounds. You’ll have 42 stitches in each round.
Rounds 17-24: Decreasing and Stuffing the Body
Just like the head, we’ll decrease to close up the body.
- Round 17: *Single crochet in the next 5 stitches, decrease over the next 2 stitches.* Repeat around. (36 stitches)
- Round 18: *Single crochet in the next 4 stitches, decrease over the next 2 stitches.* Repeat around. (30 stitches)
- Round 19: *Single crochet in the next 3 stitches, decrease over the next 2 stitches.* Repeat around. (24 stitches)
- Round 20: *Single crochet in the next 2 stitches, decrease over the next 2 stitches.* Repeat around. (18 stitches)
- Round 21: *Single crochet in the next stitch, decrease over the next 2 stitches.* Repeat around. (12 stitches)
- Round 22: Decrease over every 2 stitches around. (6 stitches)
- Rounds 23-24: Single crochet in each stitch around for 2 rounds. (6 stitches) These rounds will form a small base for the body.
Stuff the body firmly with fiberfill.
Closing the Body
Close the body in the same way you closed the head: cut the yarn, leaving a tail for sewing, thread the yarn needle, weave through the front loops of the remaining 6 stitches, pull tight, and secure the yarn tail.
Making the Black Border and Spots
Now we’ll add the black details that really fashion the ladybug’s classic look. We’ll construct a black border around the head and make the spots for the body and head.
The Black Head Border
Using black yarn, we’ll develop a border around the cream-colored face part of the head. Look at the image to see how the black border frames the face. With black yarn and your crochet hook, attach the black yarn to the edge where the cream head meets the red body. You can do this by making a slip knot on your hook, inserting the hook into a stitch on the edge, yarn over, and pull through. Then, single crochet around the edge of the cream face, forming a neat black border. When you reach the starting point, slip stitch to join the round, and fasten off, leaving a short tail to weave in. A slip stitch is a very simple stitch used to join rounds or move yarn across stitches – insert hook, yarn over, and pull directly through both loops on your hook. Fasten off means to finish off your crochet work – cut the yarn, pull the loop on your hook wider to undo the last stitch, and pull the yarn tail through to secure it.
Fashioning the Black Spots
Now we’ll make the black spots. We’ll craft 7 spots in total: 3 for the head and 4 for the body, as you can see in the image.
For each spot, using black yarn:
- Round 1: Magic ring, 6 single crochet in the ring. (6 stitches)
- Round 2: Increase in each stitch around. (12 stitches)
- Round 3: Single crochet in each stitch around. (12 stitches)
- Fasten off, leaving a tail for sewing.
Make 7 of these little black circles.
Assembling the Ladybug
Now for the exciting part – assembling all the pieces to construct our ladybug!
Attaching the Head and Body
First, we’ll join the head and body. Position the head on top of the body, aligning them as shown in the image. Using the cream yarn tail from the head (or a new strand of cream yarn if you’ve already woven it in) and your yarn needle, sew the head to the body using whip stitches. Whip stitch is a simple stitch for joining pieces – bring the needle up through both pieces of fabric from back to front, then wrap the yarn around the edge and bring the needle back down through both pieces. Go all the way around, securing the head firmly to the body.
Sewing on the Spots
Next, sew on the black spots. Look at the image to see the placement of the spots on the head and body. Arrange the 3 spots on the red part of the head and the 4 spots on the red body in a ladybug-like pattern. Use black yarn and your yarn needle to sew each spot securely to the ladybug using whip stitches or a similar stitch.
Making the Antennae
Now we’ll fashion the cute little antennae. Use black yarn.
For each antenna (make 2):
- Chain 10. A chain stitch is the foundation of most crochet projects – make a slip knot on your hook, yarn over, pull through the loop on your hook. Repeat this to form a chain. Chain 10 means making 10 chain stitches.
- Single crochet in the second chain from the hook and in each chain across. This gives the antennae a bit more substance.
- Fasten off, leaving a tail for sewing.
To attach the antennae, fold each chain in half to form a loop at the top. Sew the base of the antennae to the top of the ladybug’s head, just behind the black border, as you can see in the image.
Crafting the Legs
Let’s make the ladybug’s little legs. Use black yarn.
For each leg (make 6):
- Round 1: Magic ring, 6 single crochet in the ring. (6 stitches)
- Round 2: Increase in each stitch around. (12 stitches)
- Fasten off, leaving a tail for sewing.
Make 6 little black balls for the legs. Sew legs on each side of the ladybug’s body, on the underside, as shown in the image.
Fashioning the Smile
Finally, let’s develop the ladybug’s sweet smile! Using black yarn and your yarn needle, embroider a small, curved smile just below the eyes on the cream face. Embroidery is like drawing with yarn – use your needle to make small stitches to form the smile shape. Keep it simple and charming.
Your Adorable Ladybug is Ready!
Congratulations! You have just fashioned your very own crocheted ladybug! Isn’t it satisfying to see something so cute that you made with your own hands? Take a moment to admire your creation – the careful stitches, the charming details, and the overall cuteness.
This little ladybug is perfect as a gift, a desk buddy, or just a delightful handmade treasure for yourself. Now that you’ve developed these skills, imagine all the other wonderful things you can make with crochet!
We would absolutely love to see your ladybug creations! Please share photos of your finished ladybugs – it brings so much joy to see what you assemble. Happy crocheting, and remember, every stitch is a step towards something wonderful!