Dreamy Cloud and Star Baby Mobile You Can Make
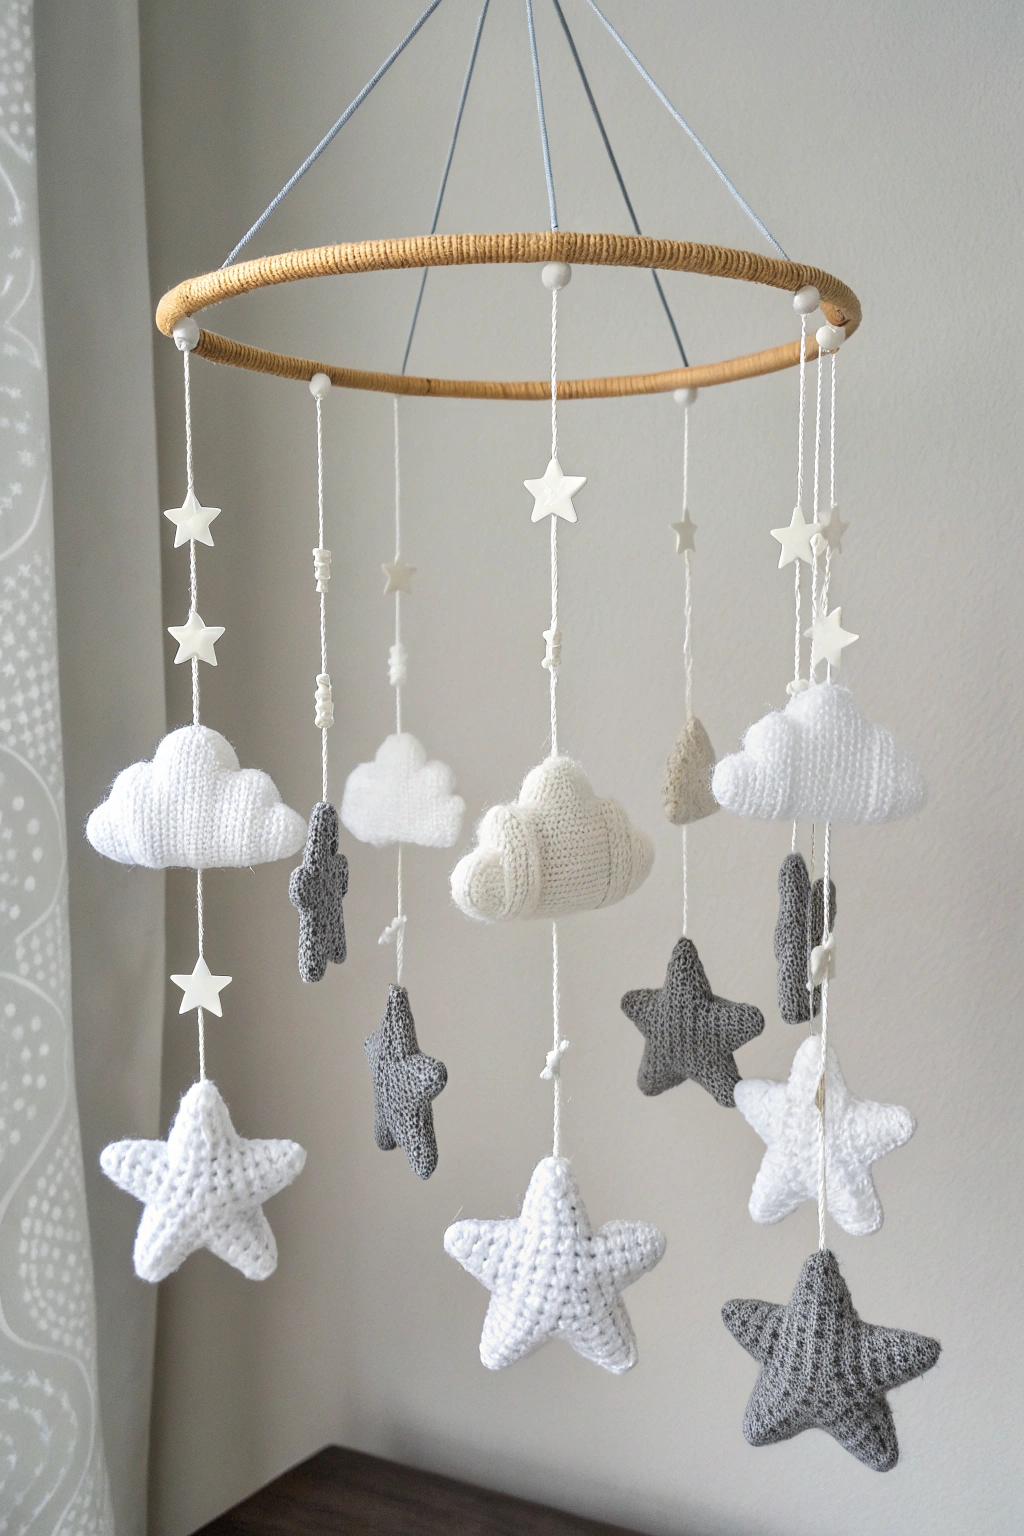
Are you looking for a heartwarming project that’s as fun to make as it is adorable? Get ready to dive into the delightful world of handmade baby mobiles! Today, we’re going to embark on a journey to fashion a charming crocheted cloud and star mobile, just like the one you see in the picture. This project is perfect for anyone wanting to add a personal touch to a nursery or build a thoughtful gift for expecting parents. Even if you’re completely new to crocheting and knitting, don’t worry! We’ll guide you through every step with simple, easy-to-understand instructions. Let’s get started and craft something truly special with our own hands!
Let’s Gather Our Supplies
Before we begin this exciting making adventure, let’s gather all the materials we’ll need. Having everything ready will make the process smooth and enjoyable! For this project, we will need:
- 🧶 Yarn: We’ll need soft yarn in white, light gray, and a creamy beige color. Cotton or wool yarn works wonderfully and feels lovely to the touch.
- 🪡 Crochet Hook: A crochet hook, size 3.5mm or 4mm will be perfect for the stars and connecting elements.
- 🥢 Knitting Needles: We’ll also need knitting needles, size 3.5mm or 4mm, for the clouds. Straight needles will work best for this project.
- ☁️ Stuffing: Soft toy stuffing to give our clouds and stars their plump, cuddly shape.
- ⭕ Wooden Ring: A wooden ring, about 8-10 inches in diameter, will form the base of our mobile.
- 🧵 String or Yarn: Thin white string or yarn to hang the clouds and stars from the ring.
- ⚪ Wooden Beads: Small wooden beads to add a decorative touch to the strings and the top of the mobile.
- ✂️ Scissors: Sharp scissors for cutting yarn and string.
- 針 Yarn Needle: A yarn needle with a large eye to weave in the ends of your yarn and assemble the pieces.
Forming the Knitted Clouds
Let’s begin by fashioning the fluffy clouds that will drift gently in our mobile. If you’ve never knitted before, don’t fret! Knitting is simply using two needles to interloop yarn and develop fabric. We’ll focus on the basic knit stitch, which is the foundation of knitting.
Knitting a Cloud Shape
To make the clouds, we’ll use the knit stitch to shape them. Look closely at the image – you’ll notice the clouds are soft and rounded. We’ll build this shape using increases and decreases. Increases make the knitted fabric wider, and decreases make it narrower.
- Cast On: To start, we need to form a row of loops on our needle – this is called casting on. Cast on about 20 stitches using your white yarn and knitting needles. If you’re unsure how to cast on, imagine making a simple loop around your needle and then repeating that process until you have 20 loops. These loops are your starting stitches.
- Knit Rows: Now, we will knit every row. The knit stitch is made by inserting your right needle into the front of the first stitch on your left needle, wrapping the yarn around the right needle, and pulling it through to produce a new stitch. Slide the old stitch off the left needle. Repeat this for every stitch on the row. Do this for several rows, maybe about 10-12 rows, to start developing the body of the cloud. This will give you a rectangular shape to begin with.
- Shaping the Cloud – Round Top: To construct the rounded top of the cloud, we need to gently decrease stitches. To decrease, knit two stitches together (k2tog). This means you insert your right needle into two stitches at once and knit them as one. Do a decrease (k2tog) at the beginning and end of every other row for a few rows. Refer to the image – you can see the top of the cloud starts to curve inwards.
- Shaping the Cloud – Curved Bottom: To fashion the curved bottom, we’ll use increases. To increase, you can use a simple increase like knitting into the front and back of the same stitch (kfb). Do an increase (kfb) at the beginning and end of every other row for a few rows. Observe in the image how the bottom of the cloud curves outwards.
- Continue Shaping: Keep alternating between rows of knitting straight, decrease rows (for top curve), and increase rows (for bottom curve), always referring to the image to guide your shape. You are essentially sculpting the cloud with your knitting needles! Don’t worry if it’s not perfect at first – practice makes perfect!
- Cast Off: Once you’re happy with the cloud shape, it’s time to cast off. Casting off is how we finish the knitted piece so it doesn’t unravel. Knit two stitches, then pass the first stitch over the second stitch and off the needle. Knit one stitch, then pass the previous stitch over the current stitch. Repeat until only one stitch remains. Pull the yarn through the last loop and tighten it to secure.
- Make More Clouds: Produce a few clouds in white, light gray, and creamy beige, varying their sizes slightly for a more organic look, just like in the picture. You can adjust the number of cast-on stitches and rows to achieve different cloud sizes.
- Stuffing the Clouds: Now it’s time to give our flat knitted shapes some volume! Take your toy stuffing and gently fill each cloud until it’s plump and soft. Don’t overstuff them, you want them to be nicely shaped but not too rigid.
- Sewing the Clouds Closed: Using your yarn needle and yarn, neatly sew the bottom opening of each cloud closed. Weave in the ends of your yarn to hide them inside the cloud, making it neat and tidy.
Crafting the Crocheted Stars
Next, we’ll assemble the sparkling stars using crochet. Crochet uses a single hook to loop yarn and form fabric. If you are new to crochet, we’ll start with the basics.
Crocheting a Star Shape
To make the stars, we’ll use basic crochet stitches. Look at the stars in the image – they have a lovely textured surface. We’ll develop these using rounds of crochet stitches.
- Slip Knot: Start by making a slip knot. This is like the first knot you make when tying your shoelaces, but on your crochet hook. Make a loop, insert your hook, yarn over (wrap the yarn around your hook), and pull through the loop.
- Chain (ch): Next, we’ll fashion a chain. Yarn over and pull the yarn through the loop on your hook. Repeat this to produce a chain of 5 stitches. This is the center of our star.
- Slip Stitch (sl st) to Join: To join the chain into a ring, insert your hook into the first chain stitch you made, yarn over, and pull through both loops on your hook. This closes the ring.
- Round 1: Single Crochet (sc): Now, we’ll work in rounds. Single crochet is a basic crochet stitch. Insert your hook into the ring, yarn over, pull up a loop (you’ll have two loops on your hook), yarn over again, and pull through both loops. This is a single crochet stitch. Construct 10 single crochet stitches into the ring. Slip stitch to join the round to the first single crochet stitch.
- Round 2: Points of the Star: Now we’ll build the points of the star. We’ll use a combination of chain stitches and double crochet stitches to form each point. If you’ve never done a double crochet, it’s a taller stitch than single crochet and gives a more open look. To double crochet (dc), yarn over, insert your hook into the stitch, yarn over, pull up a loop (three loops on hook), yarn over, pull through two loops (two loops on hook), yarn over, pull through the last two loops.
- Point 1: Chain 5, then in the second chain from the hook, single crochet, single crochet in the next chain, half double crochet in the next chain (a stitch halfway between single and double crochet – yarn over, insert hook, pull up a loop, yarn over, pull through all three loops), double crochet in the last chain. Slip stitch into the next single crochet stitch of Round 1.
- Repeat this step four more times to make a total of five points around the star. You will slip stitch into the next single crochet stitch after each point to move to the next position for the following point.
- Finishing Off: After the last point, slip stitch to the first stitch of the round. Fasten off your yarn by cutting it, pulling the loop on your hook to make a knot, and then pull the yarn end tight.
- Make More Stars: Produce stars in white and gray, varying sizes by adding or subtracting stitches in Round 1 or adding more rows to the points, just as you see different sized stars in the image.
- Stuffing the Stars: Just like the clouds, gently stuff each star with toy stuffing until they are plump but not overly firm.
- Sewing the Stars Closed: Use your yarn needle and yarn to neatly sew closed any opening at the base of the star points. Weave in all yarn ends to keep your stars looking neat.
Assembling the Mobile
Now for the exciting part – putting everything together to assemble our beautiful mobile!
Preparing the Wooden Ring
- Wrap the Ring: Take your creamy beige yarn and let’s wrap the wooden ring. This gives it a lovely finished look, just like in the image. Tie the yarn onto the ring with a knot. Then, start wrapping the yarn tightly and evenly around the ring, overlapping each wrap slightly to cover the wood completely.
- Secure the Yarn: Once the entire ring is wrapped, cut the yarn and carefully tuck the end under the wrapped yarn, securing it neatly. You can use a dab of glue if needed to keep it firmly in place, but often, tucking it in tightly is enough.
Attaching Strings, Clouds, and Stars
- Cut Strings: Cut lengths of white string or yarn for hanging the clouds and stars. Look at the image – the strings are different lengths, creating a staggered effect. Cut about 8-10 strings, varying their lengths from about 12 inches to 24 inches.
- Attach Strings to Ring: Evenly space the strings around the wooden ring. Tie each string securely to the ring. You can use a simple knot or a lark’s head knot for a neat look. The image shows the strings are attached at regular intervals around the ring.
- Add Beads to Strings: Before attaching the clouds and stars, let’s add some wooden beads! Thread a wooden bead onto each string and slide it up towards the wooden ring. You can add more beads at different points along the strings if you like, mirroring the design in the image. Secure beads in place by knotting the string below them if needed.
- Attach Clouds and Stars to Strings: Now, it’s time to attach the clouds and stars to the ends of the strings. Sew each cloud and star to the bottom of a string using your yarn needle and yarn. Make sure they are securely attached so they won’t fall off. Arrange them as shown in the image, alternating clouds and stars and varying their heights by using different string lengths.
- Top Hanging Strings: To hang the mobile, cut three or four longer pieces of string (about 30-36 inches each). Attach these evenly spaced around the wooden ring, and then gather the tops together and tie them in a knot. Slide a few wooden beads onto these top strings above the knot for a decorative finish, just like you see in the image. This will be used to hang your beautiful mobile.
Finishing Touches and Enjoying Your Handiwork
Congratulations! You’ve just fashioned your very own crocheted cloud and star baby mobile! Take a moment to admire your creation (the finished mobile, not the act of making it) – you made something truly beautiful and heartfelt with your own hands.
Hang your mobile in a nursery, and watch as the clouds and stars gently sway, bringing a touch of handmade magic to the space. Feel free to experiment with different yarn colors or add other small crocheted or knitted shapes to personalize your mobile even further!
We’d absolutely love to see your versions of this dreamy mobile! Share photos of your makes with us – it’s so inspiring to see how everyone puts their own special touch on these projects. Happy crafting, and may your making journey always be filled with joy and satisfaction!