Delicious Halal Strawberry Cheesecake Bars
Get ready to bake a truly delightful treat! These Strawberry Cheesecake Bars are surprisingly easy to put together at home and are perfect for sharing with family and friends. This recipe is designed for beginner bakers, so don’t worry if you’ve never baked before. Let’s learn how to make these beautiful and delicious halal dessert bars step by step.
Halal Ingredients You’ll Need
Here is a list of everything needed to prepare these tasty bars. You can find all of these ingredients at most grocery stores.
- 🍪 1 ½ cups graham cracker crumbs (about 10 full sheets of graham crackers)
- 🧈 ⅓ cup unsalted butter, melted
- 🍚 ¼ cup granulated sugar
- 🧀 8 ounces cream cheese, softened
- 🥛 1 (14 ounce) can sweetened condensed milk
- 🍋 ¼ cup lemon juice, freshly squeezed
- 🥄 1 teaspoon alcohol free vanilla extract
- 🍓 1 pound fresh strawberries, hulled and sliced
- 🔴 1 cup strawberry jelly or jam
- 💧 2 tablespoons water
Kitchen Equipment You’ll Need
These are the basic tools needed in the kitchen to make this recipe.
- 🥣 Mixing bowls (medium and large)
- 🥄 Measuring spoons
- measuring cups
- 🫙 Liquid measuring cup
- 🥄 Spatula or wooden spoon
- 🖐️ Hands (clean!) or food processor (optional, for crushing graham crackers)
- 9×13 inch baking pan
- 📄 Parchment paper (optional, for easier removal)
- 🔪 Knife
- 🥄 Tablespoon or spoon for spreading
Let’s Learn Basic Kitchen Techniques
Before starting, it’s helpful to understand a few simple cooking terms we’ll be using in this recipe. Don’t worry, they are all very easy!
Melting Butter: “Melting” butter means changing it from a solid to a liquid. The easiest way to melt butter is in the microwave. Place the butter in a microwave-safe bowl and heat it in short bursts, like 30 seconds at a time, until it’s completely liquid. You can also melt butter in a small saucepan on the stovetop over low heat. Be sure to watch it carefully so it doesn’t burn.
Softened Cream Cheese: Cream cheese is usually sold cold and firm in the refrigerator. “Softened” cream cheese means letting it sit at room temperature for about 30 minutes to an hour until it becomes softer and easier to mix. It should be soft enough that you can easily press your finger into it. This is important because softened cream cheese mixes smoothly into the cheesecake filling without lumps.
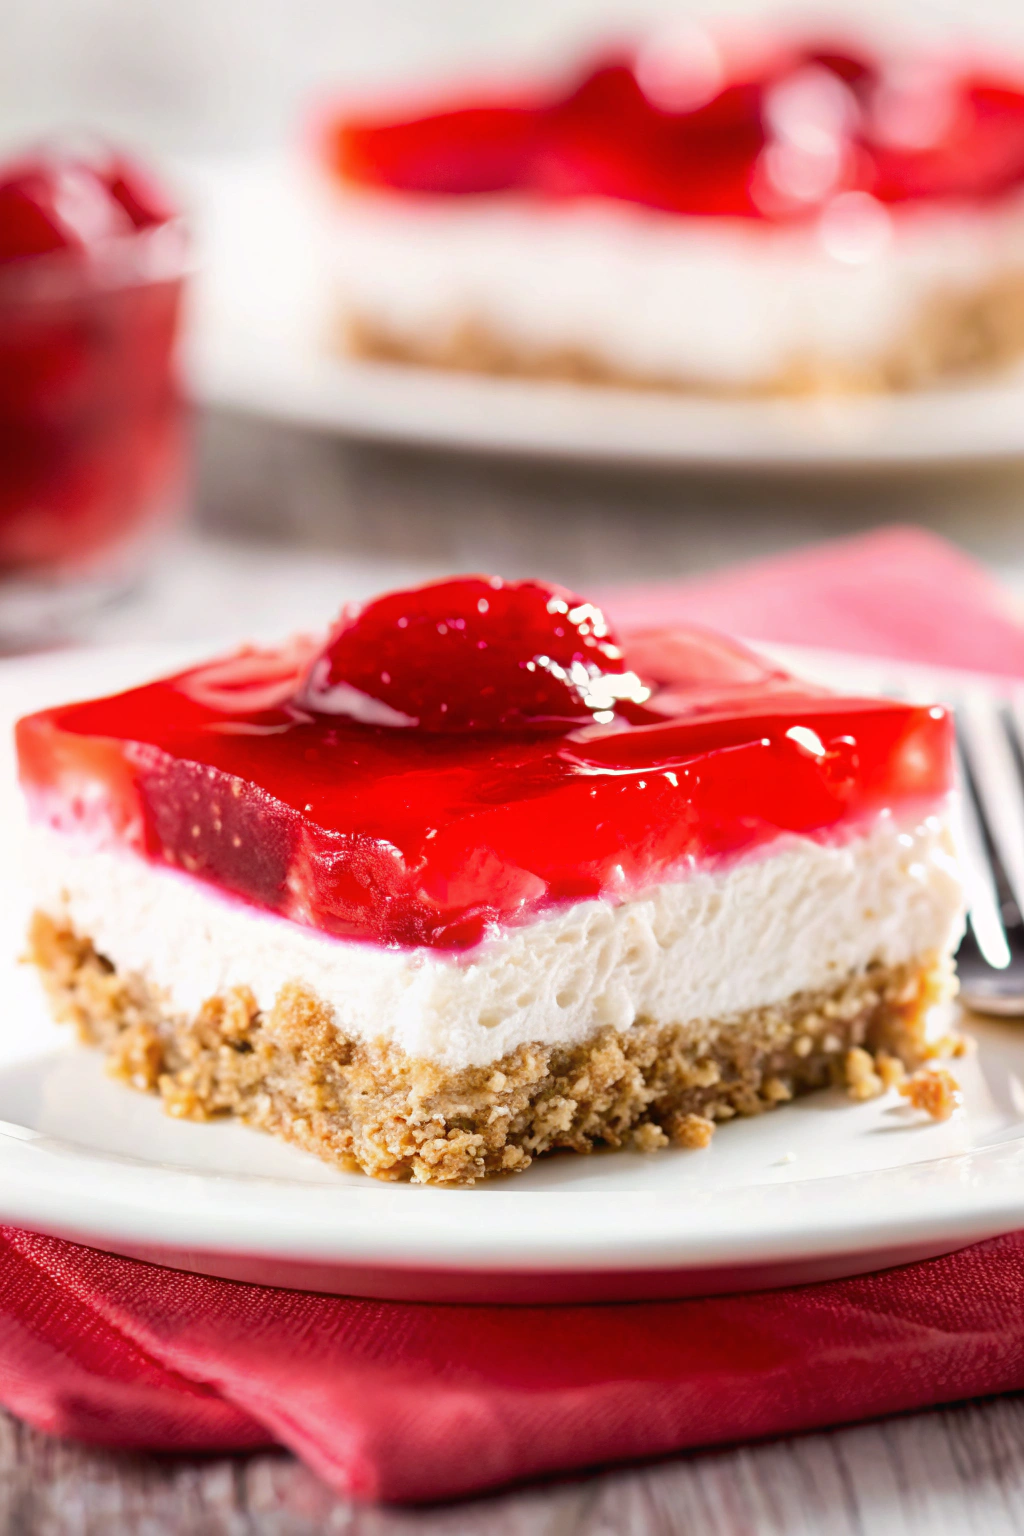
Crushing Graham Crackers: Graham crackers are used to make the crust for these bars. “Crushing” them means breaking them down into small crumbs. You can do this in a couple of ways. The easiest way is to put the graham crackers in a resealable plastic bag and then use your hands or a rolling pin to crush them into fine crumbs. Alternatively, if you have a food processor, you can pulse the graham crackers in the food processor until they become crumbs. Refer to the image; the crust has a crumbly texture, so aim for finely crushed graham crackers.
Mixing Ingredients: “Mixing” ingredients simply means combining them together. You can mix ingredients using a spoon, a spatula, or an electric mixer. For this recipe, we’ll mostly be using a spatula or spoon to gently combine the ingredients. We want to mix until everything is just combined, meaning there are no large streaks of any single ingredient left.
Chilling: “Chilling” refers to placing food in the refrigerator to cool it down and make it firm. In this recipe, chilling is important to help the cheesecake bars set properly and become firm enough to cut into squares.
Step 1: Making the Crust
This first step is all about preparing the base for our delicious cheesecake bars – the graham cracker crust!
Step 1: First, get your graham crackers ready. If you are crushing them by hand, place the graham crackers in a resealable plastic bag. Seal the bag and then use your hands or a rolling pin to crush them into fine crumbs. If using a food processor, place the graham crackers inside and pulse until they are finely crumbled. You need 1 ½ cups of these crumbs.
Step 2: In a medium mixing bowl, put the graham cracker crumbs, melted butter, and sugar. Use a spatula or spoon to mix these ingredients together until they are evenly combined and moistened. This mixture will look a bit like wet sand.
Step 3: Take your 9×13 inch baking pan. If you want to make it extra easy to remove the bars later, you can line the pan with parchment paper. Parchment paper is special paper that prevents food from sticking. Leave some parchment paper hanging over the sides of the pan – this will act like handles to lift the bars out later. This step is optional but helpful.
Step 4: Pour the graham cracker crumb mixture into the prepared baking pan. Use your fingers or the bottom of a measuring cup to press the crumbs evenly into the bottom of the pan. You want to make a firm, even layer for the crust. Refer to the image; you can see the crust layer at the bottom of the cheesecake bar. Once you’ve pressed the crust, set the pan aside for now.
Step 2: Preparing the Cheesecake Filling
Now we will prepare the creamy and smooth cheesecake filling that goes on top of the crust.
Step 1: In a large mixing bowl, place the softened cream cheese and sweetened condensed milk. Use a spatula or spoon to mix these together until they are very smooth and creamy. Make sure there are no lumps of cream cheese.
Step 2: Add the lemon juice and vanilla extract to the cream cheese mixture. Mix again until everything is well combined and smooth. The lemon juice adds a nice little tang that balances the sweetness, and the vanilla enhances the flavor.
Step 3: Pour the cheesecake filling evenly over the prepared graham cracker crust in the baking pan. Use a spatula to gently spread the filling to make sure it covers the crust completely and is smooth on top.
Step 3: Assembling and Chilling
This step is about putting everything together and then letting the refrigerator do its magic!
Step 1: Take your sliced strawberries and arrange them evenly over the top of the cheesecake filling. You can make rows of strawberries or just scatter them randomly – it’s up to you! Refer to the image; you can see strawberries nestled into the red topping.
Step 2: Now it’s time to chill the cheesecake bars. “Chilling” simply means putting it in the refrigerator to get cold and firm. Place the baking pan with the assembled cheesecake bars in the refrigerator.
Step 3: Let the cheesecake bars chill in the refrigerator for at least 4 hours, or even better, overnight. This chilling time is very important! It allows the cheesecake filling to become firm and set properly, so you can cut nice, clean bars later.
Step 4: Making the Strawberry Topping
While the cheesecake bars are chilling and becoming firm, we can prepare the shiny strawberry topping.
Step 1: In a small saucepan, combine the strawberry jelly or jam and water.
Step 2: Place the saucepan over low heat on the stovetop. Gently heat the jelly mixture, stirring occasionally with a spoon, until the jelly is completely melted and smooth. This usually only takes a few minutes. Be careful not to let it boil. We just want to melt the jelly to make it pourable.
Step 3: Once the jelly is melted and smooth, remove the saucepan from the heat and let it cool slightly for a few minutes. It should be warm but not hot when you pour it over the cheesecake.
Step 4: After the cheesecake bars have chilled for at least 4 hours, take them out of the refrigerator. Slowly and carefully pour the slightly cooled strawberry jelly mixture evenly over the strawberries and cheesecake filling. Use a spoon to gently spread the jelly to ensure it covers the entire surface. Refer to the image; notice the smooth, shiny red topping.
Step 5: Place the cheesecake bars back in the refrigerator to chill for another 1-2 hours, or until the strawberry topping is also set and firm. This final chilling makes sure the topping is not runny when you cut the bars.
Cutting and Serving
The final step is to cut these beautiful bars and get ready to enjoy them!
Step 1: Once the cheesecake bars are completely chilled and firm, remove them from the refrigerator.
Step 2: If you lined the pan with parchment paper, use the overhanging parchment paper to lift the entire cheesecake bar slab out of the pan and onto a cutting board. If you didn’t use parchment paper, you can cut the bars directly in the pan.
Step 3: Use a sharp knife to cut the cheesecake bars into squares or rectangles. You can cut them into about 12-16 bars, depending on how big you want them. For cleaner cuts, you can dip your knife in warm water and wipe it clean between each cut.
Step 4: Arrange the Strawberry Cheesecake Bars on a serving plate and they are ready to serve! These are best served cold straight from the refrigerator. Enjoy the delightful combination of the crumbly crust, creamy cheesecake, and sweet strawberry topping!
These homemade Halal Strawberry Cheesecake Bars are a wonderful treat to prepare and share. They are a testament to the joy of making delicious food in your own kitchen. Don’t be afraid to try this recipe, even if you are new to baking. With these simple steps, anyone can put together these beautiful and tasty bars. We encourage you to make these Strawberry Cheesecake Bars and experience the satisfaction of baking something special from scratch. Share your baking creations with friends and family and enjoy the smiles they bring!