Cozy Pom-Pom Baby Hat Project
Ever wanted to make something adorable and snuggly with your own hands? Well, get ready to cast on because we’re going to fashion the cutest pom-pom baby hat you’ve ever seen! This project is perfect for beginners, and imagine the joy of gifting a handmade treasure to a little one you love. Let’s dive into this fun and rewarding knitting adventure together!
Materials You’ll Need
Before we begin, let’s gather our supplies. Having everything ready will make the making process smooth and enjoyable.
- 🧶 Yarn: You’ll need medium-weight yarn in three colors: pink, white, and grey. Look for soft, baby-friendly yarn – merino wool or acrylic blends are great choices.
- 🪡 Knitting Needles: Size US 7 (4.5 mm) circular knitting needles, 16 inches (40 cm) long. Circular needles are easier for knitting hats in the round, which is how we’ll construct this cozy hat.
- ✂️ Scissors: For snipping yarn.
- 📏 Measuring Tape: To check your hat size as you develop it.
- 📍 Yarn Needle or Tapestry Needle: For weaving in the yarn ends and attaching the pom-poms.
- Pom-pom maker (optional): While you can make pom-poms with cardboard, a pom-pom maker can simplify the process, especially for beginners.
Getting Started: Let’s Learn to Knit!
If you’re completely new to knitting, don’t worry! It might seem a bit like magic at first, but with a little patience and practice, you’ll be crafting beautiful things in no time. We’ll go through each basic step slowly and clearly.
Understanding Knitting Needles and Yarn
Knitting needles are like your tools for building fabric with yarn. You’ll be using circular needles, which are two needles connected by a flexible cord. This is perfect for hats because you knit in a circle, avoiding seams! Yarn is simply the string you use to knit. It comes in different weights and materials. For this hat, we’re using medium-weight yarn, which is a good starting point for beginners.
Casting On: The First Step
Casting on is how you get the yarn onto your needles to start knitting. Think of it as forming the first row of stitches that will become the brim of your hat.
- Make a slip knot: Hold the yarn and make a loop. Insert your fingers into the loop, grab the yarn coming from the ball, and pull it through the loop. Tighten gently to form a knot – this is your slip knot. Place the slip knot onto your knitting needle.
- The Thumb Method: Hold the needle with the slip knot in your right hand. Drape the yarn coming from the ball over your left thumb, going from back to front. Hold the tail of the yarn (the short end) and the yarn from the ball in your left hand, securing them with your fingers.
- Scoop and Pull: Insert the right needle into the loop on your thumb from below, scoop the yarn from the ball (which is around your index finger) with the needle tip, and pull it through the loop on your thumb. Slide the new stitch onto the left needle. Repeat this process until you have 96 stitches cast on. These stitches are now ready to be knitted! Refer to online videos if you find it easier to learn visually – searching for “long tail cast on” will show you many helpful demonstrations.
The Knit Stitch: The Foundation
The knit stitch is the most basic stitch in knitting. It’s like the bricks you use to build a wall. Most of our hat will be fashioned using knit stitches.
- Hold the needles: Hold the needle with the cast-on stitches in your left hand and the empty needle in your right hand.
- Insert needle: Insert the right needle into the first stitch on the left needle from front to back.
- Wrap yarn: Wrap the yarn coming from the ball around the right needle tip counter-clockwise (from left to right).
- Pull through: Bring the right needle tip with the wrapped yarn through the stitch, forming a new loop.
- Slip off: Slide the old stitch off the left needle. You have now completed one knit stitch! The new stitch is now on your right needle.
The Purl Stitch: The Backside of Knit
The purl stitch is another basic stitch, and it’s essentially the reverse of the knit stitch. When you alternate knit and purl stitches, you can produce different textures.
- Hold the needles: Hold the needle with the stitches in your left hand and the empty needle in your right hand.
- Insert needle: Bring the yarn to the front of your work (between you and the needles). Insert the right needle into the first stitch on the left needle from back to front.
- Wrap yarn: Wrap the yarn around the right needle tip clockwise (from right to left).
- Pull through: Bring the right needle tip with the wrapped yarn through the stitch, forming a new loop.
- Slip off: Slide the old stitch off the left needle. You have now completed one purl stitch!
Rib Stitch: For Stretchy Edges
Rib stitch is a combination of knit and purl stitches that forms a stretchy, vertical ribbed texture. It’s perfect for the brim of a hat because it helps it fit snugly and comfortably. We’ll use a 1×1 rib, which means alternating one knit stitch and one purl stitch.
To knit 1×1 rib: * Knit 1 stitch, purl 1 stitch. Repeat from * to the end of the round.
Stockinette Stitch: The Classic Look
Stockinette stitch is a classic, smooth fabric that’s often used for sweaters and hats. It’s developed by knitting every stitch in every round when working in the round. You’ll see the “V” shapes of the knit stitches on the front of the fabric.
To knit stockinette stitch in the round: Knit every stitch in every round.
Decreasing: Shaping Your Hat
Decreasing stitches means reducing the number of stitches to shape your knitting. For a hat, we decrease towards the top to form the rounded crown. We’ll use a simple decrease called “knit two together” (k2tog).
To knit two together (k2tog): Insert your right needle into the next TWO stitches on the left needle as if to knit them together. Wrap the yarn and pull through both stitches at once. You’ve now decreased two stitches into one.
Binding Off: Finishing Your Work
Binding off is how you secure the last row of stitches so your knitting doesn’t unravel. It’s like constructing the final edge of your project.
- Knit two stitches.
- Pass the first stitch over the second: Insert the left needle into the first stitch on the right needle and lift it over the second stitch and off the needle. One stitch is now bound off.
- Knit one more stitch: You should now have one stitch on your right needle. Knit one more stitch, so you have two stitches again.
- Repeat steps 2 and 3: Continue passing the first stitch over the second and knitting one stitch until only one stitch remains on your right needle.
- Cut yarn and pull through: Cut the yarn, leaving a tail of about 6 inches. Pull the yarn tail through the last stitch and tighten to secure.
Making Pom-Poms: The Fun Fluffy Toppers
Pom-poms are those fun, fluffy balls of yarn that add a playful touch to hats. You can fashion them easily using a pom-pom maker or even just cardboard circles.
Using a pom-pom maker (if you have one): Follow the instructions that come with your pom-pom maker. Generally, you wrap yarn around the maker, close it, cut the yarn along the edge, and tie it tightly in the center before removing the maker and fluffing the pom-pom.
Making pom-poms with cardboard (easy method):
- Cut two cardboard circles: Cut out two circles of cardboard, about 3 inches in diameter. Cut a smaller circle out of the center of each to form donut shapes.
- Wrap yarn: Hold the two cardboard donuts together and start wrapping yarn around and through the center hole. Keep wrapping until the donut is thick with yarn.
- Cut and tie: Carefully cut the yarn along the outer edge of the cardboard donuts. Slide scissors between the two cardboard pieces and tie a piece of yarn tightly around the center of all the yarn strands, between the cardboard pieces. Tie it very securely!
- Remove cardboard and fluff: Remove the cardboard donuts and fluff your pom-pom! Trim any uneven strands to shape it nicely.
Weaving in Ends: Tidying Up
Weaving in ends is the final step to make your knitted piece look neat and professional. It means hiding all the loose yarn tails so they don’t unravel and are invisible. Use a yarn needle to weave the yarn tails into the back side of your knitting, following the path of the stitches. Weave in different directions to secure them well, then trim off any excess yarn.
Step-by-Step Guide to Knitting Your Pom-Pom Baby Hat
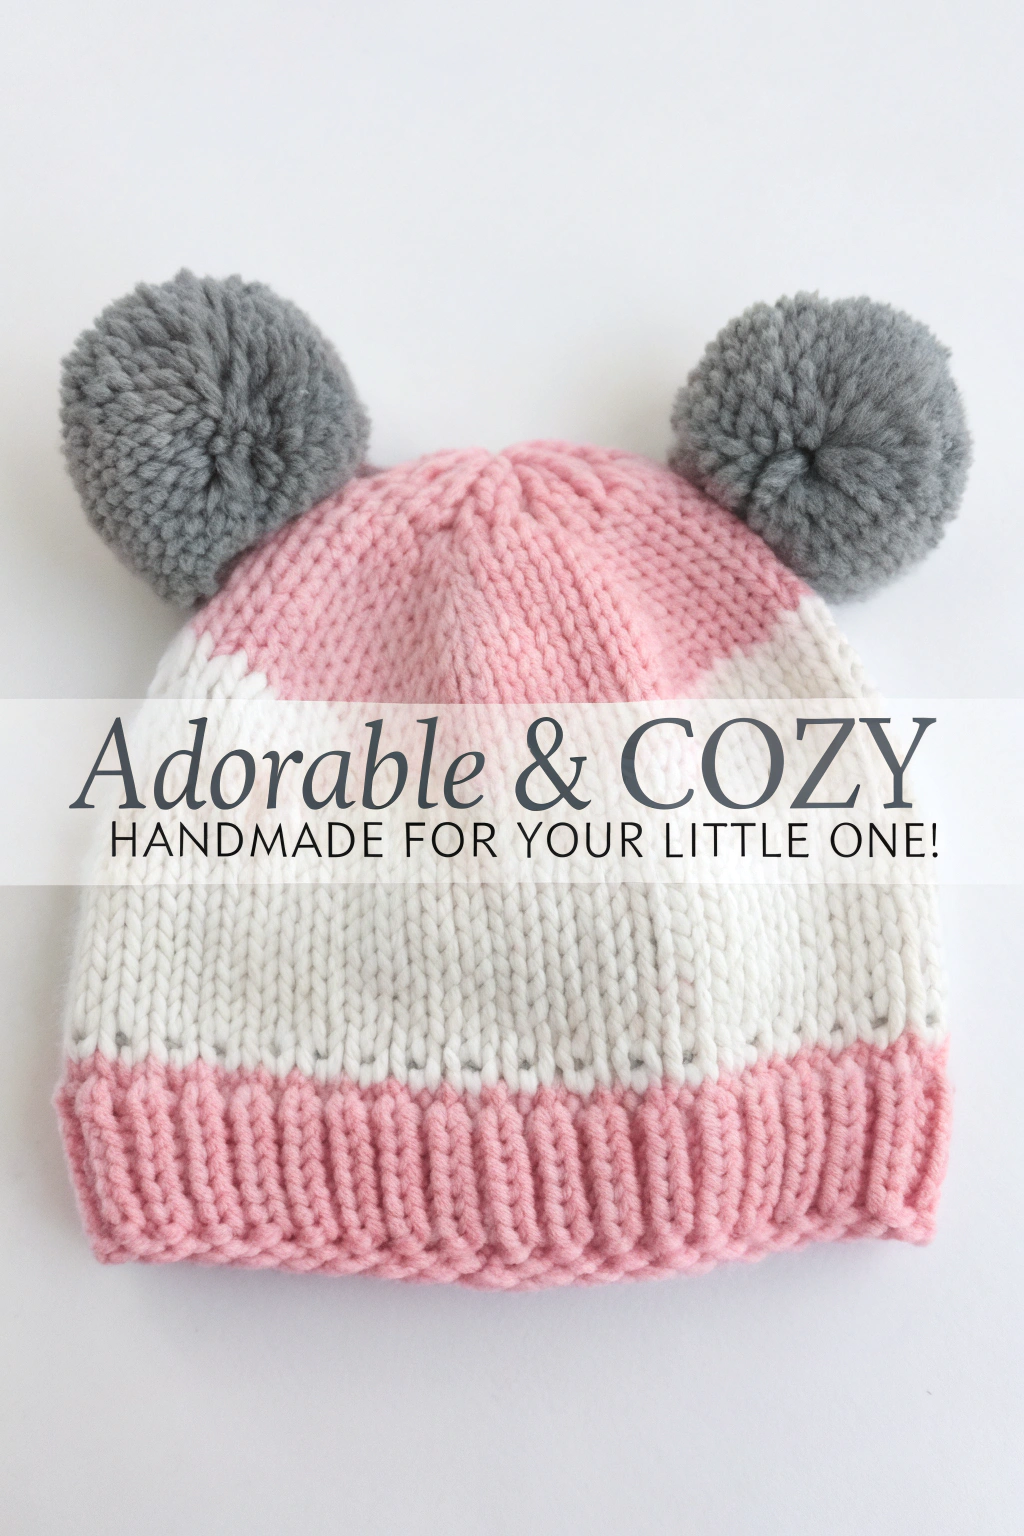
Now that you’ve learned the basics, let’s put it all together and make our adorable pom-pom baby hat! Refer to the image to see how the colors and stitches come together. The hat in the image uses pink, white, and grey colors, with a ribbed brim, stockinette body, and pom-poms. We will construct a hat just like it!
Round 1: Casting On and Setting Up the Brim
- Using pink yarn, cast on 96 stitches onto your circular needles using the long-tail cast-on method we discussed.
- Join in the round: Make sure your stitches are not twisted on the needle. Knit the first stitch on your left needle together with the last stitch on your right needle to join the round. This forms a continuous circle of knitting. Place a stitch marker at the beginning of the round if you have one, to help you keep track of your rounds.
Rounds 2-14: Knitting the Ribbed Brim
- Round 2-14: Knit 1 stitch, purl 1 stitch. Repeat from * to * around each round. This 1×1 ribbing will fashion the stretchy brim of your hat. Continue these rounds until your brim measures approximately 2 inches (5 cm) tall. You can observe in the image that the brim is pink and has this ribbed texture.
Rounds 15-40: Forming the White Body in Stockinette
- Change to white yarn: Cut the pink yarn, leaving a tail to weave in later. Attach the white yarn by tying a knot with the pink yarn tail, or using a Russian join or similar yarn joining technique (look these up online if you want a neater join).
- Round 15-40: Knit every stitch. This is stockinette stitch in the round. Knitting every stitch will produce the main body of the hat in smooth white fabric, as you can see in the image. Continue knitting until the white section measures approximately 4 inches (10 cm) tall, or about half the total hat height before decreases.
Rounds 41-55: Adding the Pink Top Section
- Change to pink yarn: Cut the white yarn, leaving a tail. Attach the pink yarn as you did before, joining it to the white yarn.
- Round 41-55: Knit every stitch. Continue knitting in stockinette stitch with pink yarn. This section, as shown in the image, will be the top part of the hat before we start decreasing to shape the crown. Knit until this pink section measures approximately 2 inches (5 cm) tall.
Rounds 56-60: Decreasing for the Hat Crown
Now we will start decreasing stitches to develop the rounded top of the hat.
- Round 56: Knit 10 stitches, knit 2 stitches together (k2tog). Repeat from * to * around the round. You will decrease 8 stitches in this round (96 stitches – 8 = 88 stitches).
- Round 57: Knit every stitch.
- Round 58: Knit 9 stitches, knit 2 stitches together (k2tog). Repeat from * to * around the round. You will decrease 8 stitches (88 stitches – 8 = 80 stitches).
- Round 59: Knit every stitch.
- Round 60: Knit 8 stitches, knit 2 stitches together (k2tog). Repeat from * to * around the round. You will decrease 8 stitches (80 stitches – 8 = 72 stitches).
Continue decreasing in this manner, reducing the number of knit stitches between each k2tog in every decrease round, and knitting plain rounds in between, until you have decreased significantly and have only about 20-30 stitches left. For very young babies, you may want to decrease more to make the top tighter. Observe in the image how the top of the hat is shaped by these decreases.
Finishing: Binding Off and Closing the Top
- Bind off: Bind off all remaining stitches using the bind-off method we learned earlier.
- Close the top: Cut the yarn, leaving a long tail (about 12 inches). Thread the yarn tail onto your yarn needle. Draw the yarn needle through all the remaining stitches on the needle, pulling them off the needle as you go. Pull the yarn tight to close the hole at the top of the hat. Securely sew the hole closed by weaving the yarn end around the gathered stitches a few times.
Fashioning the Pom-Poms
- Make two grey pom-poms: Using the grey yarn and your preferred pom-pom making method (pom-pom maker or cardboard), fashion two fluffy pom-poms. Make them approximately 2-3 inches (5-7.5 cm) in diameter, similar in size to those in the image.
Attaching the Pom-Poms and Weaving in Ends
- Attach pom-poms: Position the pom-poms on the top corners of the hat, as seen in the image, resembling ears. Use the yarn tails from making the pom-poms to securely sew them to the hat. Attach them firmly so they won’t come off easily.
- Weave in all ends: Use your yarn needle to weave in all the yarn tails from color changes and casting on/binding off on the inside of the hat. Make sure all ends are secure and hidden. Trim any excess yarn.
Tips for Beginner Knitters
- Tension is key: Try to keep your yarn tension even as you knit. Not too tight, not too loose. Consistent tension will help produce even stitches and a beautiful fabric.
- Count your stitches: Especially at the beginning! Count your stitches after each of the first few rounds to make sure you haven’t accidentally added or dropped any stitches.
- Don’t be afraid to frog (rip out): If you make a mistake, don’t be afraid to gently unravel your knitting (called “frogging” – rip-it, rip-it!). It’s part of learning, and it’s better to fix mistakes early.
- Practice makes perfect: The more you knit, the easier it will become. Don’t get discouraged if it feels awkward at first. Keep practicing, and you’ll be amazed at how quickly you improve.
Share Your Handmade Hat!
Congratulations! You’ve just made your very own cozy pom-pom baby hat! Isn’t it satisfying to fashion something beautiful with your own hands? Imagine the warmth and love knitted into every stitch! We’d absolutely love to see your finished hats. Share photos of your creations – we can’t wait to admire your handmade masterpieces! Happy knitting!