Cozy Knit Baby Cardigan: A Beginner-Friendly Guide
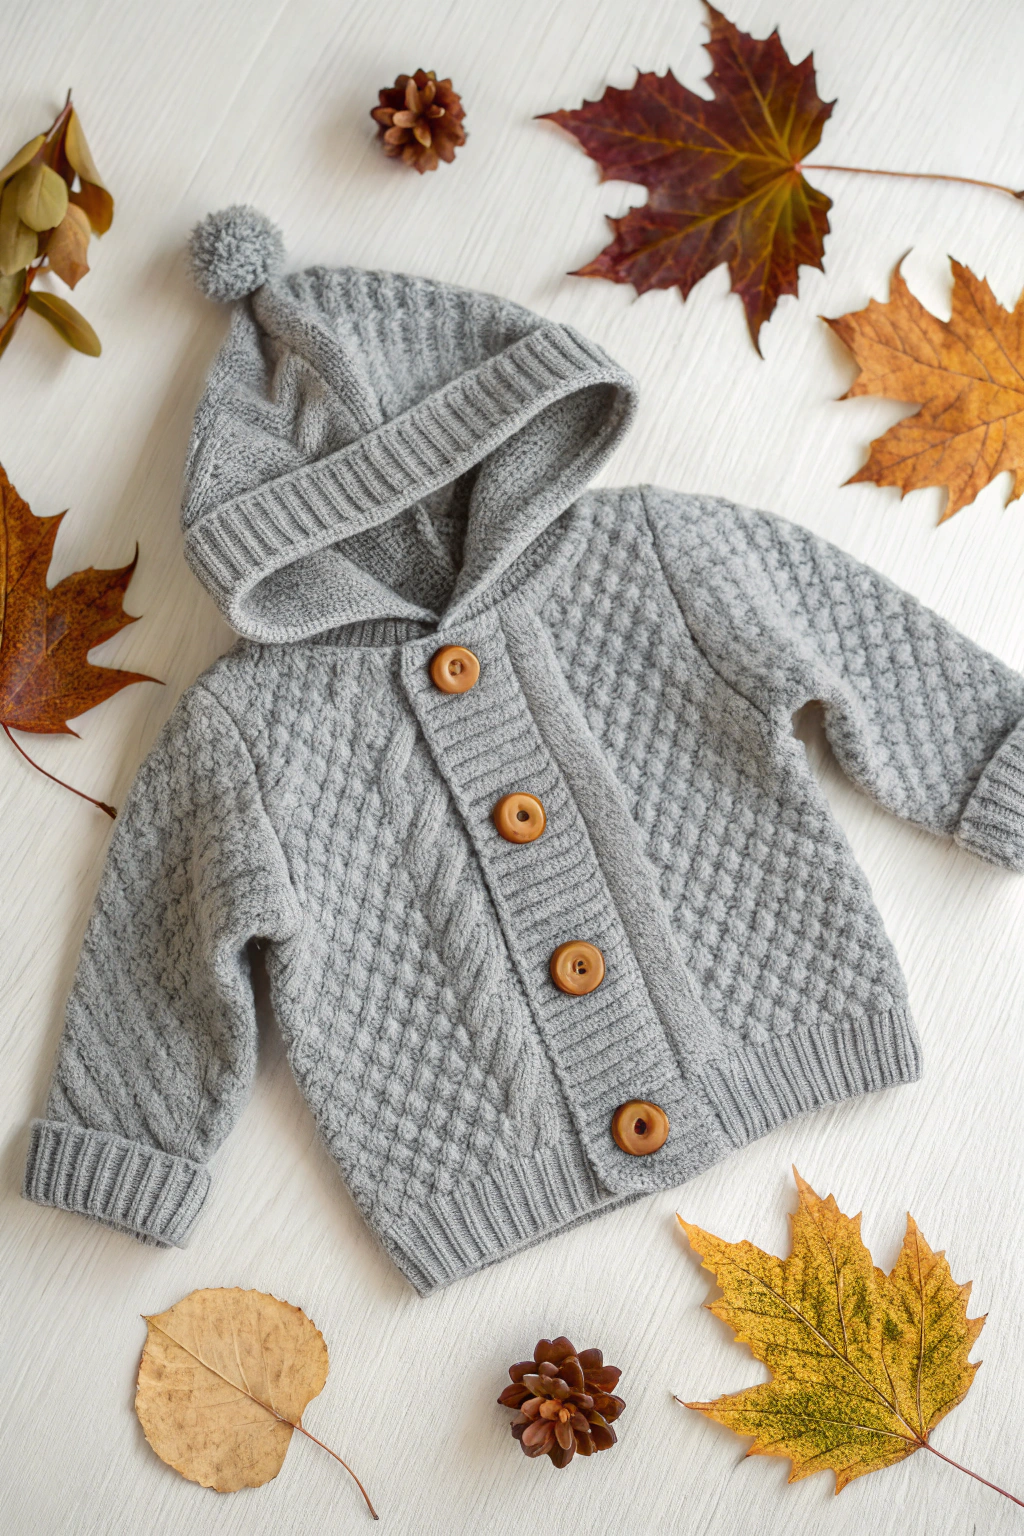
Isn’t this little hooded cardigan in the picture just the sweetest thing? Imagine making something like this yourself! Knitting might seem a bit mysterious at first, but trust me, it’s like learning to ride a bike – a little wobbly at the start, but so rewarding once you get going. And the feeling of creating something warm and cozy with your own hands? Absolutely magical! We’re going to take it super slow and easy, step by step, so even if you’ve never picked up knitting needles before, you can make a beautiful baby cardigan.
Important Note: The gorgeous cardigan in the picture is knitted with some more advanced techniques, like a lovely diamond or lattice stitch pattern and cable details. For this tutorial, we’re going to learn how to make a simpler, beginner-friendly version using garter stitch. This means we’ll be knitting every row, which is the easiest stitch for beginners! While our cardigan might not have the exact same stitch pattern as the picture, it will still be wonderfully cozy, super cute, and give you a fantastic introduction to knitting. Think of this as your first step in a wonderful knitting journey!
This project is perfect for a heartfelt handmade gift or just to treat a special little one (maybe even your own!). The soft, gentle texture of a knitted cardigan is just perfect for baby’s delicate skin, and the hood adds an extra touch of warmth and cuteness. Let’s dive in and start our knitting adventure together with this easy garter stitch version!
What You’ll Need to Get Started
Before we begin our knitting journey, let’s gather all the treasures we need for our craft. Think of it like preparing your artist’s palette! Here’s what you’ll need to create your very own cozy beginner-friendly baby cardigan:
- 🧶 Yarn: You’ll want to choose a soft, gentle yarn that’s made for babies. Look for something labeled “baby yarn” or “soft wool” or “cotton blend” in a light grey color, just like the cardigan in the image. About 300-400 yards should be plenty.
- 🪡 Knitting Needles: We’ll need a pair of knitting needles, size US 6 (4mm) should work perfectly with most baby yarns. These needles are like your magic wands for creating stitches!
- Buttons: You’ll need four buttons, about 0.75 inch in diameter. Wooden buttons, like the ones in the picture, give a lovely natural look.
- 🧵 Tapestry Needle: This is a needle with a large eye and a blunt tip. It’s like a sewing needle, but for yarn, and it helps us weave in loose ends and sew seams neatly.
- ✂️ Scissors: A sharp pair of scissors to cut your yarn.
Let’s Learn the Basic Stitches (For Our Simple Version)
If you’ve never knitted before, don’t worry! We’re focusing on the very basics for our easy garter stitch cardigan. Knitting is made up of just a few simple moves that are repeated to create fabric. Think of it like learning the alphabet before you write a story!
The Knit Stitch: The Only Stitch You Need for This Project!
For our beginner cardigan, we’re only going to use the knit stitch! It’s the most fundamental stitch in knitting and perfect for learning. It creates a ‘V’ shape in your knitted fabric, and when you knit every row (garter stitch), it creates a lovely textured fabric that’s easy to make. Here’s how you do it:
- Hold one knitting needle in your left hand and the other in your right hand. Imagine the left needle is holding stitches you’ve already made, and the right needle is going to make new ones.
- Make a slip knot (a simple loop) on your left needle – this is your first stitch.
- Hold the yarn in your right hand.
- Insert the right needle from front to back into the first stitch on your left needle. Think of it like you’re poking the right needle ‘into’ the stitch.
- Wrap the yarn counter-clockwise around the tip of the right needle. Imagine you are making a little circle around the needle tip with the yarn.
- Use the right needle to pull this loop of yarn through the stitch on the left needle. It’s like you’re pulling the new yarn loop through the old stitch.
- Slide the old stitch off the left needle. You’ve just made a knit stitch! Now there’s a new stitch on your right needle.
Keep practicing these steps. It might feel a little awkward at first, but with a bit of practice, it will become smooth and natural, like riding that bike! And remember, for our cardigan, you’ll be knitting every single row using this stitch!
(We won’t be using the purl stitch for this beginner project, but it’s another basic stitch you can learn later if you want to explore more knitting patterns!)
Casting On: Starting Your Knit
Casting on is how you create the very first row of stitches on your needle. It’s like drawing the first line on a piece of paper before you start drawing a picture! There are many ways to cast on, but here’s a simple beginner-friendly method:
- Make a slip knot and put it on your left needle.
- Hold the needle with the slip knot in your left hand, and the empty needle in your right hand.
- Hold the yarn in your left hand, letting it drape over your left thumb.
- Insert the right needle upwards into the loop on the left needle.
- Bring the yarn from behind and over the right needle tip.
- Pull the yarn down through the loop and onto the right needle.
- Slide the new stitch off the left needle. You’ve cast on one stitch!
- Repeat steps 4-7 until you have the number of stitches you need (we’ll tell you how many later). Each time you do this, you’re adding a new stitch to your right needle.
You’ll see a row of loops forming on your needle. These are your cast-on stitches, ready to be knitted!
Casting Off: Finishing Your Knit
Casting off, also called binding off, is how you finish your knitting so that the stitches don’t unravel. It’s like tying a knot at the end of a thread to stop it from coming undone! Here’s a simple way to cast off:
- Knit two stitches as you normally would. Now you have two stitches on your right needle.
- Insert the left needle into the first stitch on the right needle (the one you knitted first).
- Lift the first stitch over the second stitch and off the needle. Now you have only one stitch left on your right needle.
- Knit one more stitch. Now you have two stitches on your right needle again.
- Repeat steps 2-4: lift the first stitch over the second and off the needle.
- Keep doing this until you have only one stitch left on your right needle.
- Cut the yarn, leaving a tail of about 6 inches.
- Pull the yarn tail through the last stitch and tighten it gently. This secures the last stitch.
Congratulations, you’ve cast off! Your knitting is now finished and won’t unravel.
Knitting the Baby Cardigan: Step-by-Step (Garter Stitch Version)
Now that we know the basic stitches (just the knit stitch for this project!), let’s knit our baby cardigan! We’ll knit it in separate pieces and then sew them together, like building a house from different walls. Refer to the image to see how the different parts fit together. We’re using garter stitch for simplicity – you just knit every row!
Knitting the Back Panel
The back panel is the main part of the cardigan. Let’s start with that:
- Round 1: Cast on 60 stitches onto your needle using the cast-on method we learned. This will be the width of the back of the cardigan.
- Round 2 and all following Rounds: Knit every stitch. Yes, every single stitch! This is called garter stitch. Just keep knitting row after row. In the image, you’ll notice a more textured pattern, but our garter stitch will create a lovely, simple texture too.
- Round (Keep Knitting): Continue knitting every row until your back panel measures about 10 inches long (25 cm). Don’t worry if it’s not exact, baby clothes have a little wiggle room!
- Round (Cast Off): Cast off all stitches using the cast-off method we learned. You’ve finished the back panel!
Knitting the Front Panels (Two Pieces)
We need two front panels for the cardigan, the left and right sides that button up.
- Round 1 (for each front panel): Cast on 30 stitches onto your needle. We’re casting on half the stitches of the back panel because each front panel is about half the width.
- Round 2 and all following Rounds: Knit every stitch (garter stitch), just like the back panel.
- Round (Keep Knitting): Knit until each front panel is the same length as the back panel, about 10 inches (25 cm).
- Round (Cast Off for both): Cast off all stitches for both front panels. Now you have two front pieces that are the same size.
Knitting the Sleeves (Two Pieces)
Now for the sleeves, which will keep baby’s arms warm and cozy.
- Round 1 (for each sleeve): Cast on 30 stitches onto your needle.
- Round 2 and all following Rounds: Knit every stitch (garter stitch).
- Round (Keep Knitting): Knit until each sleeve measures about 7 inches long (18 cm). Sleeves are shorter than the body panels.
- Round (Cast Off for both): Cast off all stitches for both sleeves. You have two sleeves, ready to be attached!
Knitting the Hood
The hood is what makes this cardigan extra cute and warm. The hood in the picture has a ribbed edge (that’s the stretchy-looking part), but for our beginner version, we’ll keep it simple with garter stitch all the way.
- Round 1: Cast on 70 stitches onto your needle. The hood needs to be wider than the neckline.
- Round 2 and all following Rounds: Knit every stitch (garter stitch).
- Round (Keep Knitting): Knit until the hood piece measures about 8 inches (20 cm) long.
- Round (Cast Off): Cast off all stitches. This rectangle will become the hood.
Assembling the Cardigan
Now comes the fun part – putting all the pieces together! We’ll use our tapestry needle and yarn to sew the seams. Think of it like stitching together fabric pieces to make a garment.
- Step 1: Shoulder Seams: Lay the back panel flat, and place the front panels on top, lining up the shoulders. Use your tapestry needle and yarn to sew the shoulder seams together. You’re joining the top edges of the front and back panels.
- Step 2: Sleeve Seams: Fold each sleeve in half lengthwise. Sew along the long edge to create a tube shape for each sleeve.
- Step 3: Attach Sleeves: Now, attach the sleeves to the armholes. Look at the image to see where the sleeves are positioned. Sew each sleeve into the armhole openings on the body of the cardigan.
- Step 4: Hood Seam: Fold the hood piece in half. Sew along the back edge to create the hood shape.
- Step 5: Attach Hood to Neckline: Sew the bottom edge of the hood around the neckline of the cardigan. Make sure it’s centered and evenly attached.
Adding the Buttons and Pompom
Almost finished! Just a few final touches to make it perfect.
- Step 1: Button Placement: Lay one front panel over the other to decide where you want the buttons to go. Look at the image – the buttons are evenly spaced down one front panel. Mark the button positions with pins.
- Step 2: Sew Buttons: Sew the buttons onto one front panel at the marked positions.
- Step 3: Make a Pompom: Take some yarn and wrap it around four fingers many, many times. Carefully slide the yarn off your fingers, keeping the loops together. Tie a piece of yarn tightly around the middle of the loops, like tying a ponytail. Cut through all the loops at both ends to create the pompom fluff. Trim it to make it nice and round.
- Step 4: Attach Pompom: Sew the pompom securely to the very tip of the hood. This adds that extra adorable touch!
You Did It! Enjoy Your Handmade Baby Cardigan (Beginner Style!)
Give yourself a huge pat on the back! You’ve just knitted a beautiful, cozy baby cardigan using garter stitch! Isn’t it amazing what you can create with just yarn and needles? This handmade cardigan is filled with love and care, and it’s sure to keep a little one warm and snug.
Ready for More? Once you feel comfortable with garter stitch, you can start exploring other knitting stitches like the purl stitch and learn how to create ribbing and even textured patterns like the beautiful one in the image! Knitting is a journey of learning and creating, and you’ve taken a wonderful first step.
We’d absolutely love to see your finished cardigans! Share photos of your cozy creations on Pinterest or Instagram. And if you have any questions or get stuck along the way, don’t hesitate to ask. Happy knitting, and enjoy the wonderful world of handmade crafting!