Snuggle-Ready Baby Booties
Hello fellow crafters! Are you ready to dive into the wonderfully cozy world of knitting? If you’ve been dreaming of creating something sweet and handmade, especially for a tiny new arrival, then you’ve come to the right place! Today, we’re going to knit the most precious little baby booties you’ve ever seen. Imagine the joy of gifting these soft, snuggly booties, made with your own two hands. It’s easier than you think, and we’re here to guide you every step of the way, even if you’ve never picked up knitting needles before! Let’s get started and make something truly special.
Gather Your Cozy Supplies
Before we begin our knitting adventure, let’s make sure we have everything we need. Think of gathering your supplies like preparing your ingredients before baking a cake – it makes the whole process smoother and more enjoyable! Here’s what you’ll need to create these adorable baby booties:
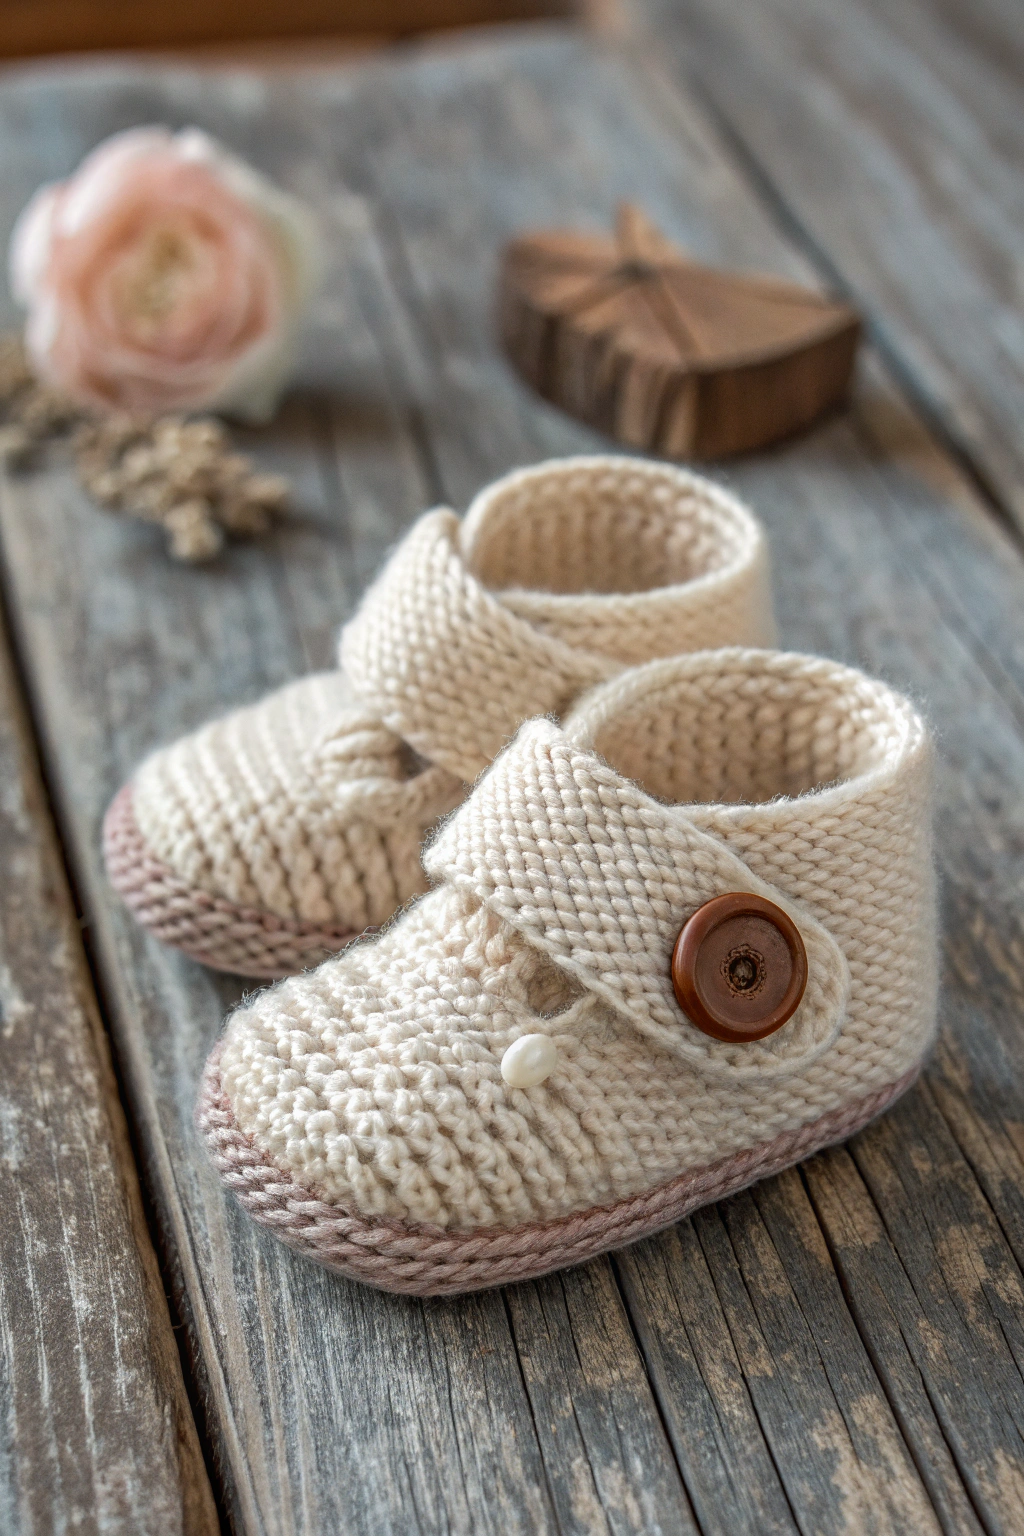
- 🧶 Yarn: Choose a soft, gentle yarn that’s made for babies. Look for “baby yarn” or “fingering weight” yarn in a lovely, light color like the creamy white in the image. About 50 grams of yarn should be plenty for a pair of booties. Think of yarn as the main building block of our booties – we’ll be looping it and shaping it to create the fabric.
- 🪡 Knitting Needles: You’ll need a pair of knitting needles that are the right size for your yarn. Check the yarn label – it usually suggests a needle size. For fingering weight yarn, size US 2 (2.75mm) or US 3 (3.25mm) needles would be a good starting point. Knitting needles are like our tools for shaping the yarn. They help us create those loops and rows that become fabric.
- ✂️ Scissors: Small, sharp scissors are essential for cutting the yarn. These will be handy for starting and finishing our booties.
- 📍 Stitch Markers (optional but helpful): These are little rings that you can place on your knitting needle to mark certain points in your work. For this project, they can help us keep track of the center of our knitting. Think of them as little signposts to guide us as we knit.
- Button: You’ll need one small button to fasten the strap of the bootie. Choose a cute button that complements your yarn color, like the wooden button in the image. Buttons add a lovely finishing touch and make the booties functional.
- 📏 Measuring Tape: A flexible measuring tape will be useful for checking the size of your bootie as you knit. This helps ensure they are just the right size for a baby’s foot.
Let’s Get Knitting! Step-by-Step Guide
Now for the fun part – actually knitting our baby booties! Don’t worry if you’ve never knitted before. We’ll take it one step at a time. Imagine we’re building with yarn, creating fabric row by row.
Step 1: Casting On – Making the First Row of Loops
Casting on is how we start knitting. It’s like creating the very first row of loops on your needle that will form the base of your knitted fabric.
- Make a Slip Knot: First, we need to make a loop on our yarn, called a slip knot. Hold the yarn and make a loop, then bring the yarn end through the loop and tighten it gently. This slip knot is the very first stitch on our needle.
- Place the Slip Knot on the Needle: Slide the slip knot onto one of your knitting needles. Hold the needle with the slip knot in your right hand.
- The Long Tail Cast On: This is a simple way to create more loops on your needle. Hold the needle with the slip knot in your right hand. Drape the yarn over your left thumb and index finger, making a ‘V’ shape. The yarn coming from the ball should be going to your index finger (this is the ‘long tail’).
- Scoop and Loop: Bring the needle tip down and under the yarn on your thumb, then scoop up the yarn from your index finger. Bring the needle tip back through the loop on your thumb, and then release the loop from your thumb. You’ve now created a new loop on your needle! Gently tighten this new loop.
- Repeat: Keep repeating step 4 until you have 35 loops on your needle. These loops are called stitches. Count them carefully to make sure you have the right number. This row of stitches is the foundation of our bootie.
Step 2: Knitting the Garter Stitch – Creating the Sole
We’re going to use a very basic stitch called garter stitch. Garter stitch is super easy because you knit every row. “Knitting” is the basic stitch in knitting, like the foundation of all knitted fabrics.
- The Knit Stitch: Hold the needle with your cast-on stitches in your left hand and your empty needle in your right hand. Insert the right needle into the first stitch on the left needle from front to back.
- Wrap the Yarn: Wrap the yarn (the yarn coming from your ball) around the right needle from back to front.
- Pull Through: Use the right needle to pull the wrapped yarn through the loop, creating a new loop on the right needle. Slip the old stitch off the left needle. You’ve completed one knit stitch!
- Knit Every Stitch: Repeat steps 1-3 for every stitch on your left needle. Once you’ve knitted all the stitches, you’ve completed your first row of garter stitch.
- Turn Your Work: Now, switch needles so the needle with the stitches is in your left hand again. We’re going to knit back across these stitches.
- Continue Garter Stitch: Keep knitting every stitch in every row. Refer to the image – you can see the garter stitch texture creates a nice, slightly bumpy surface. We’re going to knit 20 rows of garter stitch. This rectangle of garter stitch will become the sole of our baby bootie.
Step 3: Shaping the Upper – Creating the Bootie Shape
Now we’ll start shaping the bootie to create the part that goes around the baby’s foot. We’ll still be using the knit stitch, but we’ll be doing some simple shaping.
- Knit 12 Stitches: Knit the first 12 stitches of the row in garter stitch, just like we’ve been doing.
- Place a Stitch Marker: If you have stitch markers, place one on your right needle after you’ve knitted 12 stitches. This marker helps us see where the middle section starts.
- Knit 11 Stitches: Knit the next 11 stitches. This is the middle section of our bootie’s upper.
- Place Another Stitch Marker: Place another stitch marker on your right needle after knitting these 11 stitches.
- Knit Remaining 12 Stitches: Knit the last 12 stitches of the row. You should now have two stitch markers on your needle, separating the row into three sections of 12, 11, and 12 stitches.
- Continue Shaping Rows (Rows 21-34): For the next 14 rows (that’s rows 21 through 34 in total, counting from the very first row we cast on), we’re going to do something slightly different in the middle section.
- Knit the first 12 stitches (up to the first marker) in garter stitch.
- Slip the marker from the left needle to the right needle – just move it over, it’s not knitted.
- Knit the middle 11 stitches in garter stitch.
- Slip the second marker.
- Knit the last 12 stitches in garter stitch.
We are essentially continuing to knit garter stitch across all stitches for these 14 rows, maintaining the marked middle section. You’ll start to see the bootie shape forming. Observe in the image how the main part of the bootie rises up from the sole.
Step 4: Creating the Cuff – The Top Edge
Now we’re going to work on the cuff, the top edge of the bootie that goes around the baby’s ankle. We’ll make it a bit stretchy and ribbed.
- Purl Stitch: We’re going to learn a new stitch called the purl stitch. The purl stitch is like the opposite of the knit stitch and creates a different texture. Hold the needle with your stitches in your left hand. Bring the yarn to the front of your work (towards you).
- Insert Needle from Back to Front: Insert the right needle into the first stitch on the left needle from back to front.
- Wrap the Yarn: Wrap the yarn around the right needle from front to back (opposite to the knit stitch).
- Pull Through: Use the right needle to pull the wrapped yarn through the loop, creating a new loop on the right needle. Slip the old stitch off the left needle. You’ve completed one purl stitch!
- Rib Stitch Pattern: We’re going to use a rib stitch, which is a combination of knit and purl stitches. For the cuff, we’ll do a 1×1 rib, meaning we alternate one knit stitch and one purl stitch.
- Row 35 (and all cuff rows): For the cuff, we’ll knit 10 rows using the 1×1 rib pattern. This means for each row:
- Knit 1 stitch.
- Purl 1 stitch.
- Repeat knit 1, purl 1 across the entire row.
Remember to start each row with a knit stitch. This ribbing will make the cuff stretchy and comfortable around a baby’s ankle.
Step 5: Binding Off – Finishing the Knitting
Binding off is how we finish our knitting so the stitches don’t unravel. It creates a neat finished edge.
- Knit Two Stitches: Knit the first two stitches as you normally would (in knit stitch, since we are finishing off from a knit row in the ribbing).
- Pass the First Stitch Over: Now you have two stitches on your right needle. Use the left needle to lift the first stitch on the right needle (the one you knitted first) and pass it over the second stitch and off the needle. You now have only one stitch on your right needle.
- Knit One Stitch: Knit one more stitch. Now you have two stitches on your right needle again.
- Pass the First Stitch Over Again: Pass the first stitch on the right needle over the second stitch and off the needle, leaving one stitch on the right needle.
- Repeat: Keep repeating steps 3 and 4 – knit one stitch, then pass the previous stitch over – until you have only one stitch left on your right needle.
- Cut the Yarn and Pull Through: Cut the yarn, leaving a tail of about 6 inches. Pull this yarn tail through the last loop on your needle and tighten it gently. This secures the last stitch and prevents unraveling.
Step 6: Creating the Strap and Adding the Button
We’re almost done! Now we’ll make a little strap and add a button to fasten the bootie.
- Pick Up Stitches for the Strap: On one side of the bootie cuff (you can choose either side), we need to pick up stitches to make the strap. Using your knitting needle, carefully insert it into the edge of the cuff and pull through a loop of yarn. Do this along about 7-8 rows of the cuff edge to pick up approximately 8 stitches. These picked-up stitches are now on your needle.
- Garter Stitch Strap: Knit these 8 stitches in garter stitch for about 8 rows or until the strap is long enough to comfortably reach across the bootie to where you want to place the button.
- Bind Off Strap Stitches: Bind off these 8 strap stitches just like we did for the main bootie, leaving a yarn tail.
- Sew in Yarn Tails: Use your yarn needle or crochet hook to weave in all the loose yarn tails on the inside of the bootie. This makes your work neat and secure.
- Attach the Button: Decide where you want to place the button on the bootie to fasten the strap (refer to the image for placement). Sew the button securely onto the bootie using a needle and thread or yarn.
Step 7: Make the Second Bootie!
Congratulations, you’ve made one adorable baby bootie! Now, simply repeat all the steps to make the second bootie to complete the pair. Remember to make the second bootie as a mirror image if you want them to be identical (though for booties, they are often interchangeable).
Share Your Snuggly Creations!
And there you have it – your very own pair of hand-knitted baby booties! Wasn’t that a wonderful crafting journey? Imagine how precious these will look on a little one’s feet. Knitting these booties is not just about creating something practical; it’s about pouring love and care into every stitch. The joy of making something beautiful with your own hands is truly special.
We would absolutely love to see your finished booties! Please share photos of your creations – it brings us so much happiness to see what you make. Happy knitting, and may your needles always click merrily!