Cozy Crocheted Coasters: A Beginner-Friendly Project
Looking for a quick and rewarding crochet project? Learn how to make these charming crocheted coasters and bring a personal touch to your coffee table!
Materials You’ll Need
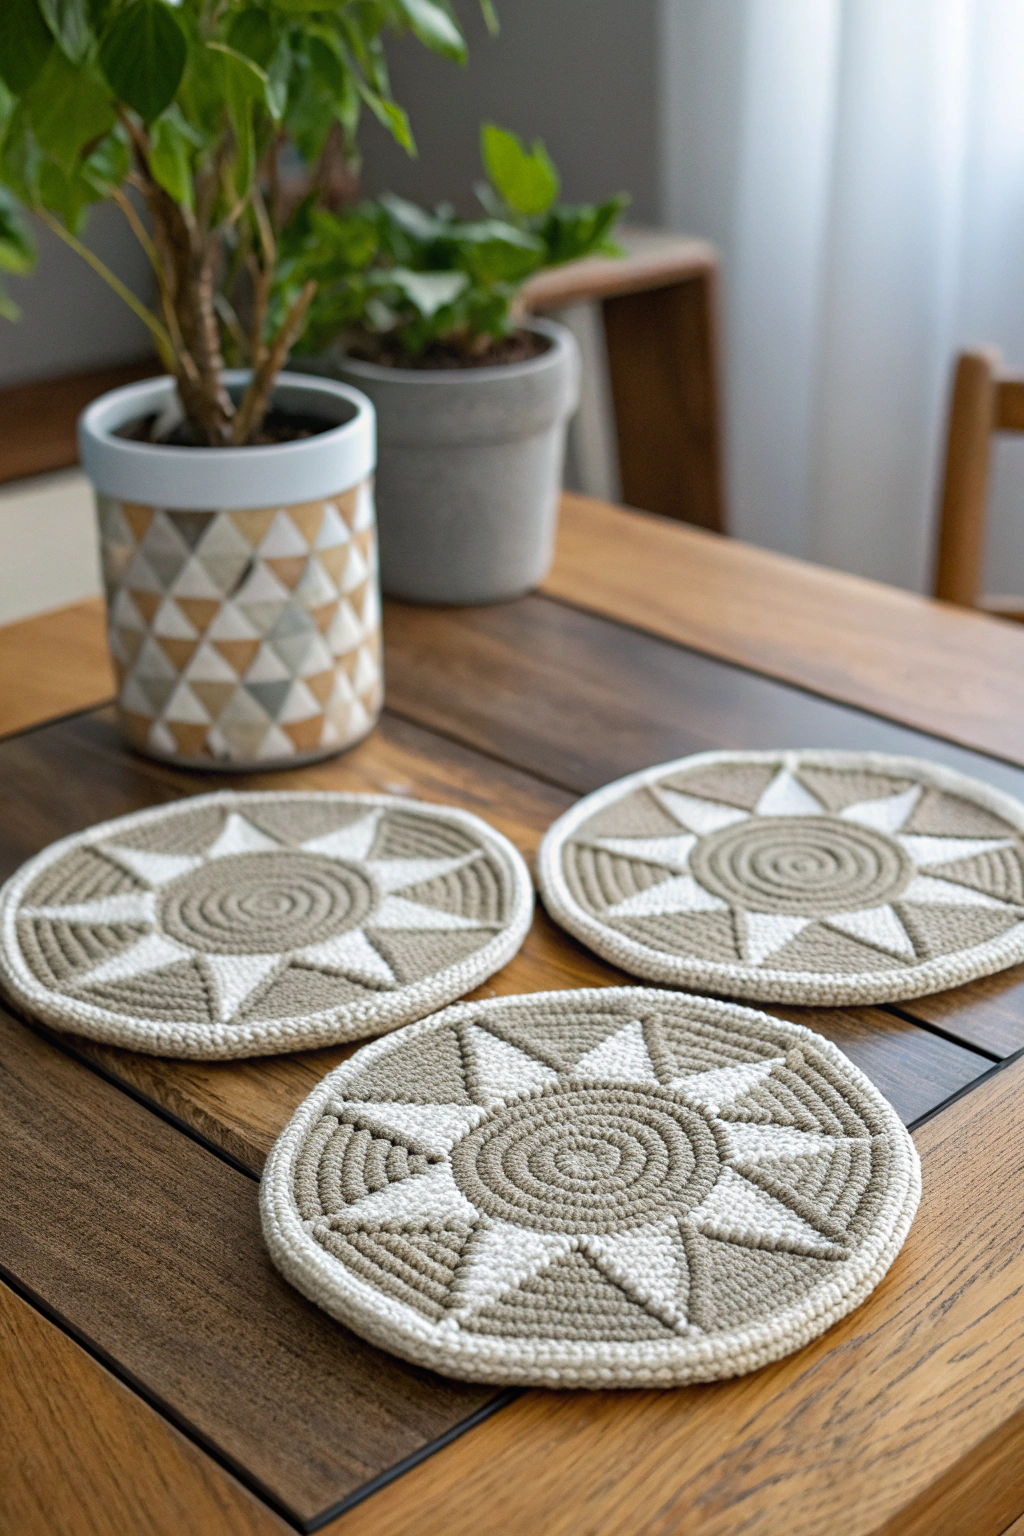
- 🧶 Worsted weight cotton yarn in two contrasting colors (e.g., beige and taupe, as seen in the image)
- 🪡 4.0 mm (G/6) crochet hook
- ✂️ Scissors
- 🧵 Yarn needle for weaving in ends
Let’s Get Started: Step-by-Step Crochet Coaster Tutorial
Creating your own set of crocheted coasters is a delightful way to add a personal touch to your home decor. These coasters are not only functional, protecting your furniture from water rings, but also beautiful handmade pieces you can be proud to display. The simple design, as you can observe in the image, makes this project perfect for beginners eager to learn basic crochet techniques and create something lovely. We will guide you through each step, ensuring even if you’ve never held a crochet hook before, you can successfully make these charming coasters.
Round 1: (Spiral Center – Back Loop Only Technique) To begin, we’ll start with the center of the coaster and create a spiral texture. Make a magic ring (also sometimes called a magic circle). If you’re new to this technique, it’s a way to start crocheting in the round without leaving a hole in the center. To make a magic ring, wrap the yarn around your fingers to form a loop. Then, insert your hook into the loop, yarn over, and pull through to create a slip knot on your hook, but don’t tighten it yet.
Now, chain 1 (ch 1). This chain stitch does not count as a stitch but prepares you for the first round. Next, work 10 double crochet (dc) stitches into the magic ring, but this time, work into the back loop only (BLO) for each double crochet stitch. Working double crochet in the back loop only will create a spiral texture in the center. To double crochet in the back loop only, yarn over, insert your hook into the back loop only of the ring, yarn over, pull up a loop (you’ll have three loops on your hook), yarn over, pull through two loops, yarn over again, and pull through the last two loops.
Repeat this nine more times for a total of 10 double crochet stitches in the ring, always working in the back loop only. After completing the 10 double crochet stitches, gently pull the tail of your magic ring to close the center circle tightly. Finally, join with a slip stitch (sl st) to the first double crochet stitch to close the round.
Round 2: Now we will switch to the lighter yarn color, similar to the beige shade used in the image, to begin creating the star-like points. Fasten off the darker yarn by cutting it and pulling the tail through the last loop on your hook to secure it. Attach the lighter yarn by making a slip knot on your hook with the new yarn. Then slip stitch into any stitch of the previous round.
Chain 1 (ch 1). Again, this chain 1 does not count as a stitch. Then, work 2 single crochet (sc) stitches in each stitch around. Important Note: In this round, we are not continuing with the back loop only technique. We are working normal single crochet (taking both loops of the stitch). To single crochet, insert your hook into the stitch (both loops unless specified otherwise), yarn over, pull up a loop (two loops on hook), yarn over, and pull through both loops.
By working two single crochet stitches in each stitch from the previous round, you will increase the diameter of your coaster. Join with a slip stitch to the first single crochet stitch to close the round.
Round 3: We will continue with the lighter yarn color. Chain 1 (ch 1). Then, in this round, we will create the pointed sections of the star design you see in the image. Work 1 single crochet (sc) in the next stitch, chain 3 (ch 3), skip the next stitch. Repeat this sequence (1 single crochet, chain 3, skip next stitch) for the entire round.
This means you’ll single crochet in one stitch, then create a chain of three stitches, and skip the next stitch below. This combination of single crochet and chain spaces will begin to form the points. You should have 10 chain-3 spaces by the end of this round. Join with a slip stitch to the first single crochet to close the round.
Round 4: Switch back to the darker yarn color, the taupe shade in the image. Fasten off the lighter yarn and attach the darker yarn with a slip stitch to any chain space from the previous round. Chain 1 (ch 1). Now, we’ll work within each chain-3 space to further define the points. Work 3 single crochet (sc) in the chain-3 space, single crochet (sc) in the next single crochet stitch from the previous round. Repeat this sequence (3 single crochet in chain-3 space, single crochet in next single crochet stitch) for the entire round.
This means in each chain space you will place three single crochet stitches, and then you’ll single crochet into the single crochet stitch that separates the chain spaces. You will see the points becoming more defined in this round. Join with a slip stitch to the first single crochet to close the round.
Round 5: Continue with the darker yarn. Chain 1 (ch 1). Work 1 single crochet (sc) in each stitch around. This round is a simple round of single crochet to solidify the shape and size. Join with a slip stitch to the first single crochet to close the round.
Round 6: Switch back to the lighter yarn color. Fasten off the darker yarn and attach the lighter yarn with a slip stitch to any stitch. Chain 1 (ch 1). Work 1 single crochet (sc) in each stitch around. This round adds a lighter border, enhancing the contrast and visual appeal, as seen in the image. Join with a slip stitch to the first single crochet to close the round.
Round 7: Continue with the lighter yarn. Chain 1 (ch 1). For the final round, we’ll create a simple, textured edge. Work slip stitch (sl st) in the next stitch, chain 1 (ch 1). Repeat this sequence (slip stitch in next stitch, chain 1) for the entire round. This creates a delicate picot-like edge. Join with a slip stitch to the first slip stitch. Fasten off and weave in all your yarn ends using the yarn needle.
To weave in ends, thread the yarn tail onto your yarn needle and then weave it through the back of your stitches, going in different directions to secure it. Trim any excess yarn.
Finishing Touches and Inspiration
Congratulations on completing your crocheted coaster! You can now make a set to protect your tabletops in style. Notice in the image how the texture and color combination create a visually appealing piece. Feel free to experiment with different color combinations to match your personal style or home décor.
Cotton yarn is an excellent choice for coasters because it is absorbent and heat-resistant. You can also adjust the size by adding or subtracting rounds, but remember to keep the increases consistent to maintain a flat coaster.
These handmade coasters make thoughtful and personalized gifts too! Imagine gifting a set to friends or family – a beautiful and practical present crafted with your own hands. The joy of creating something useful and beautiful is truly rewarding, and we hope this tutorial has inspired you to continue exploring the world of crochet. Don’t hesitate to try making a whole set of these coasters in various colors. We would love to see your creations! Please share photos of your finished coasters – it’s always inspiring to see how everyone interprets and personalizes these patterns.