How to Restore Wooden Cutting Boards
In the heart of every kitchen, nestled among the gleaming appliances and colorful cookware, lies an often-overlooked hero: the wooden cutting board. These sturdy slabs of timber have been faithful companions to chefs and home cooks alike for centuries, silently enduring the daily onslaught of sharp knives and spilled ingredients. But even the most resilient warriors need care and attention. Today, we’re diving deep into the art and science of restoring wooden cutting boards, breathing new life into these kitchen essentials.
The Timeless Appeal of Wooden Cutting Boards
Before we roll up our sleeves and get to work, let’s take a moment to appreciate the rich history and enduring appeal of wooden cutting boards. Dating back to ancient civilizations, these simple yet effective tools have stood the test of time, evolving from basic slabs of wood to the carefully crafted pieces we use today.
Why Choose Wood?
Wooden cutting boards offer numerous advantages over their plastic or glass counterparts:
- Knife-friendly surface: Wood is gentle on your knife edges, helping to maintain their sharpness.
- Natural antibacterial properties: Contrary to popular belief, wood has inherent antimicrobial qualities.
- Durability: With proper care, a wooden cutting board can last for generations.
- Aesthetic appeal: The natural grain and warm tones of wood add beauty to any kitchen.
However, these benefits come with a responsibility: proper maintenance. Regular care and occasional restoration are key to preserving your wooden cutting board’s functionality and extending its lifespan.
Recognizing the Need for Restoration
Like a treasured antique or a well-loved book, your cutting board will show signs of wear over time. Knowing when to intervene can make the difference between a simple refresh and a complete overhaul. Here are some telltale signs that your board is crying out for attention:
- Deep cuts and grooves: While some knife marks are normal, deep gouges can harbor bacteria and affect the board’s performance.
- Discoloration: Stains from food, especially those from berries or turmeric, can penetrate the wood over time.
- Warping: Exposure to moisture and heat can cause the board to lose its flat surface.
- Rough texture: A once-smooth board that feels coarse to the touch needs attention.
- Persistent odors: If your board retains food smells even after washing, it’s time for a deep clean.
- Dryness or cracking: A board that feels exceptionally dry or shows signs of splitting requires immediate care.
Gathering Your Arsenal: Tools and Materials
Before embarking on your restoration journey, assemble the following items:
- Sandpaper: Various grits (80, 120, 220, and 320)
- Food-grade mineral oil: The gold standard for board maintenance
- Beeswax or board cream: For the final protective layer
- White vinegar: A natural disinfectant
- Soft cloths: For applying oil and cream
- Sponge or scrub brush: For initial cleaning
- Optional: Electric sander, hand plane (for severe damage)
Pro Tip: Always opt for food-grade products when working with kitchen items. Your health and safety come first!
The Restoration Process: Bringing Your Board Back to Life
Step 1: Initial Assessment and Cleaning
Begin by giving your board a thorough inspection. Note any areas of severe damage, deep stains, or warping. Then, clean the board using warm water and mild dish soap. For stubborn stains, create a paste using baking soda and water, apply it to the affected area, and let it sit for a few minutes before scrubbing gently.
Step 2: Addressing Major Damage
If your board has deep cracks or is severely warped, you’ll need to take more drastic measures:
- For cracks: Apply food-safe wood glue and clamp the board tightly until dry.
- For warping: Gradually re-flatten the board using moisture and weight, or consider having it professionally planed.
Step 3: Sanding – The Key to Smoothness
Sanding is where the magic happens. Start with a coarse-grit sandpaper (80) to remove major imperfections, then progressively move to finer grits:
- 80 grit: Remove deep cuts and level the surface
- 120 grit: Smooth out the roughness left by the 80 grit
- 220 grit: Further refine the surface
- 320 grit: Achieve a silky-smooth finish
Sanding Technique: Always sand with the grain of the wood to avoid creating scratches. Use even pressure and circular motions for best results.
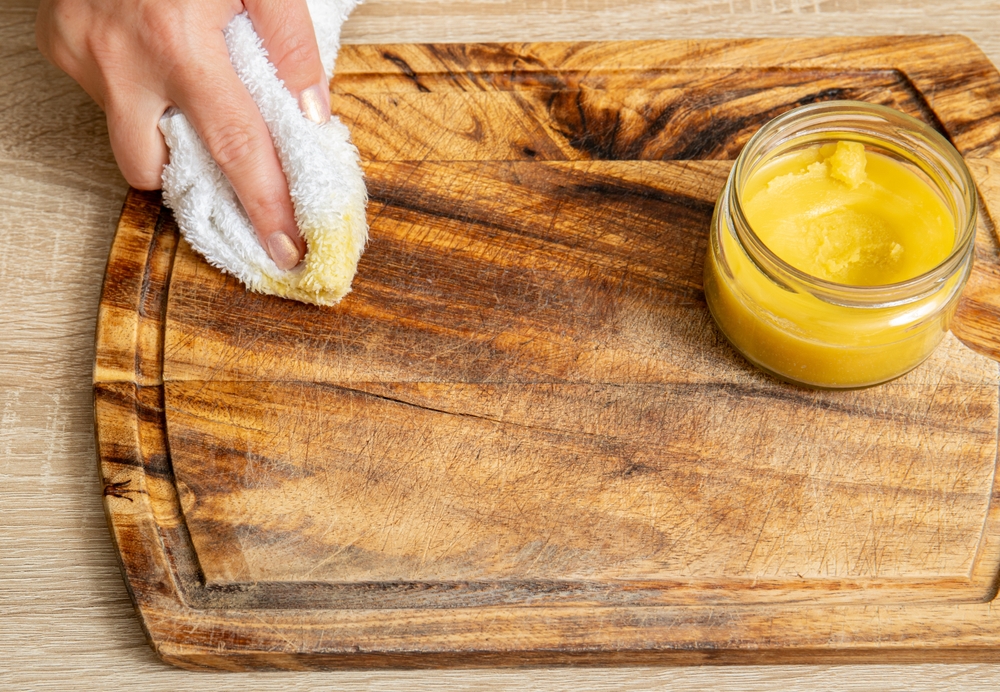
Step 4: The Art of Oiling
Once your board is smooth, it’s time to nourish the wood:
- Apply a generous amount of food-grade mineral oil using a soft cloth.
- Let the oil soak in for several hours or overnight.
- Wipe off any excess oil.
- Repeat this process 3-4 times until the wood stops absorbing the oil.
Why Mineral Oil? Unlike vegetable oils, mineral oil won’t go rancid and provides long-lasting protection.
Step 5: The Final Touch – Beeswax Finish
For ultimate protection and a beautiful sheen:
- Melt a mixture of mineral oil and beeswax (4:1 ratio).
- Apply a thin layer to the board while the mixture is still warm.
- Let it cool and buff with a clean cloth.
This creates a water-resistant barrier that helps protect your newly restored board.
Maintaining Your Restored Treasure
Your hard work doesn’t end with restoration. Regular maintenance is key to preserving your board’s beauty and functionality:
- Daily cleaning: Wash with warm water and mild soap, dry immediately.
- Monthly oiling: Apply a thin layer of mineral oil to keep the wood nourished.
- Proper storage: Store the board in a cool, dry place, away from heat sources.
- Use both sides: Regularly flip your board to ensure even wear.
Eco-Friendly Restoration Tips
For the environmentally conscious, consider these sustainable alternatives:
- Natural cleaning solution: Mix equal parts water and white vinegar for a powerful, non-toxic cleaner.
- Sustainable oils: While mineral oil is traditional, some prefer plant-based options like fractionated coconut oil or walnut oil. Be aware that these may go rancid more quickly.
- Upcycling: If your board is beyond saving as a cutting surface, consider repurposing it as a serving platter or decorative piece.
When to Say Goodbye: Replacing vs. Restoring
While restoration can work wonders, there are times when replacement is the better option:
- Safety first: If your board has deep, unrepairable cracks that can harbor bacteria, it’s time for a new one.
- Cost-effectiveness: Sometimes, the time and materials required for restoration exceed the cost of a new board.
- Sentimental value: If your board holds special memories, restoration might be worth the extra effort.
Frequently Asked Questions
Q: Can I use olive oil to season my cutting board? A: It’s best to avoid cooking oils like olive oil, as they can go rancid. Stick to food-grade mineral oil or specialized cutting board oils.
Q: How often should I restore my cutting board? A: With proper maintenance, a full restoration should only be necessary every few years. Regular oiling and cleaning can significantly extend the time between major restorations.
Q: Are there any woods I should avoid for cutting boards? A: Softwoods like pine should be avoided as they’re more prone to deep cuts and absorption. Stick to hardwoods like maple, walnut, or cherry.
Conclusion: A Labor of Love
Restoring a wooden cutting board is more than just maintenance; it’s a way to connect with a piece of culinary history. With each stroke of sandpaper and each layer of oil, you’re not just repairing a kitchen tool – you’re preserving a tradition, ensuring that your board will continue to be a part of countless meals and memories for years to come.
Remember, a well-maintained cutting board is not just a surface for chopping vegetables; it’s a canvas for culinary creativity, a silent partner in every meal you prepare. By taking the time to restore and care for your wooden cutting board, you’re investing in a kitchen essential that will serve you faithfully for generations.
So roll up your sleeves, gather your supplies, and give your faithful wooden cutting board the attention it deserves. Your knives will thank you, your food will taste better, and your kitchen will shine with the warm glow of well-loved wood.
Happy restoring!