DIY Backyard Fire Pit – How to Build Your Own On A Budget
A backyard fire pit is a great way to create an outdoor gathering space while adding style and ambiance to your yard. But buying a pre-made fire pit can be expensive. With some simple materials and a bit of time, you can build your own custom fire pit on a budget!
Benefits of a Backyard Fire Pit
Having a fire pit in your backyard has many advantages that will make your outdoor space more enjoyable:
- Provides warmth on cooler evenings so you can spend more time outdoors. The mesmerizing flames create a comfortable place to sit during spring and autumn when the weather is mild but evenings get chilly.
- Creates a cozy, relaxing ambiance that you and your guests will enjoy. The crackling fire sets a laidback mood and draws people together in conversation.
- Gives people a designated place to congregate and socialize at parties or casual gatherings. Guests naturally gravitate around the flickering fire, making it easy to mingle.
- Allows for cooking over an open fire – roast hot dogs, marshmallows for s’mores, or grill meat and vegetables. Food just seems to taste better outdoors!
- Adds style and design to your backyard landscape. The fire pit becomes a focal point and gathering place. Choose materials that match your yard.
- Provides a space to quietly reflect, read a book, or stargaze on your own. The white noise of the fire is relaxing.
- Extends enjoyable time outdoors into the cool evenings. Light up the fire and your yard stays comfortable for hours after sunset.
- Sets the scene for telling stories, playing music, or chatting long into the night. These memories will last for years to come.
Reasons to Build Your Own Fire Pit
Constructing a DIY backyard fire pit has several benefits compared to buying a pre-fabricated one:
- Cost savings – Building your own is much cheaper than buying a pre-made fire pit that can cost $200 or more for a basic model. The materials for a DIY pit cost less than $100.
- Customization – Design and build the fire pit to match your own style, space and needs. Choose the location, shape, size, and materials that work for your yard.
- Sense of accomplishment – It provides great satisfaction to design and build something yourself using your own skills and labor. Starting with an empty space and ending with a beautiful backyard fire pit you can enjoy for years is very rewarding.
- Learn new skills – Develop hands-on construction and masonry skills while completing the project. The techniques you learn can be applied to future backyard projects.
- Tailor to local conditions – Factor in issues like soil type, wind patterns, snow load, and weather in your area as you design the fire pit. This ensures it lasts.
- Follow fire codes easily – Building it yourself makes it simpler to incorporate required safety features needed to pass local inspections.
This guide will provide detailed step-by-step instructions for constructing a basic brick fire pit using readily available materials. Let’s get started!
Planning Your Custom Fire Pit Design
The first step is to plan out the fire pit design that fits your backyard best. Here are some factors to consider:
Type of Fire Pit
There are a few different options for the type of fire pit:
- In-ground fire pit – This is dug 1-2 feet into the ground like a bowl and lined with stone, concrete or firebrick. In-ground pits stay cooler and are more sheltered.
- Above-ground fire pit – The base sits on the ground, no digging required. It offers better drainage if the yard is soggy. Easier to build but less enclosed.
- Portable fire pit – A movable metal model that can be temporarily placed in the yard and taken elsewhere as needed. Great for renters.
- Chimenea or fireplace-style – Offers more directional heat control via a chimney. Ideal for closely enclosed spaces.
Shape
Circle shapes are most common for even flame distribution but fire pits can be adapted to different shapes:
- Circle – Classic and easy to build. Vary the diameter to change seating capacity.
- Square/rectangle – Provides a more contemporary linear look. Offers plenty of seating room.
- Custom shapes – Get creative! Adapting the outline to a unique shape adds personalized flair.
Size
Consider how much space you have available and the number of people the pit should accommodate. Standard sizes:
- Small – 2-4 feet diameter – cozy gathering for 2-4 people
- Medium – 4-5 feet diameter – fits 4-6 people comfortably
- Large – 6+ feet diameter – hosts larger groups of 6-10+
Measure your space and sketch possible shapes and sizes to visualize the layout. Having a site plan is very helpful before starting to build.
Materials
Fire pits can be constructed from these common materials:
- Stone or pavers
- Brick
- Concrete block
- Poured concrete
- Heavy-duty metal insert
Later sections will cover material types and quantities needed in more detail. Choose visually appealing materials that complement your yard.
Safety Features
Design elements to build in for protection:
- Surround with non-combustible materials like stone or metal edging at least 12 inches out from the pit.
- Include a spark screen or grated cover to prevent embers from escaping.
- Incorporate vents or chimney openings to improve air flow and vent smoke.
- Allow enough clearance from structures, plants and trees by following local codes.
Aesthetic Extras
For additional flair, consider adding:
- Landscaping features like flowers or retaining walls around the pit.
- Flat stones or bricks to create a hearth/seating area around the edge.
- Fire pit accessories like grates, cooking equipment, or decorative metal screens.
- A fire pit sign with an inviting funny quote or your family name.
Spend time brainstorming design ideas and create a detailed plan before getting started. This will ensure your fire pit is constructed safely and turned out exactly as envisioned.
Materials Needed
Once you’ve sketched plans for your fire pit design, next compile the supplies you’ll need. Here’s what you’ll need to complete this fire pit project:
- Fire pit liner or insert – This will contain the fire and protect the surrounding materials from heat damage. Choose one approximately 4-6 inches wider than the planned diameter. Options:
- Steel insert – Durable and withstands heat well. Provides a modern look.
- Stone liner – Natural looking. Lined with firebrick or concrete for durability.
- Firebrick – Can be mortared into a DIY liner. Withstands very high heat.
- Bricks or concrete blocks – The quantity needed depends on the size of your pit. Standard bricks 4 x 8 inches or solid concrete blocks 8 x 8 x16 inches are affordable options. Calculate the number you need based on your planned fire pit height and shape.
- Mortar or concrete – Use high temperature fire clay mortar rated for over 2000°F to bind bricks/blocks together. Or use Sakrete premixed mortar.
- Shovel, tamper and other masonry tools – For prepping the base and constructing the pit walls. Consider renting any specialized tools needed.
- Decorative rocks or pebbles – These will surround the outside of the pit. Choose rocks that match the aesthetics you want such as granite, river rock or lava rock.
- Sand or gravel – Use as a base layer for drainage under the pit.
- Metal fire grate or grill – Pick one made of iron or steel that fits your fire pit size to place over the top.
- Firewood – Hardwoods like oak, hickory or maple make the best burning and longest lasting firewood.
- Outdoor seat cushions – Weather resistant cushions add comfortable seating around the pit.
Create a complete list with exact quantities and acquire all materials before starting construction. Having everything on hand avoids frustrating delays.
Choosing the Perfect Location
Picking the right spot for your DIY fire pit is a key first decision. Here are factors to consider when selecting the location:
- Allow adequate clearance in all directions – follow the recommended safe distances specified in local building codes and fire pit manufacturing guidelines. A minimum of 6 feet is typical, but 10-20 feet is ideal.
- Be aware of wind patterns on your property so smoke and heat are directed away from your house or any structures.
- Choose a level, flat spot that can accommodate seating around the full perimeter. It should feel like a natural gathering place.
- Pick a location that is easy to access, visible from the house, and has convenient pathways. You want to use and enjoy your fire pit often.
- Check with your city about any ordinances related to fire pits, like required permits, proximity to lot lines, and maximum size limits.
- Avoid areas under tree branches or power lines which could limit fire safety.
Use spray paint or stakes to mark out the exact shape and orientation of your fire pit design on the ground in the planned spot. This allows you to visualize the layout.
Prepare the Installation Site
Now that you’ve selected the ideal spot, prep the site for installation:
Mark the Circumference
- Drive a stake in the ground at the exact center of your planned fire pit. Then tie a string to the stake, cut it to the length of your fire pit radius, and use it to mark the outer circumference by walking in a circle.
- For square pits, mark the four corners with stakes. Use string tied between them to define the edges.
- Consider using marking spray paint on the grass instead which provides a more visible outline day or night.
Remove Grass and Topsoil
- If building an in-ground fire pit, use a flat shovel to first cut out and remove the grass and topsoil within the marked fire pit area. Discard or use elsewhere in your yard.
- Dig down approximately 4-6 inches below grade to reach firmer subsoil for a stable base.
Level the Ground
- The bottom surface should be flat and level prior to installation. Use a tamper to compact any remaining loose soil. Add sand to low areas if needed to level.
- For an above-ground fire pit, simply clear any grass or debris and ensure the location is flat.
Add Gravel Base Layer
- For an in-ground fire pit, add a 5 inch layer of gravel, crushed rock or sand. Compact it down firmly to create a solid foundation.
- The gravel base improves drainage and prevents the finished pit from settling.
With proper site preparation complete, you’re now ready to start stacking materials!
Build the Fire Pit Foundation and Walls
Follow these steps to construct the main fire pit structure:
Install the Fire Pit Insert or Liner
- Place your metal or stone fire pit liner in the center of the marked area. Make sure it sits level on the prepared base.
- If using bricks or blocks instead, lay the first row end-to-end in a circle around the perimeter to form the base.
Lay the First Course
- For brick and block walls, lay the first course of masonry units in a circle around the insert or liner. Use a level to ensure this row is perfectly flat and even.
- Apply a layer of mortar between the masonry blocks and the liner to secure them together.
Stack Additional Courses
- Build upward by stacking each new course of masonry over the joints of the previous layer. This strengthens the structure.
- Using a mortar trowel, add mortar between layers and let it fully dry before adding more weight above.
- Check level frequently using a 4 foot level or use a string level wrapped around the entire diameter.
- Continue stacking rows until the walls are the desired height, usually around 16-20 inches above ground.
Mortar the Outer Face
- Once the walls are the correct height, trowel mortar over the outer faces of the blocks to give a smoothed finished appearance.
Cure the Mortar
Let the mortar cure and harden completely for 2-3 days before using the fire pit. This ensures durability. Cover pit walls with plastic sheeting if rain is expected.
- Avoid using the fire pit for at least 28 days to allow for full mortar strength to develop. The wait is worth it for safety!
Add the Finishing Design Touches
The structural work is complete! Now make your DIY fire pit truly your own with custom finishes:
Install Fire Pit Grates or Screens
- Place the heavy metal fire grate or grill top piece designed for your model over the top opening.
- Or lower a metal mesh spark screen down the inside to contain sparks and embers. Bolt it in place.
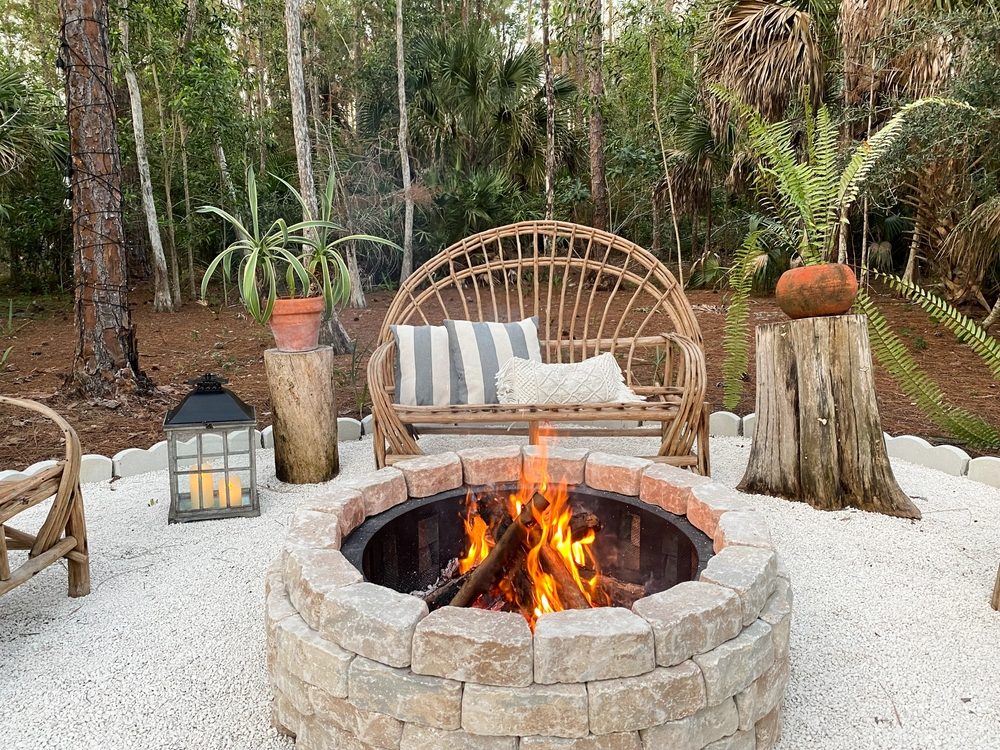
Arrange Decorative Stones or Bricks
- Surround the outside of the pit with decorative pebbles, lava rocks, tumbled glass or coordinating masonry bricks. This frames the fire pit and dresses up the exterior.
Create a Hearth Area
- If desired, build a hearth area around part of the pit perimeter using flat pavers or tiles. This hearth can extend out 12-16 inches.
- The hearth provides a place to set food, drinks and accessories within reach of people seated around the fire.
Add Finishing Landscape Touches
- Place potted plants, flowers, shrubs or small trees around the pit area to tie it into the yard landscaping.
- Install pathways from the home leading up to the fire pit out of stone, pavers or gravel.
- Accent with outdoor decor items like fire pit signs, glowing lanterns, or rustic wood stumps as extra seats.
Make It Comfortable
- Arrange weather resistant chairs, benches or loungers around the fire pit.
- Use flame resistant cushions and pillows to create cozy seating for hours of relaxation.
Safety First! Fire Pit Tips
To safely enjoy your new DIY fire pit for years, keep these important safety guidelines in mind:
- Never leave a burning fire unattended, especially overnight. Always fully extinguish the fire before leaving the area using water and stirring with a shovel to check for hot spots.
- Keep a fire extinguisher, charged water hose, or bucket of sand nearby in case of emergencies. Know how to stop and contain the fire.
- Avoid using gasoline, kerosene or other flammable liquids which can easily lead to dangerous flareups.
- In windy weather, burning embers may blow outside the pit creating hazards. Avoid lighting the fire on overly gusty days.
- Allow ashes to fully cool for 2-3 days before handling or removing them from the pit to prevent hidden hot spots which still ignite.
- Keep children a safe distance away and teach them fire pit safety rules so they avoid getting burned by staying too close.
- Check that all fire pit components such as grates and spark screens are in safe working condition prior to use. Replace damaged parts.
Get the Most From Your Fire Pit
You’re now ready to relax by your very own custom fire pit! Here are some ways to fully enjoy it:
Host a Fire Pit Party
Make your new addition the center of attention by hosting a laidback get-together focused around the fire. Offer hot dogs for roasting, ingredients for s’mores, blankets for staying cozy, and favorite drinks. Give guests fire roasting sticks and spark the conversations. The fire pit instantly becomes the place to mingle.
Cook Over the Flames
Try cooking hearty food right over the open fire. Ribs and chops smoke beautifully over a low oak wood fire. Or grill kebabs, corn on the cob, packets of veggies in foil, and other lighter fare over the flames. You can even use a dutch oven placed right in the coals to simmer up stews, baked beans or cobblers.
Stay Warm in Cool Weather
Your fire pit transforms your outdoor space from just fair weather enjoyment to year-round use. Keep the backyard livable long into the evening during spring, autumn and even winter months by lighting up the fire pit. Its mesmerizing warmth will melt away the chill.
Create Lasting Memories
From quiet solo evenings admiring the flickering flames to lively laughs-filled nights swapping stories with friends, your fire pit is sure to kindle lasting memories. You’ll love recounting favorite moments around the glow of its fires for many years to come.
Let your imagination spark new ways to put your fire pit to use. It offers a lifetime of enjoyment and may just become your favorite backyard feature.
Have you built your own custom fire pit? Share tips and photos of your project and unique fire pit ideas in the comments below!